
User's Manual


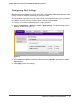
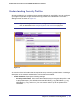


Table Of Contents
- ProSafe Wireless-N Access Point WNAP320
- Contents
- 1. Introduction
- 2. Installation and Configuration
- Wireless Equipment Placement and Range Guidelines
- Understanding WNAP320 Wireless Security Options
- Installing theWireless Access Point
- Deploying the ProSafe Wireless Access Point
- Mounting the ProSafe Wireless Access Point Using the Wall Mount Kit (Optional)
- Setting Basic IP Options
- Configuring Wireless Settings
- Setting Up and Testing Basic Wireless Connectivity
- Understanding Security Profiles
- 3. Management
- Remote Management
- Remote Console
- Upgrading the Wireless Access Point Software
- Configuration File Management
- Restoring the WNAP320 to the Factory Default Settings
- Changing the Administrator Password
- Enabling the Syslog Server
- Using Activity Log Information
- Viewing General Summary Information
- Viewing Network Traffic Statistics
- Viewing Available Wireless Station Statistics
- Enabling Rogue AP Detection
- Viewing and Saving AP Lists
- 4. Advanced Configuration
- 5. Troubleshooting and Debugging
- No lights are lit on the product family.
- No lights are lit on the access point.
- The Wireless LAN LED does not light up.
- The Wireless LAN activity light does not light up.
- The Ethernet LAN LED is not lit.
- I cannot access the Internet or the LAN with a wireless-capable computer.
- I cannot connect to the WNAP320 to configure it.
- When I enter a URL or IP address, I get a time-out error.
- Using the Restore Factory Settings Button to Restore Default Settings
- A.
- A. Supplemental Information
- C. Compliance Notification

36 | Chapter 2. Installation and Configuration
ProSafe Wireless-N Access Point WNAP320 Reference Manual
Note: Only the first profile is enabled by default. The rest of the profiles are
disabled and must be enabled if configured.
- Wireless Network Name (SSID). This is the name of your wireless network. It is set
to the default name of NETGEAR_11ng for 802.11b/g/n.
- Broadcast Wireless Network Name (SSID). If you disable broadcast of the SSID,
only devices that have the correct SSID can connect. This nullifies the wireless
network “discovery” feature of some products such as Windows XP, but the data is
still fully exposed to a determined snoop using specialized test equipment like
wireless sniffers. The default is enabled.
• Authentication settings. Specify the following settings:
- Network Authentication. The WNAP320 access point is set by default as an open
system with no authentication. When setting up network authentication, bear in mind
the following:
• If you are using Access Point mode, then all options are available. In other modes
such as Repeater or Bridge, some options might be unavailable.
• Not all wireless adapters support WPA or WPA2. Windows XP and Windows 2000
with Service Pack 3 do include the client software that supports WPA. However,
client software is required on the client. Consult the product documentation for
your wireless adapter and WPA or WPA2 client software for instructions on
configuring WPA2 settings.
You can configure the WNAP320 to use the types of network authentication shown in
the table.
Table 1. Network Authentication Types
Type
a
Description
Open System Can be used with WEP encryption or no encryption.
Shared Key You must use WEP encryption and enter at least one shared key.
Legacy 802.1x You must configure the RADIUS Server Settings to use this option.
WPA with RADIUS You must configure the RADIUS server settings to use this option.
WPA2 with RADIUS
(WPA2 is a later version of WPA.)
Select this only if all clients support WPA2. If selected, you must use
AES encryption and configure the RADIUS server settings.
WPA and WPA2 with RADIUS This selection allows clients to use either WPA (with TKIP) or WPA2
(with AES). If selected, you must use TKIP + AES encryption and
configure the RADIUS server settings.
WPA-PSK You must use TKIP or TKIP + AES encryption and enter the WPA
passphrase (network key).