
User's Manual

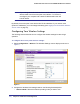


Table Of Contents
- ProSafe Wireless-N Access Point WNAP320
- Contents
- 1. Introduction
- 2. Installation and Configuration
- Wireless Equipment Placement and Range Guidelines
- Understanding WNAP320 Wireless Security Options
- Installing theWireless Access Point
- Deploying the ProSafe Wireless Access Point
- Mounting the ProSafe Wireless Access Point Using the Wall Mount Kit (Optional)
- Setting Basic IP Options
- Configuring Wireless Settings
- Setting Up and Testing Basic Wireless Connectivity
- Understanding Security Profiles
- 3. Management
- Remote Management
- Remote Console
- Upgrading the Wireless Access Point Software
- Configuration File Management
- Restoring the WNAP320 to the Factory Default Settings
- Changing the Administrator Password
- Enabling the Syslog Server
- Using Activity Log Information
- Viewing General Summary Information
- Viewing Network Traffic Statistics
- Viewing Available Wireless Station Statistics
- Enabling Rogue AP Detection
- Viewing and Saving AP Lists
- 4. Advanced Configuration
- 5. Troubleshooting and Debugging
- No lights are lit on the product family.
- No lights are lit on the access point.
- The Wireless LAN LED does not light up.
- The Wireless LAN activity light does not light up.
- The Ethernet LAN LED is not lit.
- I cannot access the Internet or the LAN with a wireless-capable computer.
- I cannot connect to the WNAP320 to configure it.
- When I enter a URL or IP address, I get a time-out error.
- Using the Restore Factory Settings Button to Restore Default Settings
- A.
- A. Supplemental Information
- C. Compliance Notification

Chapter 2. Installation and Configuration | 25
ProSafe Wireless-N Access Point WNAP320 Reference Manual
Note: If you are unable to connect, see Chapter 5, Troubleshooting and
Debugging.”
Logging In Using the Default IP Address
After you install the access point, log in to the product family to configure the basic settings
and the wireless settings. The access point is set, by default, with the IP address of
192.168.0.100 with DHCP disabled.
Note: The computer you are using to connect to the access point should
be configured with an IP address that starts with 192.168.0.x and a
subnet mask of 255.255.255.0.
To log in using the default IP Address:
1. Open a Web browser such as Internet Explorer, Mozilla Firefox, or Netscape Navigator.
Connect to the access point by entering its default address of http://192.168.0.100 into
your browser. Your Web browser should automatically find the access point and display
the home screen.
2. Enter admin for the user name and password for the password, both in lower case letters
or use a new LAN address and password if you have set them up.
3. Click Login.
4. Select Configuration > Wireless. Verify your operating mode, 11b, 11bg, or 11ng. Verify
that the correct (default) channel has been selected for your network.
It should not be necessary to change the wireless channel unless you notice interference
problems or are near another wireless access point. Select a channel that is not being
used by any other wireless networks within several hundred feet of your product family.
5. Click Apply to save any changes.