
User's Manual

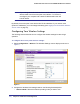


Table Of Contents
- ProSafe Wireless-N Access Point WNAP320
- Contents
- 1. Introduction
- 2. Installation and Configuration
- Wireless Equipment Placement and Range Guidelines
- Understanding WNAP320 Wireless Security Options
- Installing theWireless Access Point
- Deploying the ProSafe Wireless Access Point
- Mounting the ProSafe Wireless Access Point Using the Wall Mount Kit (Optional)
- Setting Basic IP Options
- Configuring Wireless Settings
- Setting Up and Testing Basic Wireless Connectivity
- Understanding Security Profiles
- 3. Management
- Remote Management
- Remote Console
- Upgrading the Wireless Access Point Software
- Configuration File Management
- Restoring the WNAP320 to the Factory Default Settings
- Changing the Administrator Password
- Enabling the Syslog Server
- Using Activity Log Information
- Viewing General Summary Information
- Viewing Network Traffic Statistics
- Viewing Available Wireless Station Statistics
- Enabling Rogue AP Detection
- Viewing and Saving AP Lists
- 4. Advanced Configuration
- 5. Troubleshooting and Debugging
- No lights are lit on the product family.
- No lights are lit on the access point.
- The Wireless LAN LED does not light up.
- The Wireless LAN activity light does not light up.
- The Ethernet LAN LED is not lit.
- I cannot access the Internet or the LAN with a wireless-capable computer.
- I cannot connect to the WNAP320 to configure it.
- When I enter a URL or IP address, I get a time-out error.
- Using the Restore Factory Settings Button to Restore Default Settings
- A.
- A. Supplemental Information
- C. Compliance Notification

24 | Chapter 2. Installation and Configuration
ProSafe Wireless-N Access Point WNAP320 Reference Manual
Deploying the ProSafe Wireless Access Point
Now that you have completed the setup steps, you can deploy the access point in your
network. If necessary, you can now reconfigure the computer you used in Step1
Installing
theWireless Access Point on page 18.
Tip: Before mounting the WNAP320 in a high location, first set up and test the
WNAP320 to verify wireless network connectivity.
To deploy the access point:
1. Disconnect the access point from the PC, and position it where it will be deployed. The
best location is elevated, such as on a wall or ceiling or on the top of a cubicle, at the
center of your wireless coverage area, and within line of sight of all the mobile devices.
2. Connect an Ethernet cable from your access point to a LAN port on your router, switch, or
hub.
Note: By default, access point is set with the DHCP client disabled. If your
network uses dynamic IP addresses, you must change this setting.
To connect to the access point after the DHCP server on your
network assigns it a new IP address, enter the product family name
in your Web browser. The default product family name is
netgearxxxxxx, where xxxxxx represents the last 6 bytes of the
MAC address. The default name is printed on the bottom label of the
access point.
3. If you are not using PoE, connect the power adapter to the wireless access point, and plug
the power adapter into a power outlet. The Power and LAN LEDs should be on, and the
WLAN LED should blink.
Verifying Wireless Connectivity
Follow the instructions in the next sections to set up and test basic wireless connectivity.
Once you have established basic wireless connectivity, you can enable security settings
appropriate to your needs (see
Understanding WNAP320 Wireless Security Options on
page 17).
The default SSID for the 802.11b/g/n is NETGEAR-11g. The SSID of any wireless access
adapters must match the SSID configured in the ProSafe Wireless-N Access Point
WNAP320. If they do not match, no wireless connection will be made.