
User's Manual


54 | Chapter 4. Security Settings
N600 Wireless Dual Band Gigabit ADSL2+ Modem Router DGND3700 User Manual
You can usually determine this information by contacting the publisher of the application or
user groups or newsgroups. When you have the port number information, follow these steps:
1. Select Content Filtering > Port Forwarding/Port Triggering.
2. Select the Port Forwarding radio button as the Service type.
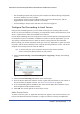
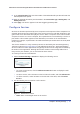
3. Click the Add Custom Service button to display the following screen:
Figure 23. Set up custom services
4. In the Service Name field, enter a descriptive name.
5. In the Protocol field, select the protocol. If you are unsure, select TCP/UDP.
6. In the Starting Port field, enter the beginning port number.
• If the application uses a single port, enter the same port number in the Ending Port
field.
• If the application uses a range of ports, enter the ending port number of the range in
the Ending Port field.
7. In the Server IP Address field, enter the IP address of your local computer that will provide
this service.
8. Click Apply. The service appears in the list in the Port Forwarding/Port Triggering screen.
Editing or Deleting a Port Forwarding Entry
To edit or delete a port forwarding entry:
1. In the table, click the button next to the service name.
2. Click Edit Service or Delete Service.
Application Example: Making a Local Web Server Public
If you host a Web server on your local network, you can use port forwarding to allow Web
requests from anyone on the Internet to reach your Web server.
To make a local Web server public:
1. Assign your Web server either a fixed IP address or a dynamic IP address using DHCP
address reservation. In this example, your router will always give your Web server an IP
address of 192.168.1.33.
2. In the Port Forwarding screen, configure the router to forward the HTTP service to the local
address of your Web server at 192.168.1.33. HTTP (port 80) is the standard protocol for
Web servers.