
User Manual


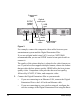

Table Of Contents
- Contents
- Welcome to the Digital Entertainer Elite
- Basic Setup
- Getting Acquainted
- Listening, Viewing, and Recording
- Fine-Tuning Your Experience
- Custom Setup and Supervisor Functions
- Maintenance and Troubleshooting
- Default Settings and Technical Specifications
- Related Documents
- Index

Basic Setup 15
Setup steps described in the following section. Be prepared to
provide the wireless network name (also called SSID) and the
wireless security settings for your network.
3. Turn on the television.
4. Set the video source selector on your television to match the
connection from your Digital Entertainer Elite. For example, if you
used an HDMI connector, set the television to use Digital HD or
HDMI input.
5. Connect the power cord to your Digital Entertainer Elite, and plug it
into an outlet.
The LED on the front of the Digital Entertainer Elite lights up to
show that it is powered on.
6. Install the two AA batteries into the remote control that came with
the product.
7. Optimize the television display as necessary.
• If the display is not sharp, or you do not see a picture, aim the
NETGEAR remote control at the Digital Entertainer Elite, and
press the TV Mode button.
Turn on the television before you turn on the Digital
Entertainer Elite.