
User Manual


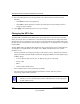

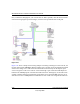
Table Of Contents
- NETGEAR Wireless-N Router WNR2000 User Manual
- Contents
- About This Manual
- Chapter 1 Configuring Basic Connectivity
- Chapter 2 Safeguarding Your Network
- Choosing Appropriate Wireless Security
- Recording Basic Wireless Settings Setup Information
- Changing Wireless Security Settings
- Viewing Advanced Wireless Settings
- Using Push 'N' Connect (Wi-Fi Protected Setup)
- Restricting Wireless Access by MAC Address
- Changing the Administrator Password
- Backing Up Your Configuration
- Understanding Your Firewall
- Chapter 3 Restricting Access From Your Network
- Chapter 4 Customizing Your Network Settings
- Chapter 5 Fine-Tuning Your Network
- Allowing Inbound Connections to Your Network
- Configuring Port Forwarding to Local Servers
- Configuring Port Triggering
- Using Universal Plug and Play
- Optimizing Wireless Performance
- Configuring Quality of Service
- Changing the MTU Size
- Optimizing Your Network Bandwidth
- Overview of Home and Small Office Networking Technologies
- Chapter 6 Using Network Monitoring Tools
- Chapter 7 Troubleshooting
- Troubleshooting Quick Tips
- Troubleshooting Basic Functions
- Troubleshooting the Web Configuration Interface
- Troubleshooting the Internet Connection
- Troubleshooting a Network Using the Ping Utility
- Problems with Date and Time
- Solving Wireless Connection Problems
- Restoring the Default Configuration and Password
- Appendix A Technical Specifications
- Appendix B Related Documents
- Index

NETGEAR Wireless-N Router WNR2000 User Manual
Fine-Tuning Your Network 5-19
v1.0, May 2008
3. From the Priority Category list, select MAC Address. The QoS - Priority Rules screen
changes:
4. If the device to be prioritized appears in the MAC Device List, select it. The information from
the MAC Device List is used to populate the policy name, MAC Address, and Device Name
fields. If the device does not appear in the MAC Device List, click Refresh. If it still does not
appear, you must complete these fields manually.
5. From the Priority drop-down list, select the priority that this device’s traffic should receive
relative to other applications and traffic when accessing the Internet. The options are Low,
Normal, High, and Highest.
6. Click Apply to save this rule to the QoS Policy list and return to the QoS Setup screen.
7. In the QoS Setup screen, select the Turn Internet Access QoS On check box.
8. Click Apply.
Editing or Deleting an Existing QoS Policy
To edit or delete an existing QoS policy:
1. From the main menu, under Advanced, select QoS Setup. The QoS Setup screen displays, as
shown in Figure 5-6 on page 5-15.
Figure 5-10