
User Manual


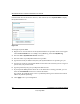


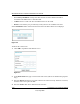
Table Of Contents
- NETGEAR Wireless-N Router WNR2000 User Manual
- Contents
- About This Manual
- Chapter 1 Configuring Basic Connectivity
- Chapter 2 Safeguarding Your Network
- Choosing Appropriate Wireless Security
- Recording Basic Wireless Settings Setup Information
- Changing Wireless Security Settings
- Viewing Advanced Wireless Settings
- Using Push 'N' Connect (Wi-Fi Protected Setup)
- Restricting Wireless Access by MAC Address
- Changing the Administrator Password
- Backing Up Your Configuration
- Understanding Your Firewall
- Chapter 3 Restricting Access From Your Network
- Chapter 4 Customizing Your Network Settings
- Chapter 5 Fine-Tuning Your Network
- Allowing Inbound Connections to Your Network
- Configuring Port Forwarding to Local Servers
- Configuring Port Triggering
- Using Universal Plug and Play
- Optimizing Wireless Performance
- Configuring Quality of Service
- Changing the MTU Size
- Optimizing Your Network Bandwidth
- Overview of Home and Small Office Networking Technologies
- Chapter 6 Using Network Monitoring Tools
- Chapter 7 Troubleshooting
- Troubleshooting Quick Tips
- Troubleshooting Basic Functions
- Troubleshooting the Web Configuration Interface
- Troubleshooting the Internet Connection
- Troubleshooting a Network Using the Ping Utility
- Problems with Date and Time
- Solving Wireless Connection Problems
- Restoring the Default Configuration and Password
- Appendix A Technical Specifications
- Appendix B Related Documents
- Index

NETGEAR Wireless-N Router WNR2000 User Manual
4-4 Customizing Your Network Settings
v1.0, May 2008
Specify the pool of IP addresses to be assigned by setting the starting IP address and ending IP
address. These addresses should be part of the same IP address subnet as the router’s LAN IP
address. Using the default addressing scheme, you should define a range between 192.168.1.2 and
192.168.1.254, although you might wish to save part of the range for devices with fixed addresses.
The router delivers the following parameters to any LAN device that requests DHCP:
• An IP address from the range you have defined
• Subnet mask
• Gateway IP address (the router’s LAN IP address)
• Primary DNS server (if you entered a primary DNS address in the Basic Settings screen;
otherwise, the router’s LAN IP address)
• Secondary DNS server (if you entered a secondary DNS address in the Basic Settings screen)
To use another device on your network as the DHCP server, or to manually specify the network
settings of all of your computers, clear the Use Router as DHCP Server check box. Otherwise,
leave it selected. If this service is not selected and no other DHCP server is available on your
network, you need to set your computers’ IP addresses manually or they will not be able to access
the router.
Using Address Reservation
When you specify a reserved IP address for a computer on the LAN, that computer always
receives the same IP address each time it accesses the router’s DHCP server. Reserved IP
addresses should be assigned to computers or servers that require permanent IP settings.
To reserve an IP address:
1. Click Add.
2. In the IP Address field, type the IP address to assign to the computer or server. (Choose an IP
address from the router’s LAN subnet, such as 192.168.1.x.)
3. Type the MAC address of the computer or server.
Tip: If the computer is already present on your network, you can copy its MAC
address from the Attached Devices screen and paste it here.