
User Manual

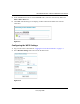

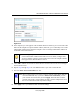
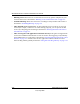
Table Of Contents
- NETGEAR Wireless-N Router WNR2000 User Manual
- Contents
- About This Manual
- Chapter 1 Configuring Basic Connectivity
- Chapter 2 Safeguarding Your Network
- Choosing Appropriate Wireless Security
- Recording Basic Wireless Settings Setup Information
- Changing Wireless Security Settings
- Viewing Advanced Wireless Settings
- Using Push 'N' Connect (Wi-Fi Protected Setup)
- Restricting Wireless Access by MAC Address
- Changing the Administrator Password
- Backing Up Your Configuration
- Understanding Your Firewall
- Chapter 3 Restricting Access From Your Network
- Chapter 4 Customizing Your Network Settings
- Chapter 5 Fine-Tuning Your Network
- Allowing Inbound Connections to Your Network
- Configuring Port Forwarding to Local Servers
- Configuring Port Triggering
- Using Universal Plug and Play
- Optimizing Wireless Performance
- Configuring Quality of Service
- Changing the MTU Size
- Optimizing Your Network Bandwidth
- Overview of Home and Small Office Networking Technologies
- Chapter 6 Using Network Monitoring Tools
- Chapter 7 Troubleshooting
- Troubleshooting Quick Tips
- Troubleshooting Basic Functions
- Troubleshooting the Web Configuration Interface
- Troubleshooting the Internet Connection
- Troubleshooting a Network Using the Ping Utility
- Problems with Date and Time
- Solving Wireless Connection Problems
- Restoring the Default Configuration and Password
- Appendix A Technical Specifications
- Appendix B Related Documents
- Index

NETGEAR Wireless-N Router WNR2000 User Manual
2-16 Safeguarding Your Network
v1.0, May 2008
5. In the wireless client, follow its specific networking instructions to enable WPS, to allow it to
connect to the router.
The WNR2000 router’s green button light ceases blinking and remains on when one of
these conditions occurs:
• The router and the client establish a wireless connection.
• The 2-minute window period expires for establishing a WPS connection. If the connection
is not established, no WPS security settings will be specified in the WNR2000 router.
Security PIN Entry
There are two ways to enable a wireless client to join a network using a PIN: using the router’s
security PIN or using the wireless client’s security PIN.
Using the Router’s Security PIN
1. Obtain your router’s security PIN from the rear panel of the router or from the Advanced
Wireless Settings screen.
2. On the wireless client, follow its specific networking instructions to enter the router’s security
PIN and to establish a wireless connection with the router.
Using the Wireless Client’s Security PIN
1. Log in to the router as described in “Logging In to Your Wireless Router” on page 1-2.
2. Select Add WPS Client in the main menu, and click Next.
3. Select the PIN Number setup method.
4. On the wireless client, obtain its security PIN, or follow its specific networking instructions to
generate a client security PIN.
Figure 2-8