Contents Important Information ............................................................................................................................................... 3 What you should know about Power Over Ethernet (PoE) .................................................................. 3 Introduction .............................................................................................................................................................. 4 Package Contents ......................
Important Information What you should know about Power Over Ethernet (PoE) Power-over-Ethernet (PoE) or "Active Ethernet" eliminates the need to run 240 Volt power to Wireless Access Points and other devices on a wired LAN. Using Power-over-Ethernet systems, installers need to run only a single CAT5 Ethernet cable that carries both power and data to each device. This allows greater flexibility in the locating of AP's and network devices and significantly decreasing installation costs in many cases.
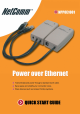
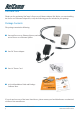
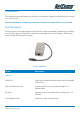
Introduction Thank you for purchasing NetComm’s Power-over-Ethernet Adapter Kit. Before you start installing the Power-over-Ethernet Adapter Kit, verify the following parts are included in your package. Package Contents The package contains the following: ■ One unit Power-over-Ethernet Injector, and one unit of Power-over-Ethernet Splitter ■ One DC Power Adapter ■ One AC Power Cord ■ A Quick Installation Guide and Package Contents Note.
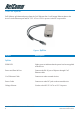
Installation This chapter describes the function of the Power-over-Ethernet Adapter Kit and shows how to install it on your network. Basic knowledge of networking is assumed. Read this chapter before you proceed. The POE Injector The PoE Injector mixes data and power into the RJ-45 connector and then transmits power and data over the Cat5 cable to the PoE (direct connection) compatible device or PoE Splitter. This Injector inputs 48 Volts DC into the PoE system.
The POE Splitter PoE Splitters split data and power from the Cat5 Ethernet line. It will output Ethernet data to the device via the Etherent port and DC 5V/1.67A or 12V/1A power via the DC output cable.
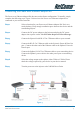
Connecting the Power-over-Ethernet Adapter Kit The Power-over-Ethernet Adapter Kit does not need software configuration. To install it, simply complete the following steps. Figure 2.4 shows how the Power-over-Ethernet Adapter Kit is connected to your wireless network. Step 1 Select a location for your Power-over-Ethernet Adapter Kit. Put it on a sturdy desktop. Keep enough ventilation space between the device and the surrounding objects.
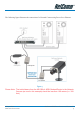
Now you should see that power is provided to the device you have connected to the POE Splitter. If there is no power, please refer to the Troubleshooting section in this guide. The following figure illustrates connection of an NP5400 Access Point using Power Over Ethernet. Figure 4 Please Note: The total distance from the NB1300+4 ADSL Modem/Router to the NP5400 Access Point (as used in this example) should be less than 100 metres (i.e. 328 feet).
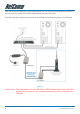
The following figure illustrates the connection of a Network Camera using Power Over Ethernet. Figure 5 Please Note: The total distance from the NB1300+4 ADSL Modem/Router to the Network Camera (as used in this example) should be less than 100 metres (i.e. 328 feet). YML720 Rev1 www.netcomm.com.
Appendix A: Cable Connections This cable information is provided for your reference only. Please ensure you only connect the appropriate cable into the correct socket on either this product or your computer. If you are unsure about which cable to use or which socket to connect it to, please refer to the hardware installation section in this manual. If you are still not sure about cable connections, please contact a professional computer technician or NetComm for further advice.
In a straight-through cable, wires 1,2,3,4,5,6,7 and 8 at one end of the cable are still wires 1~8 at the other end. In a crossover cable, the wires of 1,2,3,6 are reversed so that wire 1 become 3 at the other end of the cable, 2 becomes 6, and so forth. To determine which wire is wire 1, hold the RJ-45 cable tip with the spring clip facing towards the ground and the end pointing away from you. The copper wires exposed upwards to your view. The first wire on the far left is wire 1.
Appendix B: Troubleshooting The LEDs do not light up. Check that the power supply is properly connected. The Injector LED does not light up. First, refer to the installation instructions to ensure that you have connected the cables correctly. Secondly, ensure you are using straight-through category 5 cable. The cable must be an 8-wire cable. A 4-wire cable will not work. Look at the connector to see if it has 8 wires. Refer to the Appendix on Cable connections for more information.
Appendix C: Technical Specifications Standards IEEE 802.3, IEEE 802.3u, IEEE 802.
Appendix D: Registering your NetComm Product All NetComm Limited (“NetComm”) products have a standard 12 month warranty from date of purchase against defects in manufacturing and that the products will operate in accordance with the specifications outlined in the User Guide. However some products have an extended warranty option (please refer to packaging).
Product Warranty The warranty is granted on the following conditions: 1. This warranty extends to the original purchaser (you) and is not transferable; 2. This warranty shall not apply to software programs, batteries, power supplies, cables or other accessories supplied in or with the product; 3. The customer complies with all of the terms of any relevant agreement with NetComm and any other reasonable requirements of NetComm including producing such evidence of purchase as NetComm may require; 4.
Technical Specifications Standards IEEE 802.3, IEEE 802.3u, IEEE 802.