3G9W – HSPA 7.
Thank you for purchasing NetComm’s HSPA Wi-Fi Router Preface The purpose of this manual is to provide you detailed information on the installation, operation and application of your HSPA 7.2Mbps Wi-Fi Router. Important Notice and Safety Precaution • • • • • Before servicing or disassembling this equipment, always disconnect all power or telephone lines from the device. Use an appropriate power supply, preferably the supplied power adapter, with an output of DC 12V 1.
G9W - HSPA 7.2Mbps Wi-Fi Router USER GUIDE Table of Contents 1 – Introduction....................................................................................................................................... 6 1.1 1.2 1.3 1.4 Features...................................................................................................................................................7 Package Contents.........................................................................................................
6.2 Access Control.......................................................................................................................................39 6.2.1 Services.....................................................................................................................................39 6.2.2 IP Addresses...............................................................................................................................40 6.2.3 Passwords...........................................
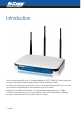
Introduction
Introduction With the increasing popularity of the 3G standard worldwide, this HSPA 7.2Mbps Wi-Fi Router provides you with triple-band coverage through expanding cellular networks throughout the world. By following the simple step-by-step instructions found on the Connection Manager USB key, you can share your connection with multiple wireless and wired devices using the 3G network. Integrating a Sierra Wireless HSPA module, this Router downloads turbo speeds of up to 7.2Mbps.
3G9W - HSPA 7.2Mbps Wi-Fi Router USER GUIDE 1.1 • • • • • • • • • • • • • • • • • 1.2 Features This HSPA 7.2Mbps Wi-Fi Router allows you to share your 3G connection with multiple wireless or wired devices Provides you with worldwide coverage through triple-band HSUPA/HSDPA/UMTS (850 / 1900 / 2100 MHz), quad-band EDGE/GSM (850 / 900 / 1800 / 1900 MHz) Embedded multi-mode HSUPA/HSDPA/UMTS/EDGE/GPRS/GSM module Integrated 802.11g/54Mbps AP (backward compatible with 802.
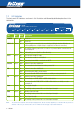
3G9W – FRONT BEZEL GRAPHICS The background colour of the bezel must be printed WHITE INK 1.3 type and graphics print WHITE INK onto background colour of Pantone 313 LEDAll Indicators The front panel LED and indicators arekeyline shownare in this illustration and followed by–detailed explanations in the Lights product for positioning purposes only do not output table below. 3G9W HSPA 7.
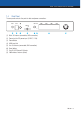
3G9W - HSPA 7.2Mbps Wi-Fi Router USER GUIDE 1.4 Rear Panel The rear panel contains the ports for data and power connections. Main AUX Reset Power LAN4 LAN3 LAN2 LAN1 USIM 1 (1) (2) (3) (4) (5) (6) (7) (8) 2 3 4 5 6 7 8 Main 3G Antenna (removable, SMA connection) Power jack for DC power input (12VDC / 1.5A).
Quick Setup
Telstra Turbo 7 Series Wireless Gateway USER GUIDE Quick Setup 2.1 Setup Procedure NOTE: Chapters 3 through 8 explain how to setup and use the WUI These steps explain how to quickly setup your router: 1: Attach the two 3G antennas provided to the ports marked Main and AUX on the back of the router. The antennas should be screwed in a clockwise direction. 2: Insert your SIM card (until you hear a click) into the USIM slot at the back of the Router.
Web User Interface
3G9W - HSPA 7.2Mbps Wi-Fi Router USER GUIDE Web User Interface This section describes how to access the device via the web user interface using a web browser such as Microsoft Internet Explorer (version 5.0 or later). 3.1 Default Settings The following are the default settings for the device. • • • • • • • • Local (LAN) access (username: admin, password: admin) Remote (WAN) access (username: support, password: support) User access (username: user, password: user) LAN IP address: 192.168.1.
3.2 TCP/IP Settings DHCP Mode When your Router powers up, the Dynamic Host Configuration Protocol DHCP server (on the device) will start automatically. To set your PC for DHCP mode, check the Internet Protocol properties of your Local Area Connection. You can set your PC to DHCP mode by selecting Obtain an IP address automatically in the dialog box shown below. STATIC IP Mode To configure your Router manually, your PC must have a static IP address within the Router’s subnet.
3G9W - HSPA 7.2Mbps Wi-Fi Router USER GUIDE 3.3 Login Procedure NOTE: The default settings can be found in 3.1 Default Settings. To login to the web interface, follow the steps below: 1: Open a web browser and enter the default IP address for the Router in the Web address field. In this case http://192.168.1.1. NOTE: For local administration (i.e. LAN access), the PC running the browser must be attached to the Ethernet, and not necessarily to the device.
3.4 Web User Interface Homepage The web user interface (WUI) is divided into two window panels, the main menu (on the top) and the display screen (on the bottom). The main menu has the following options: Basic, 3G Settings, Wireless, Management, Advanced and Status. Selecting one of these options will open a submenu with more options. Basic is discussed below while subsequent chapters introduce the other main menu selections.
3G9W - HSPA 7.2Mbps Wi-Fi Router USER GUIDE The following table provides further details. Fields Description Software version The software version of the device. Bootloader version The bootloader version of the device. Wireless driver version The wireless driver version of the wireless module. Network The name of or other reference to the mobile network operator. Link Shows the connection status of the current 3G connection.
3G Settings
3G9W - HSPA 7.2Mbps Wi-Fi Router USER GUIDE 3G Settings This menu includes 3G service Setup and PIN Configuration. NOTE: Sections 8.3 and 8.4.2 also provide information about the 3G service. 4.1 3G Service Setup Select your 3G service settings according to predefined or custom profiles. Setup instructions are provided in the following sections for your assistance.
4.1.1 Profile Setup Your Service Provider will provide the information required to complete the first time setup instructions below. This includes profile, username and password. Only complete those steps for which you have information and skip the others. 1. If your SIM card is not inserted into the gateway, then do so now. 2. Type the APN in the APN field. If you have not received a username and password, leave these fields empty. 3.
3G9W - HSPA 7.2Mbps Wi-Fi Router USER GUIDE 4.2 PIN Configuration NOTE: If you have entered the incorrect PIN 3 times, your SIM card will be locked for your security. Please call your 3G Provider for assistance. 4.2.1 PIN Code Protection This screen allows for changes to the 3G SIM card PIN code protection settings. PIN code protection prevents the use of a SIM card by unauthorized persons. To use the 3G internet service with this router however, the PIN code protection must be disabled.
PIN Lock On After you are finished using your SIM card for Internet service, you may wish to lock it again. In this case, first go to the 3G Settings - PIN Configuration screen, as shown below. Select PIN lock On, enter the PIN Code and click Save/Apply. After you do so, the following dialog box should appear. You can now return your SIM card to your cellular phone or other mobile device. NOTE: If the dialog box fails to appear, check your PIN code before trying again.
3G9W - HSPA 7.2Mbps Wi-Fi Router USER GUIDE 4.2.2 PIN Code Change If you wish to change your PIN code for greater security, enable the PIN Code protection. Go to the previous section and follow the procedure listed under PIN Lock On. After locking the SIM card, select PIN Code Change and enter your Old and New PIN codes in the fields provided and click Save/Apply. NOTE: If you forget to change the PIN Code without first turning on PIN lock protection, you will see this dialog box as a helpful reminder.
Wireless
3G9W - HSPA 7.
5.1 Setup This screen allows you to configure basic features of the wireless LAN interface. You can enable or disable the wireless LAN interface, hide the network from active scans, set the wireless network name (also known as SSID) and restrict the channel set based on country requirements. The Wireless Guest Network function adds extra networking security when connecting to remote hosts. Option Description Enable Wireless A checkbox that enables (default) or disables the wireless LAN interface.
3G9W - HSPA 7.2Mbps Wi-Fi Router USER GUIDE 5.2 Security This Router includes a number of security options that provides you with a secure connection to a 3G network. State-of-the art security includes: • WEP / WPA / WPA2 data encryption • SPI Firewall • VPN Pass-Through • MAC address IP filtering • Authentication protocols – PAP / CHAP You can authenticate or encrypt your service on the Wired Equivalent Privacy (WEP) algorithm, which provides protection against unauthorized access such as eavesdropping.
Select SSID Your Service Set Identifier (SSID), sets your Wireless Network Name. You can connect multiple devices including Laptops, Desktop PCs and PDAs to your Wireless Router. To get additional devices connected, scan for a network, and locate the SSID shown on your Wireless Security Card. If the SSID does not match, access is denied. Network Authentication This option is used for authentication to the wireless network. Each authentication type has its own settings as illustrated below.
3G9W - HSPA 7.2Mbps Wi-Fi Router USER GUIDE 5.3 Configuration The following screen appears when you select Configuration.
Option Description AP Isolation Select On or Off. By enabling this feature, wireless clients associated with the Access Point can be linked. Band The new amendment allows IEEE 802.11g units to fall back to speeds of 11 Mbps, so IEEE 802.11b and IEEE 802.11g devices can coexist in the same network. The two standards apply to the 2.4 GHz frequency band. IEEE 802.11g creates data-rate parity at 2.4 GHz with the IEEE 802.11a standard, which has a 54 Mbps rate at 5 GHz. (IEEE 802.
3G9W - HSPA 7.2Mbps Wi-Fi Router USER GUIDE Option Description 54g Mode Select Auto mode for greatest compatibility. Select Performance mode for the fastest performance among 54g certified equipment. Select LRS mode if you are experiencing difficulty with legacy 802.11b equipment. If this does not work, you may also try 802.11b only mode. 54g Protection In Auto mode, the router will use RTS/CTS to improve 802.11g performance in mixed 802.11g/802.11b networks. Turning protection Off will maximize 802.
5.4 MAC Filter This screen appears when Media Access Control (MAC) Filter is selected. This option allows access to be restricted based upon the unique 48-bit MAC address. To add a MAC Address filter, click the Add button shown below. To delete a filter, select it from the table below and click the Remove button. Option Description MAC Restrict Mode Disabled – Disables MAC filtering Allow – Permits access for the specified MAC addresses.
3G9W - HSPA 7.2Mbps Wi-Fi Router USER GUIDE 5.5 Wireless Bridge The following screen appears when selecting Wireless Bridge, and goes into a detailed explanation of how to configure wireless bridge features of the wireless LAN interface. Click Save/Apply to implement new configuration settings. Feature Options AP Mode Selecting Wireless Bridge (Wireless Distribution System) disables Access Point (AP) functionality while selecting Access Point enables AP functionality.
5.6 Station Info The following screen appears when you select Station Info, and shows authenticated wireless stations and their status. Click the Refresh button to update the list of stations in the WLAN. BSSID The BSSID is a 48-bit identity used to identify a particular BSS (Basic Service Set) within an area. In Infrastructure BSS networks, the BSSID is the MAC (Media Access Control) address of the AP (Access Point); and in Independent BSS or ad hoc networks, the BSSID is generated randomly.
Management
Management The Management menu has the following maintenance functions and processes: 6.1 6.2 6.3 6.4 Device Settings Access Control Simple Network Time Protocol (SNTP) Save and Reboot 6.1 Device Settings 6.1.1 Backup Settings The Device Settings screens allow you to backup, retrieve and restore the default settings of your Router. It also provides a function for you to update your Routers firmware. The following screen appears when Backup is selected.
3G9W - HSPA 7.2Mbps Wi-Fi Router USER GUIDE 6.1.2 Update Settings The following screen appears when selecting Update from the submenu. By clicking on the Browse button, you can locate a previously saved filename as the configuration backup file. Click on the Update settings to load it. 6.1.3 Restore Default The following screen appears when selecting Restore Default. By clicking on the Restore Default Settings button, you can restore your Routers default firmware settings.
6.1.4 Update Firmware The following screen appears when selecting Update Firmware. By following this screens steps, you can update your Routers firmware. Manual device upgrades from a locally stored file can also be performed using the following screen. 1: Obtain an updated software image file 2: Enter the path and filename of the firmware image file in the Software File Name field or click the Browse button to locate the image file.
3G9W - HSPA 7.2Mbps Wi-Fi Router USER GUIDE 6.2 Access Control The Access Control option found in the Management drop down menu, configures access related parameters in the following three areas: • Services • IP Addresses • Passwords Access Control is used to control local and remote management settings for your Router. 6.2.
6.2.2 IP Address The IP Address option limits local access by IP address. When the Access Control Mode is enabled, only the IP addresses listed here can access the device. Before enabling Access Control Mode, add IP addresses with the Add button. On this screen, enter the IP address of a local PC which you wish to allow permission. Click Save/Apply to continue. 6.2.3 Passwords The Passwords option configures your account access password for your Router.
3G9W - HSPA 7.2Mbps Wi-Fi Router USER GUIDE 6.3 Simple Network Time Protocol (SNTP) This screen allows you to configure the time settings of your Router. To automatically synchronize with Internet timeservers, tick the box as illustrated below. The following options should now appear (see screenshot below): First NTP timeserver: Select the required server. Second NTP timeserver: Select second timeserver, if required. Time zone offset: Select the local time zone.
6.4 Save and Reboot NOTE1: It may be necessary to reconfigure your TCP/IP settings to adjust for the new configuration. For example, if you disable the Dynamic Host Configuration Protocol (DHCP) server you will need to apply Static IP settings. NOTE2: If you lose all access to your web user interface, simply press the reset button on the rear panel for 5-7 seconds to restore default settings. This function saves the current configuration settings and reboots your Router.
Advanced Setup
Advanced Setup This chapter explains advanced setup for your Router: 44 – YML902
3G9W - HSPA 7.2Mbps Wi-Fi Router USER GUIDE 7.1 Local Area Network (LAN) This screen allows you to configure the Local Area Network (LAN) interface on your Router. See the field descriptions below for more details.
7.2 Network Address Translation (NAT) 7.2.1 Port Forwarding Port Forwarding allows you to direct incoming traffic from the Internet side (identified by Protocol and External port) to the internal server with a private IP address on the LAN side. The Internal port is required only if the external port needs to be converted to a different port number used by the server on the LAN side. A maximum of 32 entries can be configured. To add a Virtual Server, click the Add button.
3G9W - HSPA 7.2Mbps Wi-Fi Router USER GUIDE Options Description Select a Service User should select the service from the list. Or Or Custom Server Create a customer server and enter a name for the server Server IP Address Enter the IP address for the server. External Port Start Enter the starting external port number (when you select Custom Server). When a service is selected the port ranges are automatically configured.
7.2.2 Port Triggering Some applications require specific ports in the Router’s firewall to be open for access by remote parties. Port Triggering opens up the ‘Open Ports’ in the firewall when an application on the LAN initiates a TCP/UDP connection to a remote party using the ‘Triggering Ports’. The Router allows the remote party from the WAN side to establish new connections back to the application on the LAN side using the ‘Open Ports’. A maximum 32 entries can be configured.
3G9W - HSPA 7.2Mbps Wi-Fi Router USER GUIDE Options Description Select an Application User should select the application from the list. or or Custom Application User can enter the name of their choice. Trigger Port Start Enter the starting trigger port number (when you select custom application). When an application is selected, the port ranges are automatically configured. Trigger Port End Enter the ending trigger port number (when you select custom application).
7.3 Security 7.3.1 IP Filtering Your Router can be secured with IP Filtering or Parental Control functions. The IP Filtering screen sets filter rules that limit incoming and outgoing IP traffic. Multiple filter rules can be set with at least one limiting condition. All conditions must be fulfilled when individual IP packets pass filter. Outgoing IP Filter The default setting for Outgoing traffic is ACCEPTED. Under this condition, all outgoing IP packets that match the filter rules will be BLOCKED.
3G9W - HSPA 7.
7.3.2 Parental Control This Parental Control allows you to restrict access from a Local Area Network (LAN) to an outside network through the Router on selected days at certain times. Make sure to activate the Internet Time server synchronization as described in section 6.3 SNTP, so that the scheduled times match your local time. Click Add to display the following screen. See instructions below and click Save/Apply to apply the settings.
3G9W - HSPA 7.2Mbps Wi-Fi Router USER GUIDE 7.4 Routing 7.4.1 Default Gateway Default Gateway, Static Route and Dynamic Route settings can be found in the Routing link as illustrated below. If the Enable Automatic Assigned Default Gateway checkbox is selected, this device will accept a default Gateway assignment. If the checkbox is not selected, a field will appear allowing you to enter the static default gateway and/or WAN interface, then click Save/Apply.
7.4.2 Static Route The Static Route screen displays the configured static routes. Click the Add or Remove buttons to change settings. Click the Add button to display the following screen. Enter Destination Network Address, Subnet Mask, Gateway IP Address and/or WAN Interface. Then click Save/Apply to add the entry to the routing table.
3G9W - HSPA 7.2Mbps Wi-Fi Router USER GUIDE 7.4.3 Dynamic Route To activate this option, select the Enabled radio button for Global RIP Mode. To configure an individual interface, select the desired RIP version and operation, followed by placing a check in the Enabled checkbox for that interface. Click Save/Apply to save the configuration and to start or stop dynamic routing.
7.5 7.5.1 Domain Name Servers (DNS) DNS Server Configuration If the Enable Automatic Assigned DNS checkbox is selected, this device will accept the first received DNS assignment from the Wireless Area Network (WAN) interface during the connection process. If the checkbox is not selected, a field will appear allowing you to enter the primary and optional secondary DNS server IP addresses. Click on Save to apply. NOTE: Click the Save button to save the new configuration.
3G9W - HSPA 7.2Mbps Wi-Fi Router USER GUIDE 7.5.2 Dynamic DNS The Dynamic DNS service allows a dynamic IP address to be aliased to a static hostname in any of a selection of domains, allowing the router to be more easily accessed from various locations on the internet. Note: The Add/Remove buttons will be displayed only if the router has been assigned an IP address from the remote server. To add a dynamic DNS service, click the Add button and this screen will display.
Status
3G9W - HSPA 7.
8.1 Diagnostics The Diagnostics menu provides feedback on the connection status of the device. The individual tests are listed below. If a test displays a fail status: 1: Click on the Help link 2: Now click Re-run Diagnostic Tests at the bottom of the screen to re-test and confirm the error 3: If the test continues to fail, follow the troubleshooting procedures in the Help screen.
3G9W - HSPA 7.2Mbps Wi-Fi Router USER GUIDE 8.2 System Log This function allows you to view system events and configure related options. Follow the steps below to enable and view the System Log. 1: Click Configure System Log to continue. 2: Select the system log options (see table below) and click Save/Apply.
Option Description Log Indicates whether the system is currently recording events. You can enable or disable event logging. By default, it is disabled. Log level Allows you to configure the event level and filter out unwanted events below this level. The events ranging from the highest critical level “Emergency” down to this configured level will be recorded to the log buffer on the Router’s SDRAM.
3G9W - HSPA 7.2Mbps Wi-Fi Router USER GUIDE 8.3 3G Status Select this option for detailed status information on your Routers 3G connection. Consult the table on the next page for detailed field descriptions.
Status Description Manufacturer The manufacturer of the embedded 3G module. Model The model name of the embedded 3G module. FW Rev. The firmware version of the 3G module. IMEI The IMEI (International Mobile Equipment Identity) is a 15 digit number that is used to identify a mobile device on a network. FSN Factory Serial Number of the 3G module. IMSI The IMSI (International Mobile Subscriber Identity) is a unique 15-digit number used to identify an individual user on a GSM or UMTS network.
3G9W - HSPA 7.2Mbps Wi-Fi Router USER GUIDE Status Description Signal Level (RSSI) 3G Radio Signal Strength Index Value 2~5 6 ~ 10 11 ~ 13 Signal level in dBm -109 ~ -103 -101 ~ -93 -91 ~ -87 14 ~ 17 18 ~ 31 99 -85 ~ -79 -77 ~ -52 unknown 5 Signal bars LED Low Medium High Quality (Ec/Io) The total energy per chip per power density (Ec/Io) value of the active set’s three strongest cells. Network Registration Status Should display as registered with a valid unlocked SIM card.
8.4 Statistics These screens provide detailed information for: • • Local Area Network (LAN) and Wireless Local Area Network (WLAN) 3G Interfaces NOTE: These statistics page refresh every 15 seconds. 8.4.1 LAN Statistics This screen displays statistics for the Ethernet and Wireless LAN interfaces.
3G9W - HSPA 7.2Mbps Wi-Fi Router USER GUIDE 8.4.2 3G Statistics Click 3G network in the Statistics submenu to display the screen below. Service Shows the service type Inbound Octets Number of received octets over the interface. Packets Number of received packets over the interface. Drops Received packets which are dropped. Error Received packets which are errors. Octets Number of Transmitted octets over the interface. Packets Number of Transmitted packets over the interface.
8.5 Route Select Route to display the paths the Router has found. Field Description Destination Destination network or destination host Gateway Next hop IP address Subnet Mask Subnet Mask of Destination Flag U: route is up !: reject route G: use gateway H: target is a host R: reinstate route for dynamic routing D: dynamically installed by daemon or redirect M: modified from routing daemon or redirect Metric The ‘distance’ to the target (usually counted in hops).
3G9W - HSPA 7.2Mbps Wi-Fi Router USER GUIDE 8.6 ARP Click ARP to display the ARP information. Field Description IP address Shows IP address of host pc Flags Complete Incomplete Permanent Publish HW Address Shows the MAC address of host pc Device Shows the connection interface 8.7 Dynamic Host Configuration Protocol (DHCP) Click DHCP to display the DHCP information.
CLI commands Via Telnet
3G9W - HSPA 7.2Mbps Wi-Fi Router USER GUIDE CLI commands via Telnet Show all CLI commands Description: List all available CLI commands that the 3G router supports.
End the telnet session Description: End the telnet session Synopsis: logout Example: > logout Reset/reboot device Description: To reboot the router. Synopsis: reboot Example: > reboot Radio Signal Strength Description: Display the 3G radio signal strength.
3G9W - HSPA 7.
IMSI & IMEI read Description: Display the IMSI and IMEI value Synopsis: sierra show --imsi sierra show --imei Example: > sierra show --imsi imsi: 466974800524867 > sierra show --imei IMEI: 354219010024303 Wireless LAN mode set and read Description: Allows user to configure the Wireless LAN interfaces on the 3G router. This command can be use to configure basic feature, security feature, wireless bridge feature and MAC filter features of the wireless LAN interface.
3G9W - HSPA 7.2Mbps Wi-Fi Router USER GUIDE Configure basic Wireless LAN features Description: Configure basic wireless LAN features such as enable or disable the wireless LAN interface, hide the network from active scans, set the wireless network name (also known as SSID) and restrict the channel set based on country requirements.
--isolate <0|1> Description: Set wireless devices isolation. When enabled, wireless devices connected to the router will not be able to communicate to each other Valid value: 0 or 1 0 – not isolate wireless devices. 1 – isolate wireless devices Default value: 0 --channel Description: Set the wireless LAN channel. Valid value: 0~14 0 means auto select channel. Default value: 0 --rate Description: Set the wireless LAN data rate. Valid value: 0, 1, 2, 5.
3G9W - HSPA 7.2Mbps Wi-Fi Router USER GUIDE --frag Description: Set the wireless LAN fragment threshold. Valid value: 256~2346 Default value: 2346 --dtim Description: Set the wireless LAN DTIM interval. Valid value: 1~255 Default value: 1 --beacon Description: Set the wireless LAN beacon interval.
Example 1: User wants to enable the wireless LAN, configure the wireless LAN network name (SSID) as “TestAP”, configure wireless LAN channel to 5 and then hide the SSID: wlan config --enable 1 wlan config --ssid “TestAP” wlan config --channel 5 --hide 1 Or merge the above commands wlan config --enable 1 --ssid “TestAP” --channel 5 --hide 1 78 – YML902
3G9W - HSPA 7.2Mbps Wi-Fi Router USER GUIDE Configure wireless LAN security Description: Enable or disable and configure the wireless LAN security. This router supports different types of security such as: WEP, 802.1X, WPA and WPA2.
Options: --wep Description: enable or disable WEP encryption --keybit <64|128> Description: Set the WEP encryption strength --nkey1 --nkey2 --nkey3 --nkey4 Description: Set the WEP key. Note: 5 ASCII characters or 10 hexadecimal digits for 64-bit encryption keys. 13 ASCII characters or 26 hexadecimal digits for 128-bit encryption keys --keyidx <1|2|3|4> Description: Set the current WEP Key index.
3G9W - HSPA 7.2Mbps Wi-Fi Router USER GUIDE --rekey Description: Set the Group Rekey Interval Default value: 0 --pskey <”pskeyStr”> Description: Set the WPA Pre-Shared Key Valid value: string of 8 ~ 63 characters. Note: 1. wlPreauth can only be used with WPA2. 2. When using WPA-PSK or WPA2-PSK, WPA Pre-Shared Key (pskey) must be set first. 3. WEP MUST be enable when security is set to shared / 802.1X radius security mode. 4.
Configure wireless LAN MAC filter Description: Enable, disable and configure the wireless LAN MAC filter feature. This feature enables the router to allow or deny connection from wireless client based on the MAC address. Synopsis: wlan macfilter [--mode ] [--add ] [--remove ] Options: --mode Description: Disable and set the wireless LAN MAC filter mode.
3G9W - HSPA 7.2Mbps Wi-Fi Router USER GUIDE Configure Wireless Bridge (Wireless Distribution System/WDS) Description: configure the wireless bridge Synopsis: wlan wds [--mode ] [--restrict ] [--rmac1 ] [--rmac2 ] [--rmac3 ] [--rmac4 ] Options: --mode Description: configure wireless AP mode. Default value: ap --restrict Description: enable or disable bridge restrict mode.
Show wireless LAN interface configurations Description: show the current configuration of the wireless LAN interface Synopsis: wlan info [--config] [--security] [--macfilter] [--wds] [--station] Options: --config Description: display the list of parameters from config option Example: > wlan info --config Wlan Config Info : Basic : wlan config enable = 1 wlan config hide = 0 wlan config ssid = Series7Wireless7890 wlan config bssid = 00:11:22:33:44:56 wlan config country = AU Advance : wlan config isolate =
3G9W - HSPA 7.
Contact Information If you have any technical difficulties with your product, please do not hesitate to contact NetComm’s Customer Support Department. Email: support@netcomm.com.au www.netcomm.com.au Note: NetComm Technical Support for this product only covers the basic installation and features outlined in the Quick Start Guide. For further information regarding the advanced features of this product, please refer to the configuring sections in the User Guide or contact a Network Specialist.