N3G005W User Guide
Contents Overview.................................................................................................................................................. 5 N3G005W Features..........................................................................................................................................6 Package Contents............................................................................................................................................7 Minimum System Requirements.....
N3G005W Tool Box........................................................................................................................................................59 Tool Box > System Info...........................................................................................................................60 Tool Box > Restore Setting......................................................................................................................60 Tool Box > Firmware Upgrade..................
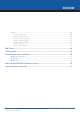
Overview
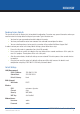
N3G005W Overview NetComm N3G005W 3G Wireless Router is a high-performance router that supports wireless networking for home, office or public space usage. The NetComm N3G005W 3G Wireless Router supports the use of a 3G USB Modem which enable you to distribute your 3G Broadband service among multiple computers. It also has a WAN uplink port to connect the N3G005W to an ADSL/Cable modem or existing gateway router.
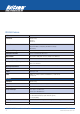
N3G005W Features 3G Access Standards IEEE 802.11b/g IEEE 802.3 IEEE 802.
N3G005W Package Contents Your N3G005W Wireless Router Package contains the following items: • N3G005W Wireless Router • Quick Installation Guide • User Guide on CD • RJ-45 Straight-through Ethernet Cable • Cradle Set • 5V, 3.0A Power Supply Unit. If any of the above items are damaged or missing, please contact your dealer immediately. Minimum System Requirements Before continuing with the installation of your N3G005W Wireless Router, please confirm that you comply with the minimum system requirements.
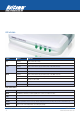
LED Indicators Label Status Indicates 3G Flashing Flashes when unit is ready Off Power is off Flashing Flashes when data is being sent and received on the LAN connection On Indicates a link to your LAN or Network card is active Off Indicates no link to LAN Flashing Flashes when data is being sent and received on the WAN connection On Indicates that the upstream link to your Modem or router via the WAN port is active Off Indicates no link to WAN Flashing Indicates that the Wireless link
N3G005W Restoring Factory Defaults This feature will reset the Router to its factory default configuration. Occasions may present themselves where you need to restore the factory default settings on your router. Typical situations are: • You have lost your password and unable to login to the router; • You have purchased the router from someone else and need to reconfigure the device. • You are asked to perform a factory reset by a member of the excellent NetComm Support Staff.
Connecting
N3G005W Connecting your N3G005W Wireless Router Connect the N3G005W Wireless Router to Your Network Note: DO NOT connect N3G005W 3G Wireless Router to power before performing the installation steps below. Step 1. Attach the antenna. 1. Remove the antenna from its plastic wrapper. 2. Screw the antenna in a clockwise direction to the back panel of the unit. 3. Once secured, position the antenna upward at its connecting joint. This will ensure optimal reception.
Step 2. Plug the USB 3G modem into the USB port. Note: The N3G005W 3G Wireless Router is designed to work with either UMTS, EV-DO or HSDPA 3G cards that can be used as modems (support tethered data). Please refer to your service provider for detailed feature information. Step 3. Insert the Ethernet cable into LAN Port on the back panel of the N3G005W 3G Wireless Router, and an available Ethernet port on the network adapter in the computer you will use to configure the unit.
N3G005W Step 5. 1. Connect the power adapter to the port on the back panel of your N3G005W 3G Wireless Router. 2. Then plug the other end of the power adapter into a wall outlet or power strip. a. The 3G LED will turn ON to indicate that the unit is powered on. b. Other LEDs will flash ON and OFF as the N3G005W 3G Wireless Router performs initialization and Internet connection processes. This will take a few minutes. c. When complete, the following LEDs will illuminate green: 3G, LAN, and WiFi.
Setting Up Your PC
N3G005W Setting up your PC Having physically connected your N3G005W, the next step is to configure the router to establish a broadband connection. Depending on your computers current settings you may first need to reconfigure the TCP/IP (Network Settings) to access your 3G Wireless Router. Follow the instructions for your operating system. Windows® XP PCs In the Windows task bar, click the Start button, and then click Control Panel. Click on Network & Internet Connections icon. (Category mode only).
Windows Me PCs 1. 2. 3. 4. 5. 6. 7. 8. In the Windows task bar, click the Start button, point to Settings, and then click Control Panel. Click on View All Control Panel Options. Double-click the Network icon. The Network Properties dialog box displays with a list of currently installed network components. If the list includes Internet Protocol (TCP/IP), then the protocol has already been enabled. Skip to step 10.
N3G005W Next, configure the PCs to accept IP information assigned by the Modem: 9. Follow steps 1 - 3 above. 10. Select the network component labeled TCP/IP, and then click Properties. If you have multiple TCP/IP listings, select the listing associated with your network card or adapter. 11. In the TCP/IP Properties dialog box, click the IP Address tab. 12. Click the radio button labeled Obtain an IP address automatically. 13. Click OK twice to confirm and save your changes.
Web Configuration Wizard
N3G005W Web Configuration Wizard Having physically connected your N3G005W, the next step is to establish the broadband connection to the internet. Please follow the steps below to configure your N3G005W router via the web configuration wizard utility. 1. Open your web browser (e.g. Internet Explorer/Firefox/Safari) and navigate to http://192.168.123.254/ 5. Select the type of WAN connection that you want to use and click on Next. Notes: 6.
APN (Access Point Name) for various providers ISP APN Username/Password required Telstra telstra.internet NO Bigpond telstra.bigpond YES Three 3netaccess NO Vodafone vfinternet.au NO Optus internet NO Virgin VirginBroadband NO (PAP) 7. Please review the settings and click on Apply Settings to save them. You can also click Back if there is a error. Notes: 9.
Advanced Setup
Advanced Setup To access the Advanced Setup option of your N3G005W, you need to access the unit’s web configuration outline on page 15 and click on Advanced Setup menu at the top of the page. For first time installation, you will be presented with the following page. Choose Advanced Setup and click Enter to access the Advanced Setup page. N3G005W 3G Wireless Router User Guide 22 YML894 Rev3 www.netcomm.com.
N3G005W After that, click on any of the top menu to access the respective settings pages. Basic Setting The Basic Setting page allows you to configure a number of basic settings on the unit. This section deals with these features. Click on any of the menu on the left to configure the respective setting page. YML894 Rev3 ������������������������������������� N3G005W 3G Wireless Router User Guide www.netcomm.com.
Basic Setting > Primary Setup This Page allows you to change the LAN (Local Area Network) settings on your N3G005W wireless router and the WAN (Wide Area Network) connection. Note: This example shows WAN connection for Telstra Next G connection. N3G005W 3G Wireless Router User Guide 24 YML894 Rev3 www.netcomm.com.
N3G005W 1. LAN IP Address: the local IP address of this device. 2. LAN Netmask: the Netmask of the local IP address 3. WAN’s MAC Address: The WAN’s MAC of this device. If you want to clone the MAC address from your computer network card, just click the Clone MAC and click Save. 4. Auto-Backup: tick to enable wired-Wan back up function. Enter an IP address where the unit will check for wired-WAN connection. 5. WAN Type: WAN connection type of your ISP.
Static IP Address If your WAN connection uses a static IP address, please select Static IP Address and fill in the required information in the fields provided. • • • • • • WAN IP Address. Type in the IP address assigned by your Internet Service Provider. Subnet Mask. Type in the Subnetmask assigned by your Internet Service Provider. WAN Gateway. Type in the WAN Gateway assigned by your Internet Service Provider. WAN MTU. Leave as default unless instructed by your Internet Service Provider.
N3G005W Dynamic IP Address This connection will get the IP address from the internet service provider. Choose this connection if you are connecting the router to an Optus Cable Modem service. Leave everything as default unless instructed by your Internet Service Provider. Dynamic IP Address with Road Runner Session Management This connection will get the IP address from the internet service provider. Choose this connection if you are connecting the router to a Telstra Bigpond Cable modem. • • • Account.
PPP over Ethernet Most ADSL service will use PPP over Ethernet protocol. Use this if you connect the router to a bridge ADSL modem. • • • • • • PPPoE Account/ PPPoE Password. Type in your account username and password. MTU. Leave as default unless instructed by your Internet Service Provider. Primary DNS/Secondary DNS. Primary DNS/Secondary DNS. Type in the DNS address assigned by your Internet Service Provider. Optional. Maximum Idle Time.
N3G005W L2TP For internet services using L2TP. • • • • • • My Tunnel Name. Type in the Tunnel Name assigned by your Internet Service Provider. Server IP address. Type in the server IP address assigned by your Internet Service Provider. My IP Address. Tick Get IP from theDHCP Server if your service uses a DHCP server. Or tick on Use Static IP and type in the IP address assign by your Internet Service Provider. L2TP Account / L2TP Password. Type in the username and password assigned by your provider.
PPTP For internet service using PPTP. • • • • • • My Tunnel Name. Type in the Tunnel Name assigned by your Internet Service Provider. Server IP address. Type in the server IP address assigned by your Internet Service Provider. My IP Address. Tick Get IP from the DHCP Server if your service uses a DHCP server. Or tick on Use Static IP and type in the IP address assigned by your Internet Service Provider. PPTP Account / PPTP Password. Type in the username and password assigned by your provider.
N3G005W 3G For 3G service, you need to enter the following, please refer to your 3G service provider for detailed information. • • • • • • • • • • • • Note APN- Enter the APN for your PC card. Pin Code- Enter the Pin Code for your SIM card Dial-Number- This field should not be altered except when required by your service provider. User Name- Enter your 3G username. Password- Enter your 3G password.
iBurst For iBurst services using the iBurst USB choose iBurst and enter the following information • • • • • • Username / Password. Type in your account username and password. WAN MTU. Leave as default unless instructed by your Internet Service Provider. Primary DNS/Secondary DNS (Optional). Primary DNS/Secondary DNS. Type in the DNS address assigned by your Internet Service Provider. Maximum Idle Time.
N3G005W Basic Setting > DHCP Server This page allows you to configure the DHCP Server on the unit. For more settings click on More. 1. DHCP Server: Please leave this set to Enable unless you have another DHCP server on the same network. 2. Lease Time: DHCP lease time to the DHCP client. 3. IP Pool Starting/Ending Address: You must specify the starting / ending address of the IP address pool. Please leave as default unless necessary. 4. For following options please press button 4. Domain: Optional. 5.
Basic Setting > Wireless This page allows you to configure the wireless feature of the unit such as SSID and security. 1. Wireless - Enable by default. Changing this option to Disable will turn off the wireless feature on the unit and you will not be able to connect wirelessly. 2. WMM Capable- Choose Enable or Disable WMM function. WMM stands for Wi-Fi Multimedia, this provides features that improve the user experience for audio, video and voice applications over Wi-Fi networks. 3.
N3G005W a) WEP (Wired Equivalent Privacy). Enabling this security will protect your data while it is transferred from the computer to the N3G005W router. Select the WEP Encryption (64bit or 128bit) and enter the WEP key in Key 1 field. Please note that WEP Encryption key can only use numbers from 0 to 9 and letters from A to F. 64 bit encryption needs 10 digits key and 128 bit encryption needs 26 digits key. b) 802.1X: In order to use 802.
c) WPA-PSK/WPA2-PSK : A newer type of security is WPA-PSK-TKIP and WPA-PSK2-ADE. This type of security gives a more secure network compare to WEP. Use TKIP Encryption Type for WPA-PSK and AES for WPA2-PSK. After that, please enter the key in the Passphrase field. The key needs to be more then 8 characters and less then 63 characters and it can be any combination of letters and numbers. Please note that the configuration for WPA-PSK and WPA2-PSK is identical d) WPA/WPA2 : Similar to 802.
N3G005W Click Save to save the settings and Undo to cancel. To Configure WDS (Wireless Distribution System) click on WDS Setting button and you will be presented with the following page. WDS is used to wirelessly connect multiple Access Points (in WDS mode), and in doing so extends the wireless infrastructure to locations where cabling is not possible or inefficient to implement.
Basic Setting > Change Password On this page you can change the N3G005W web configuration password. Please type in your old password (factory default password is admin) and type in the new password. You also need to type in the new password in the Reconfirm field. Note: if you change the password, please make sure that you use the new password the next time you log into the web configuration. Click Save to save the settings and Undo to cancel. N3G005W 3G Wireless Router User Guide 38 YML894 Rev3 www.
N3G005W Forwarding Rules The Forwarding Rules page allows you to configure the port forwarding management on the unit. Click on any of the menu on the left to access the respective setting page. Forwarding rules are a necessary feature as by default NAT (Network Address Translation) will automatically block incoming traffic from the Internet to the LAN if a specific port mapping does not exists in the NAT translation table.
Forwarding Rules > Virtual Server A virtual server is defined as a Service Port, and all requests to this port will be redirected to the computer specified by the Server IP. Virtual Server can also work with Scheduling Rules, and give user more flexibility on Access control. For detail instructions on scheduling rules, please refer to Advanced Setting > Scheduling. For example, if you have an FTP server (default port is port 21) at 192.168.123.1, a Web server (default port is port 80) at 192.168.123.
N3G005W Forwarding Rules > Special AP Some applications like On-line games, Video conferencing and Internet telephony require multiple connections to the internet. Because of that, these applications cannot work with a pure NAT router such as the N3G005W. The Special Applications feature allows some of these applications to work with this router. If this fails to make the application working, try to set up that computer as the DMZ host instead. Please refer to Forwarding Rules > Miscellaneous section.
Forwarding Rules > Miscellaneous DMZ (Demilitarized Zone) Host is a computer without the protection of firewall. It allows that particular computer to be exposed to unrestricted 2-way communication to the internet. It is mostly used for Internet games, Video conferencing, Internet telephony and other special applications. To enable DMZ, enter the IP address of the PC and tick on Enable. Note: This feature should be used only when necessary. Click Save to save the settings and Undo to cancel.
N3G005W Security Setting The Security Setting page allows you to configure the security management on the unit such as Packet filters and MAC Control. Click on any of the menu on the left to access the respective setting page. YML894 Rev3 ������������������������������������� N3G005W 3G Wireless Router User Guide www.netcomm.com.
Security Setting > Packet Filters Packet Filter enables you to control what packets are allowed to pass through the router. There are two type of packet filter, Outbound Packet Filter which applies to all outbound packets and Inbound Packet Filter which only applies to packets that destined to Virtual Server or DMZ host only. To enable an Outbound Filter, please make sure to tick the Enable tick box on the top of the page. There are two type of filtering policies: 1.
N3G005W For source or destination IP address, you can define a single IP address (192.168.123.1) or a range of IP addresses (192.168.123.100-192.168.123.200). Empty fields imply all IP addresses. For source or destination port, you can also define a single port (80) or a range of ports (1000-1999). And you need to add prefix “T” or “U” to specify TCP or UDP protocol e.g. T80, U53, U2000-2999. No prefix indicates both TCP and UDP are defined. An empty implies all port addresses.
Security Setting > Domain Filters Domain Filters enable you to prevent users from accessing specific domain addresses. To enable the Domain Filter please make sure to tick the Enable tick box on the top of the page. Log DNS Query. Please tick the Enable tick box if you want to log the action when someone accesses the specific URLs. Privilege Host/Netmask. To set a group of computer that has privilege to access the internet without any restriction.
N3G005W Security Setting > URL Blocking URL Blocking will block LAN computers from connecting to a pre-defined website. The major difference between Domain Filter and URL Blocking is that Domain Filter require users to input a suffix (e.g. xxx.com, yyy.net) while URL Blocking only requires user to input a keyword. To enable URL Blocking please make sure to tick on Enable tick box on the top of the page. To set a URL Blocking rule, you need to specify the following: • URL.
Security Setting > MAC Control MAC Control allows you to assign different access rights for different users and to assign a specific IP address to a certain MAC address. To enable MAC Address Control please make sure to tick the Enable tick box on the top of the page. Two types of control are available: • Connection control. Check Connection Control to control which clients (wired and wireless) can connect to the unit.
N3G005W Security Setting > Miscellaneous This page allows you to change various miscellaneous security settings on the unit. These settings are: 1. Remote Administrator IPAdress/Host/Port. By default, only users on the LAN side can browse the unit web configuration page to perform administration task. Enabling this feature will allow you to connect to the web configuration from the internet. If the specified Host address is 0.0.0.
Advanced Setting The Advanced Setting page allows you to configure the advanced settings on the unit such as System log, Dynamic DNS and SNMP. Click on any of the menu on the left to configure the access the respective setting page. N3G005W 3G Wireless Router User Guide 50 YML894 Rev3 www.netcomm.com.
N3G005W Advanced Setting > System Log The N3G005W Wireless router supports System log’s via syslog (using UDP packet). For syslog, you need to enter the IP address of the host computer that will receive the syslog message and tick on the Enable tick box for IP Address for Syslog. Click Save to save the settings and Undo to cancel. YML894 Rev3 ������������������������������������� N3G005W 3G Wireless Router User Guide www.netcomm.com.
Advanced Setting > Dynamic DNS The Dynamic DNS feature enables users to have a static domain name for their internet connection even when their internet connection IP address is dynamic. By mapping the host name to the current public IP address of the router, users who want to connect to the router or any services behind the router from the internet can just use the Dynamic DNS hostname instead of the IP Address which might change every time the router connects to the Internet.
N3G005W Advanced Setting > QoS To Enable QoS make sure the Enable Tick Box on the top of the page is ticked. Upstream bandwidth Total bandwidth of outgoing traffic. Downstream bandwidth Total bandwidth of incoming traffic. You can specify 8 QoS rules to control data flows through the Router.
Advanced Setting > SNMP SNMP (Simple Network Management Protocol) is a protocol designed to give user the capability to remotely manage a computer or network device by polling and setting terminal values and monitoring network events. To Enable SNMP, you need to set the following: • Enable SNMP. Check either Local or Remote or both to enable the function. If Local is ticked, the unit will respond to request from LAN and if Remote is ticked, the unit will respond to request from WAN. • Get Community.
N3G005W Advanced Setting > Routing When you have more than one router or subnet on your network, you need to enable routing function to allow different subnets to communicate with each other. There are two types of routing feature on the N3G005W Wireless Router, Dynamic routing and Static routing. Dynamic Routing use RIP protocol to allow the N3G005W to adapt to changes in the network.
Advanced Setting > System Time This page allows you to change the System time setting on the N3G005W Wireless Router. There are three ways to set up the System Time on the unit. 1. Get Date and Time by NTP Protocol. Select if you want to get the date and time from an NTP server. You also need to choose the Time Server and the Time Zone. Click on Sync Now! to sync the time with the Time Server. 2. Set Date and Time using PC’s Date and Time.
N3G005W Advanced Setting > Scheduling This feature allows you to define a time schedule for Virtual Server and Packet Filter rules on the unit. To enable Scheduling please make sure to tick the Enable tick box at the top and click on Save. After that, create a new rule by pressing the Add New Rule button. Enter the Rule name and set the Start Time and End Time for each day. And then click Save to save the new rule.
Advanced Setting > Performance This page give you option to change the wireless advance settings. 1. Beacon Interval. Beacons are packets sent by the unit to synchronize to wireless clients. The default value is set to 100 milliseconds and the acceptable value is 1 to 1000. 2. DTIM interval. The default value is set to 3 and the acceptable value is 1 to 65535. A DTIM is a countdown informing clients of the next window for listening to broadcast and multicast messages.
N3G005W Tool Box The Tool Box page consists of various tools for the unit. Click on any of the menu on the left to access the respective page. YML894 Rev3 ������������������������������������� N3G005W 3G Wireless Router User Guide www.netcomm.com.
Tool Box > System Info From this page you can view the System log and the Routing Table of the unit. Tool Box > Restore Setting To restore the configuration from a file, browse the configuration file and then click the Restore button. Notes: Please disable any anti virus or firewall program before doing restoring the settings. N3G005W 3G Wireless Router User Guide 60 YML894 Rev3 www.netcomm.com.
Web User Interface
WAN Failover
N3G005W WAN Failover Tool Box > Firmware Upgrade To update your N3G005W firmware, browse the update image file or configuration file and then click the Upgrade button. Notes: Please disable any anti virus or firewall program before doing the firmware upgrade. Tool Box > Backup Setting To back up your settings to a file, click the Backup Setting button and save it as a bin file. When you want to restore those settings, please click Firmware Upgrade button and use the bin file.
The WAN failover feature of the N3G005W is designed to provide a backup WAN connection in case your primary connection should fail. To use this feature, you will require both a regular WAN connection and a 3G WAN connection. Please follow these steps to set up WAN failover on your N3G005W. 1. Open your web browser (e.g. Internet Explorer/Firefox/Safari) and navigate to http://192.168.123.254/. 2. At the login screen, type in “admin” (without quotes) in the System Password field. Then click on Login. 3.
N3G005W 8. When your primary (non-3G) WAN connection reconnects, the N3G005W will automatically revert to this connection. Please allow up to 2 minutes for this change to occur. 9. To confirm that the process in Step 8 is complete, refresh the status page of the web interface after 1 minute. The WAN connection should appear as shown below: YML894 Rev3 ������������������������������������� N3G005W 3G Wireless Router User Guide www.netcomm.com.
Troubleshooting N3G005W 3G Wireless Router User Guide 66 YML894 Rev3 www.netcomm.com.
N3G005W Troubleshooting This section provides an overview of common issues, and possible solutions for the installation and operation of the N3G005W Wireless Router. 1. Unable to access the Web Configuration when I use my computer to configure the router. Note: It is recommended that you use an Ethernet connection to configure the N3G005W. 2.
3. Why does my wireless connection keep dropping? • Please try the following steps to improve the wireless signal quality. • • • If you are using 2.4GHz cordless phones, X-10 equipment, or other home security systems, ceiling fans, or lights, your wireless connection may degrade dramatically, or drop altogether. To avoid interference, you can change the wireless Channel on the N3G005W Wireless Router. Keep your product at least 3-6 feet away from electrical devices that generate RF noise.
Wireless Connection N3G005W YML894 Rev3 ������������������������������������� N3G005W 3G Wireless Router User Guide www.netcomm.com.
Establishing your wireless connection 7. • • 8. • • • What is VPN? VPN stands for “Virtual Private Networking.” VPN creates a “tunnel” through an existing Internet connection using PPTP (Point-to-Point Tunneling Protocol) or IPSec (IP Security) protocols with various encryption schemes including Microsoft Challenge Handshake Authentication Protocol (MS-CHAP). This feature allows you to use your existing Internet connection to connect to a remote site with added security.
N3G005W The following examples use “wireless” as the SSID and 64bit WEP with “a1b2c3d4e5” as the encryption key. 3. Select the wireless network you want to connect to and click Connect: Windows XP service pack 2 Follow these steps: 1. Open Network Connections (Start -> Control Panel -> Network Connections): 4. Enter the network key (“a1b2b3d4e5”) and click Connect: 2. Right-click on your Wireless Network Connection and select View Available Wireless Networks: 5. The connection will show Connected.
Mac OSX 10.4 Follow these steps: 1. Click on the Airport icon on the top right menu. 2. Click on the network name that you want to connect. This example uses “NetComm n3G Series” as the network name. N3G005W 3G Wireless Router User Guide 72 3. On the new window, tick on Show Password and type in the network key in the Password field. This example uses “a1b2c3d4e5” as the key. After that, click on OK. 4. To check the connection, click on the Airport icon and there should be a tick on the wireless name.
N3G005W Windows Vista 4. Choose “NetComm n3G Series”. Follow these steps: 1. Open Network and Sharing Center (Start > Control Panel > Network and Sharing center). 5. Click on the wireless network name. In this example, the wireless network name is “wireless” and click “Connect”. 2. Click on “Connect to a network”. 6. Tick on “Display Characters” and type in the network key. This example uses “a1b2c3d4e5” as key. Click “Next” after that. 3. Choose “Connect to the Internet” and click on “Next”.
Wireless Security Web User Interface
N3G005W How to configure WEP/WPA-PSK Wireless Security 7. Select the appropriate location. This will affect the firewall settings on the computer. Notes: 8. Tick on both “Save this network” and “Start this connection automatically” and click on “Next”. For other operating system (Windows 98SE, Windows ME, Windows 2000 etc) or if you use the wireless adaptor utility to configure your wireless connection, please consult the wireless adapter documentation for additional information. 9.
Legal and Regulatory Web User Interface
N3G005W 1. Open your web browser (i.e. Internet Explorer or Firefox) and navigate to http://192.168.123.254/. • Click on Save to save the settings 2. At the login screen, type in admin in the System Password field. Then click on Login. 3. Click on Basic Setting and then click on Wireless. 6. To use WPA, please configure the following: • Change Security to WPA-PSK • Change Encryption Type to TKIP • Enter the WPA key in the Passphrase field. 4.
Legal & Regulatory Information This manual is copyright.
N3G005W Product Warranty Limitations of Warranty The warranty is granted on the following conditions: The Trade Practices Act 1974 and corresponding State and Territory Fair Trading Acts or legalisation of another Government (“the relevant acts”) in certain circumstances imply mandatory conditions and warranties which cannot be excluded. This warranty is in addition to and not in replacement for such conditions and warranties. 1.
Product Warranty NetComm products have a standard 12 months warranty from date of purchase. However some products have an extended warranty option, via registering your product online at the NetComm website www.netcomm.com.au. Refer to the User Guide for complete product warranty conditions, limitations of warranty and other legal and regulatory information. Contact Information If you have any technical difficulties with your product, please do not hesitate to contact NetComm’s Customer Support Department.