
User's Manual
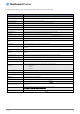


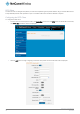


Table Of Contents
- Introduction
- Target audience
- Prerequisites
- Notation
- Product overview
- Product features
- Package contents
- Physical dimensions
- LED indicators
- Ethernet port LED indicators
- Interfaces
- Mounting options
- DIN rail mounting bracket
- Wall mounted via DIN rail bracket
- DIN rail mount
- Pole mount using DIN rail bracket
- Desk mount
- Powering the router
- Installing the router
- Data Connection
- Connect on demand
- SIM Management
- Operator settings
- SIM security settings
- LAN
- Wireless settings
- Ethernet LAN/WAN
- WAN failover
- Routing
- VPN
- Dynamic DNS
- Network time (NTP)
- Data stream manager
- PADD
- SNMP
- TR-069
- GPS
- USSD
- IO configuration
- SMS messaging
- Diagnostics
- Sending an SMS Diagnostic Command
- Log
- System configuration
- Administration
- Watchdogs
- Power management
- USB-OTG
- Storage
- Reboot
- Restoring factory default settings
- Accessing recovery mode
- Status
- Log
- Application Installer
- Settings
- Reboot
- Overview
- Accessing USB/SD card storage devices
- Host and Device mode

70
NetComm Wireless 4G WiFi M2M Router
www.netcommwireless.com
UM-00009
GRE tunnelling
The Generic Route Encapsulation (GRE) protocol is used in addition to Point-to-Point Tunnelling Protocol (PPTP) to create VPNs
(virtual private networks) between clients and servers or between clients only. Once a PPTP control session establishes the VPN
tunnel GRE is used to securely encapsulate the data or payload.
Configuring GRE tunnelling
To configure GRE tunnelling:
1.
From the menu bar at the top of the screen, click Networking and then from the VPN section on the left side of the screen,
click GRE. The GRE client list is displayed.
Figure 81 - GRE client list
2.
Click the +Add button to begin configuring a new GRE tunnelling client profile. The GRE Client Edit screen is displayed.
Figure 82 – GRE client edit