
User's Manual


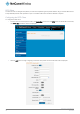


Table Of Contents
- Introduction
- Target audience
- Prerequisites
- Notation
- Product overview
- Product features
- Package contents
- Physical dimensions
- LED indicators
- Ethernet port LED indicators
- Interfaces
- Mounting options
- DIN rail mounting bracket
- Wall mounted via DIN rail bracket
- DIN rail mount
- Pole mount using DIN rail bracket
- Desk mount
- Powering the router
- Installing the router
- Data Connection
- Connect on demand
- SIM Management
- Operator settings
- SIM security settings
- LAN
- Wireless settings
- Ethernet LAN/WAN
- WAN failover
- Routing
- VPN
- Dynamic DNS
- Network time (NTP)
- Data stream manager
- PADD
- SNMP
- TR-069
- GPS
- USSD
- IO configuration
- SMS messaging
- Diagnostics
- Sending an SMS Diagnostic Command
- Log
- System configuration
- Administration
- Watchdogs
- Power management
- USB-OTG
- Storage
- Reboot
- Restoring factory default settings
- Accessing recovery mode
- Status
- Log
- Application Installer
- Settings
- Reboot
- Overview
- Accessing USB/SD card storage devices
- Host and Device mode

www.netcommwireless.com
NetComm Wireless 4G WiFi M2M Router
67
UM-00009
Figure 78 - OpenVPN P2P mode settings
4.
Use the Server port field to select a port number and then use the drop down list to select a packet type to use for the
OpenVPN server. The default OpenVPN port is 1194 and default packet type is UDP.
5.
In the Local IP Address and Remote IP Address fields, enter the respective local and remote IP addresses to use for the
OpenVPN tunnel. The slave should have the reverse settings of the master.
6.
Under the Remote network section, enter the network Address and network Subnet mask. The Network Address and
Network Mask fields inform the Master node of the LAN address scheme of the slave.
7.
Press the Generate button to create a secret key to be shared with the slave. When the timestamp appears, you can click
the Download button to save the file to exchange with the other router.
8.
When you have saved the secret key file on each router, use the Browse button to locate the secret key file for the master
and then press the Upload button to send it to the slave. Perform the same for the other router, uploading the slave’s
secret key file to master.
9.
When they are uploaded click the Save button to complete the peer-to-peer OpenVPN configuration.