
User's Manual


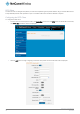


Table Of Contents
- Introduction
- Target audience
- Prerequisites
- Notation
- Product overview
- Product features
- Package contents
- Physical dimensions
- LED indicators
- Ethernet port LED indicators
- Interfaces
- Mounting options
- DIN rail mounting bracket
- Wall mounted via DIN rail bracket
- DIN rail mount
- Pole mount using DIN rail bracket
- Desk mount
- Powering the router
- Installing the router
- Data Connection
- Connect on demand
- SIM Management
- Operator settings
- SIM security settings
- LAN
- Wireless settings
- Ethernet LAN/WAN
- WAN failover
- Routing
- VPN
- Dynamic DNS
- Network time (NTP)
- Data stream manager
- PADD
- SNMP
- TR-069
- GPS
- USSD
- IO configuration
- SMS messaging
- Diagnostics
- Sending an SMS Diagnostic Command
- Log
- System configuration
- Administration
- Watchdogs
- Power management
- USB-OTG
- Storage
- Reboot
- Restoring factory default settings
- Accessing recovery mode
- Status
- Log
- Application Installer
- Settings
- Reboot
- Overview
- Accessing USB/SD card storage devices
- Host and Device mode

62
NetComm Wireless 4G WiFi M2M Router
www.netcommwireless.com
UM-00009
OpenVPN
OpenVPN is an open source virtual private network (VPN) program for creating point-to-point or server-to-multi-client encrypted
tunnels between host computers. It can traverse network address translation (NAT) and firewalls and allows authentication by
certificate, pre-shared key or username and password. OpenVPN works well through proxy servers and can run over TCP and UDP
transports. Support for OpenVPN is available on several operating systems, including Windows, Linux, Mac OS, Solaris, OpenBSD,
FreeBSD, NetBSD and QNX.
Configuring an Open VPN server
From the menu at the top of the screen, click Networking and from the VPN section on the left, click OpenVPN. A list of configured
OpenVPN VPN connections is displayed.
Figure 72 - OpenVPN VPN List
Click the +Add button for the type of OpenVPN server/client you would like to configure.
OpenVPN Server
To configure an OpenVPN Server:
1.
Click the OpenVPN profile toggle key to switch it to the ON position.
2.
Type a name for the OpenVPN server profile you are creating.
3.
Select OpenVPN connection type (TUN/TAP). Default is TUN.
4.
Use the Server port field to select a port number and then use the drop down list to select a packet type to use for your
OpenVPN Server. The default OpenVPN port is 1194 and default packet type is UDP.
5.
In the VPN network address and VPN network subnet mask fields, enter the IP address and network subnet mask to
assign to your VPN. This is ideally an internal IP address which differs from your existing address scheme.
6.
Next to Diffie-Hellman parameters, select appropriate encryption key size then click the Generate DH button. This will
create an encryption key to secure your OpenVPN connection. Default key size is (1024) bit.
7.
Under Server Certificates, enter the required details. All fields must be completed. The Country field must consist of two
characters only. When the details have been entered, click the Generate CA certificate button to generate the Certificate
Authority (CA) certificate based on this information.
8.
Under the Server certificates section, select the Authentication type that you would like to use for the OpenVPN Server.
Note: The Diffie-Hellman parameters can take up to 10 minutes to generate. Please be patient.