
User's Manual

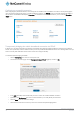


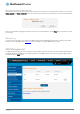


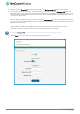
Table Of Contents
- Introduction
- Target audience
- Prerequisites
- Notation
- Product overview
- Product features
- Package contents
- Physical dimensions
- LED indicators
- Ethernet port LED indicators
- Interfaces
- Mounting options
- DIN rail mounting bracket
- Wall mounted via DIN rail bracket
- DIN rail mount
- Pole mount using DIN rail bracket
- Desk mount
- Powering the router
- Installing the router
- Data Connection
- Connect on demand
- SIM Management
- Operator settings
- SIM security settings
- LAN
- Wireless settings
- Ethernet LAN/WAN
- WAN failover
- Routing
- VPN
- Dynamic DNS
- Network time (NTP)
- Data stream manager
- PADD
- SNMP
- TR-069
- GPS
- USSD
- IO configuration
- SMS messaging
- Diagnostics
- Sending an SMS Diagnostic Command
- Log
- System configuration
- Administration
- Watchdogs
- Power management
- USB-OTG
- Storage
- Reboot
- Restoring factory default settings
- Accessing recovery mode
- Status
- Log
- Application Installer
- Settings
- Reboot
- Overview
- Accessing USB/SD card storage devices
- Host and Device mode

28
NetComm Wireless 4G WiFi M2M Router
www.netcommwireless.com
UM-00009
Operator settings
The Operator settings page enables you to select which frequency band you will use for your connection and enables you to scan
for available network operators in your area.
Figure 29 - Band settings
Note: In order to change the operator’s band settings, the data connection must be disabled. When you access this page,
you are prompted to disable the data connection if it is already active.
You may want to do this if you’re using the router in a country with multiple frequency networks that may not all support High Speed
Packet Access (HSPA). You can select the router to only connect on the network frequencies that suit your requirements.
Use the Change band drop down list to select the band you wish to use.
The following band settings options are available:
It is not necessary to change the default setting of All bands in most cases. In fact, locking to a particular band can cause
connection difficulties if the device is moved to a location where the forced band selection is no longer available.
When All bands is selected, the router attempts to find the most suitable band based on the available networks for the inserted SIM
card.
The “2G all”, “WCDMA all”, “LTE all”, “3G/2G all” and “LTE/3G all” options allow you to force the device to lock to those particular
networks only.
Click the Save button to save and apply your selection.
Operator settings
The operator settings feature allows you perform a scan of available networks, and to optionally lock to a particular network
returned by the network scan. To scan for available networks, set the Select operator mode from automatic to Manual then click the
scan button. This operation can take a few minutes and requires that the packet data session be disconnected prior to scanning.
Figure 30 - Operator settings