
User's Guide
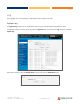
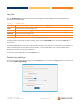

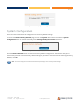
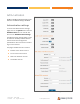


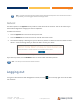
Table Of Contents
55 of 63
CFW-2182 – User Guide
UG01233 v1.2 August 13, 2020 © Casa Systems 2020
Log capture level
The log capture level defines the amount of detail that the system log stores. This setting also affects the
Display level setting on the System log page, for example, if this is set to a low level, such as “Error”, the
System log will not be able to display higher log levels.
Item Definition
Debug Show extended system log messages with full debugging level details.
Info Show informational messages only.
Notice Show normal system logging information.
Warning Show warning messages only.
Error Show error condition messages only.
Table 10 - System log capture levels
Non-volatile log
When the CFW is configured to log to non-volatile memory, the log data is stored in flash memory, making it
accessible after a reboot of the CFW. You can specify the size of the logging data. Up to 10,000 KB (10 MB) of
log data will be stored before it is overwritten by new log data. Flash memory has a finite number of
program-erase operations that it may perform to the blocks of memory. While this number of program-
erase operations is quite large, we recommend that you do not enable this option for anything other than
debugging to avoid excessive wear on the memory.
Remote syslog server
The CFW can be configured to output log data to a remote syslog server. This is an application running on a
remote computer which accepts and displays the log data. Most syslog servers can also save the log data to
a file on the computer on which it is running allowing you to ensure that no log data is lost between reboots.
To configure the CFW-2182 to output log data to a remote syslog server:
1 Click the System menu from the top menu bar, open the Log submenu on the left and then select
System log settings.
2 Under the Remote syslog server section, enter the IP address or hostname of the syslog server in
the IP / Hostname [PORT] field. You can also specify the port number after the IP or hostname by
entering a semi-colon and then the port number e.g. 192.168.1.102:514. If you do not specify a port
number, the CFW will use the default UDP port 514.
3 Click the Save button to save the configuration.