
- NetComm Modem Router User Guide
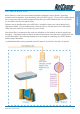
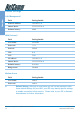
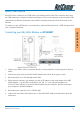
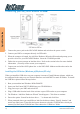
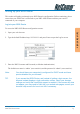
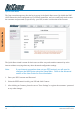

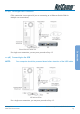
Table Of Contents
- Contents
- Overview
- NB5 Package Contents Note
- Minimum System Requirements
- Front Indicators
- Back Panel
- Resetting Factory Defaults
- Do I need a Micro filter?
- Default Settings
- Quick Start Guide
- Connecting your NB5 ADSL Modem via ETHERNET
- Connecting your NB5 ADSL Modem via USB
- Setting up your ADSL Router
- Log into your ADSL Router
- Quick Start Menu
- Connecting your ADSL Router
- Step 1: Connecting the ADSL Router to Your Computer/Notebook
- Step 1.1 Connecting to the Ethernet/USB
- Step 1.2 Connecting to the ADSL Line
- Step 1.3 Connecting to the Power Outlet
- Step 1.4 Powering On
- Step 2: Configuring Your Ethernet Network Card / Installing Your USB Device
- 2.1 Configuring Your Ethernet Network Card
- 2.2 Installing the USB Device Driver
- Step 3: Configuring Your Internet Browser
- Step 4: Connecting to the Internet
- Firewall Configuration
- Introduction to Firewalls
- Network Address Translation and Port Mapping
- Dedicated Firewalls
- Advanced Configuration of your ADSL Router
- Log into your ADSL Router
- Advanced Configuration of your ADSL Router-Login Settings
- Advanced Menus
- Introduction to Setup and Advanced Menus
- Configuring the ADSL Connection
- The Setup Menu
- WAN Setup
- PPPoE Connection
- PPPoA Connection Setup
- DHCP Connection Setup
- Static Connection Setup
- Bridged Connection Setup
- CLIP [Classical IP over ATM] Connection Setup
- LAN Setup
- DHCP Configuration
- Management IP
- The Advanced Menu
- UPnP
- SNMP
- IP QoS
- LAN Clients
- MAC Filter Control
- Enable/Disable MAC Filtering
- Create MAC Filter Rules
- Edit or Delete MAC Filter Rules
- Hidden MAC Filter Rules
- Multicasting
- Static Routing
- Dynamic Routing
- Port Forwarding
- Access Control
- IP Filters
- DMZ Configuration
- Tools Menu
- System Commands
- User Management
- Update Firmware
- Ping Test
- Modem Test
- Reboot
- Log Out
- Status Menu
- Network Statistics
- Connection Status
- DHCP Clients
- Modem Status
- Product Information
- System Log
- Appendix A: Troubleshooting
- The ADSL Router is not functional
- I can't connect to the ADSL Router.
- The DSL Link LED continues to blink but does not go solid
- The DSL Link LED is always off
- Appendix B: ADSL Router terms
- What is a firewall?
- What is NAT?
- What is a DMZ?
- What is a Gateway?
- Appendix C: Features
- ADSL/ATM Support
- Encapsulation Support
- Network Support
- Management Support
- Security Support
- External Connectors:
- Appendix D: Cable Connections
- RJ-45 Network Ports
- Twisted pair cables
- Straight and crossover cable configuration
- RJ11 connector and cable
- 605 to RJ-11 adapter
- USB cable
- 9 Pin (RS-232 ) Serial Cable
- Appendix E: Registering your NetComm Product
- Contact Information
- Legal & Regulatory Information
- Product Warranty
NetComm NB5 Ethernet/USB Modem Router YML717 Rev1
14 www.netcomm.com.au
Quick Start Guide
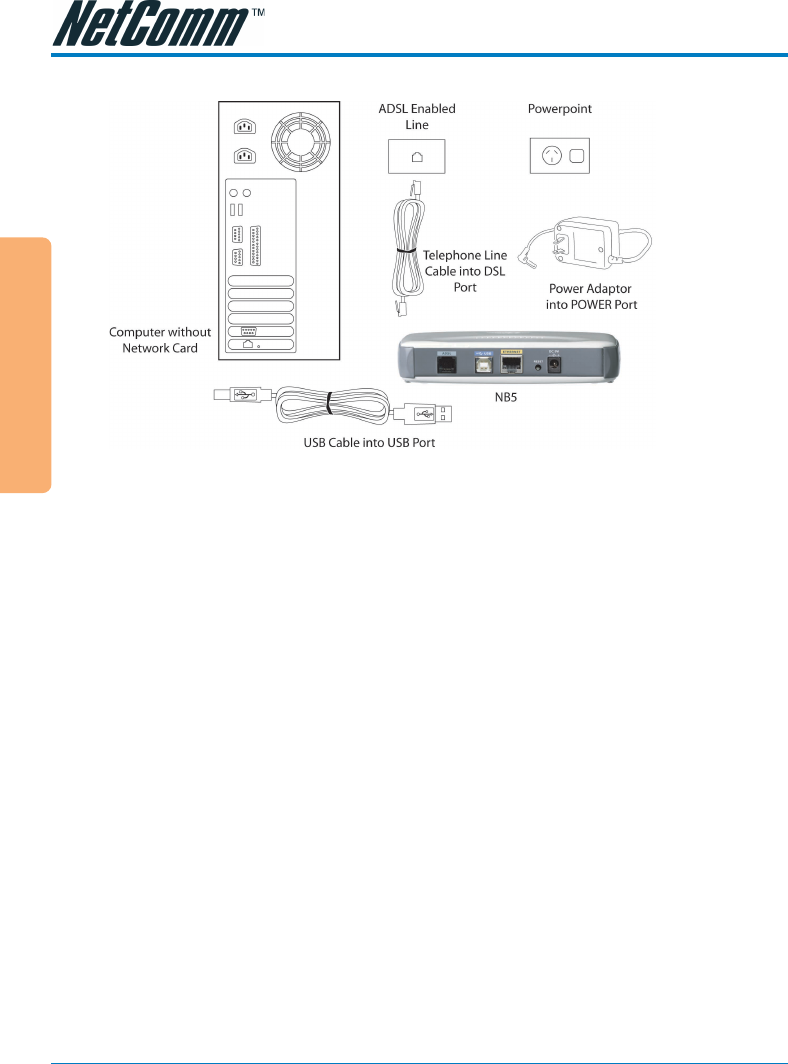
Connecting your NB5 ADSL Modem via USB
1. Connect the power pack to the NB5 ADSL Modem and switch on the power switch.
2. Connect your NB5 to a computer directly via USB cable.
3. When the computer is booted, the Add New Hardware Wizard will launch and prompt you to
provide a driver for your NB5 ADSL Modem. Insert the CD ROM provided.
4. Follow the on-screen prompts to load the driver. Refer to the section below for more detailed
information. (You may need to restart your computer).
5. Connect one end of the ADSL phone line to the NB5 ADSL Modem and the other end to the
wall socket.
Installing the USB driver (Windows 98/Me/2000/XP only)
When you install the USB driver on your computer it creates a Virtual Ethernet Adapter, which can
be configured in the same way as a Network Interface card with DHCP or static IP address. To install
the USB driver please follow the steps below:
1. Boot your machine into Windows 98/Me/2000/XP.
2. Insert your NetComm NB5 CD ROM into your CD-ROM drive.
3. Plug power up to your NB5 and switch ON.
4. Plug a USB cable from the back of the unit into a spare USB socket on your computer.
5. The Windows “Add New Hardware Wizard” should appear. Click Next to continue.
6. Ensure the option “Search for the best driver….” is chosen and click Next.
7. When prompted where you would like to look for the drivers choose “Specify location” and
untick any other boxes. Then click the browse button to select the CD-ROM drive which you
inserted you NetComm CD-ROM into. Then choose the ‘USBdriver’ folder.