
Installation Instructions


NetBotz Wireless Sensor Pod 180 Installation Guide
11
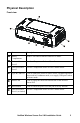
External installation
The Wireless Sensor Pod ships with a mounting plate to be used when installing
a pod in a non-rack location or in a non-Netshelter VX, SX, or SV rack.
1. Separate the two pieces of the plastic push rivets.
Note: To avoid equipment damage, use only the hardware
provided when installing the brackets.
2. Place the included mounting plate on the back of the pod and align the
holes with the mounting holes on the pod.
3. Insert the outer sleeves into the mounting holes on the rear of the plate.
4. Insert the plastic rivets into the anchor sleeves.
5. Use the appropriate hardware to mount the Wireless Sensor Pod in the
desired location. DO NOT POWER THE SENSOR POD AT THIS
TIME.
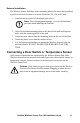
Connecting a Door Switch or Temperature Sensor
Only connect sensors that are supported by the Wireless Sensor Pod. Each
Wireless Sensor Pod can monitor and control up to three door switch sensors or
temperature sensors. Connect sensors to the universal sensor ports on the
Wireless Sensor Pod.
Caution: Only connect approved devices to ports on the Wireless
Sensor Pod as directed in this manual. Plugging in other devices
may result in equipment damage not covered under warranty.