
Instructions / Assembly


1.3
12
1.4
1.5
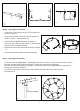
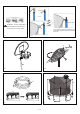
Step 2 - Leg Support Assembly
• Connect the T Section(# 4) to the Top Frame(# 3) as
shown in Figure1.2
• Connect the Vertical Tube(# 5) to the W leg(# 6) as
shown in Figure1.3 with Screw(# 12)
• Connect the completed sections in as shown in
Figure1.4, and make sure the holes on T Section and
Vertical Tube are aligned vertically
• Repeat this step for the other sets as shown in Figure
1.5
• Connect parts and complete the frame assembly
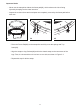
9
· Fix screws (#12) on every other T Section(#4) as circled in Figure 1.6. Only six screws will be used in
this step, and the holes below the screwed T Section will not be used in assembly.
· Do not over-tighten the screws at this step. The screws should only be tightened all the way after all
the Springs have been installed.
· The holes on the rest of 6 legs will be used to attach the Poles (#9,10) for putting up the
Enclosure(#13).
12
1.6
No screw required
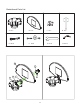
Step 3 - Leg Support Assembly