
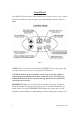
Operating instructions


8 www.nesco.com
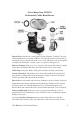
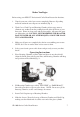
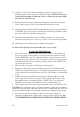
Make sure Rear Seal fi ts securely over metal rim of larger opening in Cover
(Fig. 4).
Align the metal hinge pin of Cover with the matching hole in the Roaster
Body and slide together until the pin is fully seated.
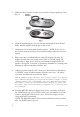
Gently press Cover down until it latches in place. NOTE: If the cover is
not securely latched, the Safety Cutoff Switch will not allow the roaster to
operate.
Plug roaster into a standard 120-volt outlet. The display will show 20
minutes the fi rst time your roaster is used. This is a default setting and
will produce a ‘light’ roast. We don’t recommend roasting less than 20
minutes. We suggest a roast time of 25 minutes minimum as a starting point.
Experiment with roasting times and have fun!
Adjust roast time using the “UP” arrow (on Control Panel) to add minutes
or “DOWN” arrow to subtract minutes from the roast cycle. The longer
roast time, the darker the roasted beans will be.
Note: The maximum roast time is 30 minutes. However, during a roasting cycle, you may add
up to 5 additional roasting minutes by pressing the UP Arrow while the red light is ‘on’ and the
remaining roast time is between 6 and 24 minutes. The roaster will not allow you to add more
than 5 minutes to a roast cycle, so the maximum allowable roasting time is 35 minutes. Once
the 5-minute ‘cooling’ cycle has started and the green light turns ‘on’, you can no longer add
more roasting time.
Press the RECALL button to display the previous ‘roast time’ used when
the START button was pressed. Your roaster stores this number even if the
roaster is unplugged between roast cycles. This feature helps you roast
coffee beans more consistently.
NOTE: The RECALL button will not remember additional minutes added
after the START button is pressed.
5.
6.
7.
8.
9.
10.