
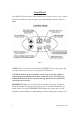
Operating instructions


10 www.nesco.com
After the roaster has cooled for 10 minutes, open the roaster Cover by
pulling the plastic tab towards you while lifting up. CAUTION: Please use
caution when opening or removing Cover, as all metal parts may still be
hot after the roasting cycle.
Remove Screen/Front Seal and brush chaff particles from Screen into the
trash. Slowly remove Chaff Cup and discard chaff into the trash.
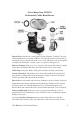
Grasp the plastic handle of the Roasting Chamber and remove from Roaster.
CAUTION: Do not touch glass or metal base of Roasting Chamber as these
parts may still be hot after the roasting cycle.
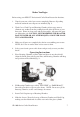
Pour the fresh-roasted beans into an airtight container or coffee grinder.
Allow the roasted beans to ‘rest’ (see p. 12) for a few hours before grinding.
Grind your fresh roasted beans in a blade or burr grinder.
Brew and enjoy the best cup of coffee you’ve ever tasted!
Caring for Your Roaster
Your coffee bean roaster must be cleaned after every use. This will ensure
the safe operation of the appliance, longevity and assure optimal roasting
results. WARNING: It is very important that the screen be in place before
you start the roaster. If the screen is not in place it will cause your roaster to
malfunction. Roaster issues caused by leaving out the screen will NOT be
covered by the warranty.
Make sure the roaster has cooled before removing parts.
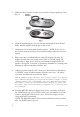
Empty the Chaff Cup in the trash. Brush or rinse the chaff fl akes off the
Chaff Cup and Screen/ Front Seal. To facilitate cleaning, the Screen can be
easily removed by stretching back the top ‘lip’ of the rubber seal and pulling
it out.
Wash Chaff Cup, Screen/Front Seal, Roasting Chamber and Cover with
warm soapy water and rinse. Set parts aside to drain and let them air dry
thoroughly before re-assembling roaster. NOTE: The Cover, Roasting
Chamber, Screen/Front Seal and Rear Seal are all dishwasher safe.
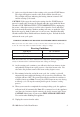
When dried, insert Screen into groove provided at the top of the Front Seal.
CAUTION: Not cleaning these parts or operating the appliance without proper installation
will shorten the life expectancy of the roaster and can create a condition where the roaster may
overheat and malfunction. Make sure all washable components are completely dry before using.
Set Cover on end, after washing, to allow excess water to drain out.
Wipe Roaster Body with a damp cloth or sponge and set aside to dry. DO
NOT IMMERSE ROASTER BASE IN WATER OR OTHER LIQUID.
16.
17.
18.
19.
20.
21.
1.
2.
3.
4.
5.
6.
7.