Coffee Bean Roaster NEVER LEAVE ROASTER UNATTENDED WHILE IN OPERATION! Use/Care Guide Model CR-1000 Series
CONGRATULATIONS! Congratulations on the purchase of your new NESCO® Coffee Bean Roaster! Please spend a few minutes reviewing this booklet. By doing so, you will learn how to get the most out of your NESCO® Coffee Bean Roaster. Enjoy your roasting with our compliments. TABLE OF CONTENTS: IMPORTANT SAFEGUARDS . . . . . . . . . . . . . . . . . . . . . . . SAVE THESE INSTRUCTIONS . . . . . . . . . . . . . . . . . . . . WELCOME TO COFFEE BEAN ROASTING . . . . . . . . GET TO KNOW YOUR COFFEE BEAN ROASTER . .
IMPORTANT SAFEGUARDS When using electrical appliances, basic safety precautions should always be followed including the following: 1. 2. 3. 4. 5. 6. 7. 8. 9. 10. 11. 12. 13. 14. 15. 16. 17. 18. 19. 20. 21. 22. 23. READ ALL INSTRUCTIONS. Do not touch hot surfaces. Do not place on or near hot electric or gas burners, or in a heated oven. To protect against electric hazards, do not immerse cord, plug, or base of this appliance in water or other liquid. This appliance should not be used by children.
Welcome to the World of Home Coffee Bean Roasting! Congratulations on your purchase of a new NESCO® Professional Coffee Bean Roaster! You will be able to create the greatest tasting cup of coffee in the world at a fraction of the price you’d pay in a gourmet coffee shop. WARNING NEVER LEAVE ROASTER UNATTENDED WHILE IN OPERATION. With the NESCO® name, you can be assured of a quality appliance, and we’ll provide tips and suggestions on how to roast your own coffee beans to perfection in your own home.
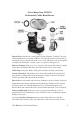
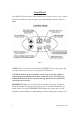
Get to Know Your NESCO® Professional Coffee Bean Roaster Fig. 1 Roaster Base contains the control panel, heating elements, Catalytic Converter and mounting base for roasting chamber. A two-speed fan directs the heated air through the green coffee beans in the ‘roast’ cycle and blows cool air through the roasted beans, during the ‘cooling’ cycle, to stop the roasting process. Roaster Chamber holds up to 5 oz.
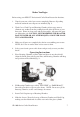
Control Panel Your NESCO® Professional Coffee Bean Roaster features an easy to use Control Panel that includes five large keypads, large digital display and two indicator lights. Fig. 2 NOTE: The screen must be cleaned between EVERY use to ensure proper and safe operation of your roaster (see Caring For Your Roaster). CAUTION: Failure to clean the filter screen or operating the appliance without proper installation of the filter screen may cause your roaster to malfunction.
Before You Begin Before using your NESCO® Professional Coffee Bean Roaster the first time: 1. Unpack your new coffee bean roaster completely. Remove all packing materials and make sure all parts are included. (Fig 1). 2. Wash Cover, Chaff Cup and Roasting Chamber in hot soapy water to eliminate any residue from the packing that will affect the flavor of your first roast. Rinse in clean water and dry thoroughly. All removable parts are dishwasher safe.
5. Make sure Rear Seal fits securely over metal rim of larger opening in Cover (Fig. 4). 6. Align the metal hinge pin of Cover with the matching hole in the Roaster Body and slide together until the pin is fully seated. 7. Gently press Cover down until it latches in place. NOTE: If the cover is not securely latched, the Safety Cutoff Switch will not allow the roaster to operate. 8. Plug roaster into a standard 120-volt outlet. The display will show 20 minutes the first time your roaster is used.
11. After you select the time for the roasting cycle, press the START button. The auger will begin to turn the coffee beans and the fan will start. The red light will glow, indicating the heating element is turned ‘ON’ and the roasting cycle started. CAUTION: If the auger does not begin rotating after the START button is pressed, a small coffee bean may be trapped under the auger inside the Roast Chamber. STOP THE ROASTING CYCLE IMMEDIATELY by unplugging the roaster. Allow the roaster to cool if it is hot.
16. After the roaster has cooled for 10 minutes, open the roaster Cover by pulling the plastic tab towards you while lifting up. CAUTION: Please use caution when opening or removing Cover, as all metal parts may still be hot after the roasting cycle. 17. Remove Screen/Front Seal and brush chaff particles from Screen into the trash. Slowly remove Chaff Cup and discard chaff into the trash. 18. Grasp the plastic handle of the Roasting Chamber and remove from Roaster.
8. Examine the slots surrounding the ‘Drive Shaft’ (Fig. 3) and remove any debris with a damp towel or small brush. This surface must be free of debris before beginning the next roast cycle. 9. The screen of the Screen/Front Seal is a very fine mesh stainless steel and requires special attention after every roast cycle. Fine particles of chaff lodge in the fine screen of the filter. Remove particles of chaff with a brush and running water.
• • • • Resist the urge to refrigerate roasted beans. Don’t store coffee in a refrigerator; it is damp inside and dampness compromises the flavor and aroma. Grind your coffee immediately before brewing. The purpose of grinding coffee is to break open the coffee bean and make the flavor oils available to hot water and then to our palates. Unfortunately, breaking open the bean also exposes flavor oils to oxygen or “staling.” Grinding should be done only moments before brewing to maximize the flavor and aroma.
Problem Cause and Solution Smoke is emitted and auger is turning. • The Screen/Front Seal or Rear Seal not properly installed, damaged or missing. Reposition as needed. • Screen is blocked. Make sure screen is cleaned and open before operating. Smoke is emitted but auger is NOT turning. Unit is operating with correct amount of green beans but the auger is NOT turning. • There may debris lodged under auger. Unplug the roaster immediately. ALLOW UNIT TO COOL BEFORE REMOVING PARTS. Remove beans.
Problem Cause and Solution With Roasting Chamber clean and empty, auger does not turn after pressing START button. • Roasting Chamber not seated correctly. Unplug roaster from outlet. Open Cover, make sure Roasting chamber is fully seated on the heat shield of Roaster Base. • Auger drive mechanism may be damaged. Return to our factory for servicing (see One Year Limited Warranty). When roaster is running, the keypads do not work. • This is a normal condition when roasting or cooling.
ONE YEAR LIMITED WARRANTY This appliance is warranted for one year from date of original purchase against defects in material and workmanship. This warranty does not cover transportation damage, misuse, accident or similar incident. This warranty gives you specific legal rights and you may have other rights, which vary from state to state. This product is intended for household use only, not for commercial use. Warranty does not cover commercial use.
WEBSITE: www.nesco.