
User Manual


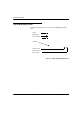


Table Of Contents
- 14-0066 - Exhibit Cover.pdf
- PUBLICATION_UM Handheld_12.13.pdf
- Neptune Handheld System User’s Manual
- 1 Introduction
- 2 Overview of the Neptune Handheld System
- 3 Using the CE5320 Handheld
- 4 Using the Nomad Handheld
- 5 Setting Up the R900 Belt Clip Receiver
- R900 Belt Clip Receiver
- Nomad Handheld and R900 Belt Clip Receiver
- Unpacking and Inspecting Equipment
- Using the R900 Belt Clip Receiver
- Using the R900 Belt Clip Receiver to Read a Route
- Updating R900 Belt Clip Receiver Firmware
- 6 Gathering Route Data
- The Reading Entry Screen
- Manually Collecting Meter Readings
- Collecting RR Readings
- Working with Accounts
- Validating Readings
- Removing a Reading
- Clearing a Skip Code
- Clearing a Comment Code, Customer Note, or Trouble Code
- Adding a New Meter to a Route
- Correcting or Changing Meter Information
- Finding and Displaying Reading-Entry Screens
- Resequencing Routes
- 7 Communicating with the Host Computer
- 8 Using the Field Programmer
- Connecting the Mouse
- Starting Field Programmer
- Programming the ProRead
- Querying the ProRead
- Reading the ProRead Register
- Programming the R900G Endpoint
- Using Command Gas
- Reading the R900G Endpoint Register
- Networking Two Registers
- Managing Formats
- 9 Maintaining and Repairing the Neptune Handheld System
- 10 Troubleshooting
- Appendix A Changing Volume Settings
- Appendix B Tokens List for Custom Format Screen
- Appendix C Pressure Configuration Factor Indexes
- Glossary
- Index
- Neptune Locations

Gathering Route Data
6-4 N_SIGHT R900 User’s Manual for the Neptune Handheld System
2 Using the number keys, enter the reading in the space provided.
Figure 6.2 N_SIGHT R900 Reading Entry Field
3 Touch or press .
The N_SIGHT R900 software displays the next meter in the route,
according
to the route direction or . Touching this icon and
temporarily change the direction for
the route. However, to change
it for future uses, refer to the procedure for “Changing the Route
Direction, Forward or Reverse,” on page 6-14.
4 Continue entering readings for each mete
r until you have com-
pleted all routes assigned to you.
As you complete each route, a message appears in the display to let
you
know that you have completed the route and are moving to a
new one. Follow the instructions shown in the display to access the
reading-entry screen of the next route.
Reading entry field
The number of hyphens in the reading entry field indicate the number of
reading digits required.