
User Manual

Switch mode
You can change the behaviour of the foot switches with this routine. For example the BYPASS switch
can be assigned as STOP switch, while BYPASS is beeing accessed by pressing BYPASS and
SLOW/FAST together. Settings are stored to flash memory so that there's no reprogramming
necessary on next power up.
1. Power up the mini Vent II while holding the BYPASS switch for at least 3 seconds
This enters the edit routine.
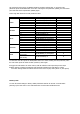
2. The LO and HI LED show the current status. Here’s a list of all options:
Display
Function
(Pressing BYPASS)
(Pressing BYPASS +
SLOW/FAST)
(Pressing
SLOW/ FAST)
LO LED blinking 1x
Bypass Function
Stop Function
Slow/Fast
Function
LO LED constantly on
Stop Function
Bypass Function
Slow/Fast
Function
HI LED blinking 1x
Slow/Fast Function
Stop Function
Slow/Fast
Function
HI LED constantly on
Slow/Fast Function
Bypass Function
Slow/Fast
Function
LO and HI LED
constantly on
Slow/Fast Function Slow/Fast Function Slow/Fast
Function
To select the next setting press the SLOW/FAST switch once. After reaching the last setting the next
button press will bring you to the first setting again.
3. When editing is finished press Bypass and Slow/Fast simultaneously and hold for at least
2 seconds. Setting will be stored and the mini Vent returns to play mode (effect on, slow speed).
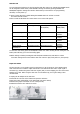
Input Gain Select
The mini Vent II is set to Hi Gain input from the factory to get the most out of the DRIVE section
when used with low to medium output instruments. If an instrument with hotter output signal is
connected (e.g. Humbucker guitars and some organs) and you notice clipping, the mini Vent can be
switched to Lo Gain. When using the mini Vent II in an Effects loop, the Lo gain setting is also
recommended.
1. Unplug the AC adapter of the mini Vent
2. Unscrew the 4 screws on the bottom and open the enclosure
3. Find the jumper soldered flat on the PCB board (see picture below)
4. Remove the jumper and attach on one of the pins only
5. Attach the bottom cover with the 4 screws