
User Manual

On entering the edit routine, the SPEED parameter is always selected first. To select the next
parameter press the BYPASS switch once. After reaching the last parameter (MODE), the next button
press will select the first parameter (SPEED) again.
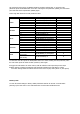
4. The High LED shows the current parameter value:
Parameter Value Display Factory Setting
-3 HI LED blinking 1x, then pause
-2 HI LED blinking 2x, then pause A
-1 HI LED blinking 3x, then pause
0 (Standard 122) HI LED always blinking B
SPEED
+1 HI LED constantly on
-2 HI LED blinking 1x, then pause
-1 HI LED blinking 2x, then pause
0 HI LED blinking 3x, then pause A
+1 HI LED always blinking B
BALANCE
+2 HI LED constantly on
1 (off) HI LED blinking 1x, then pause A
2 HI LED blinking 2x, then pause
3 HI LED blinking 3x, then pause
4 HI LED always blinking B
DRIVE
5 HI LED constantly on
1 (short distance) HI LED blinking 1x, then pause
2 HI LED blinking 2x, then pause B
3 HI LED blinking 3x, then pause
4 HI LED always blinking
DISTANCE
5 (long distance) HI LED constantly on A
Cabinet Simulation off
(GIT mode)
HI LED blinking 1x, then pause A
MODE
Cabinet Simulation on
(KEY mode)
HI LED constantly on B
To select the next value press the SLOW/FAST switch once. After reaching the last (maximum) value
the next button press will select the first (minimum) value again.
5. Toggle the A-B switch if the other memory shall be edited too and repeat the previous steps
6. When editing is finished press Bypass and Slow/Fast simultaneously and hold for at least
2 seconds. Settings will be stored and the mini Vent returns to play mode (effect on, slow speed).
Factory reset
To reset all internal settings to factory default, hold both switches for at least 3 seconds while
powering up the mini Vent II. As a confirmation the LO and HI LED will blink 4 times.