
Instruction Manual


5
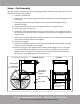
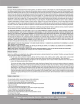
Setup – Cart Assembly
Thiscartrequiresassembly.Removeallpackagingandtape,thenfollowthestepsbelowforcart
assembly(referenceimageshown).
1. Turnbaseupsidedown.
2. Fastenlegstobasecabinetusingboltsandnutsprovided.Donotfullytightenthenuts
atthistime.
3. Boltalegtiestriptothelegswithboltsandnutsprovided,thentightenallleg
fastenerssecurely.
4. Bolttheotherlegtiestriptotheaxlesupports(referenceimageshown).
5. Installalegcaponeachlegend.
6. Installaxle‐slideaxlethroughholeinsupports,theninsertacotterpinintothehole
oneachendoftheaxle.Thecotterpinmustbeontheinsideofthesupport(reference
imageshown).
7. Slideaspacerontotheaxleshaft,thenplaceawheeloneachendoftheaxleandfasten
witha5/8‐18locknut.DONOTovertighten.
8. Positioncartupright.
9. Assembleahandlebarbracketoneachendofthehandlebar.Fastenhandleassembly
tobaseusingtheboltsandnutsprovided.
10. Removethepopper’soldmaidpan,thencarefullyinstallpopperoncart‐thepower
cordgoesdownintothecabinet(acordaccessholeisprovidedonthefloorofthe
cabinet).Makesurepopperissecurelyseatedoncart,thenslidetheoldmaidpan
throughthecartopeningandintothepopperforuse.
Handlebar
5/8‐18LockNut
CotterPin
(installoninside
ofsupport)
WheelSpacer
BaseCabine
t
HandlebarBracket
LegTieStrip
(foraxlesupport)
LegTieStrip
Leg
1/4‐20x3/4”
HexHDBolt
andNut
Cartopeningforoldmaidpan.