
User's Manual


6
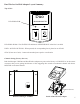
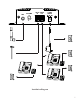
Messager USB Duo Installation:
The Messager USB Duo should be installed using the following steps:
Step 1: Wall or shelf mount the Messager USB Duo near the incoming phone lines. Screws and rubber feet are
supplied in the accessory kit.
Step 2: Attach the antenna by screwing it onto the ANT jack (If not already attached).
Step 3: Connect the incoming phone lines to the TELCO IN jack.
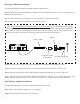
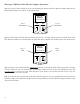
Duo Wireless Adapter Installation:
The Duo Wireless Adapter should be installed using the following steps:
Step 1: Place a Duo Wireless Adapter next to each phone.
Step 2: Plug the attached power pack to a wall outlet.
L1
L2
L1\2
Splitter
Female-to-female
in-line adapter
12VDC
500mA
+
VOLUME
ANT
TELCO
IN
PHONE
OUT
+
Step 4: Connect the wire going to the phones throughout the building to the PHONE OUT jack.
Step 5: Attach the included power pack to a wall outlet, then attach the other end to 12VDC jack.
Step 6: Plug the USB stick that was included with the unit into the USB jack on the front of the unit.
Step 7: Adjust the volume level with pot labeled VOLUME on the rear of the unit. Call into the phone system
andbeplacedonholdtonetunevolume.Volumeupisclockwise,volumedowniscounter-clockwise.
If this is a two-line installation AND both lines are on seperate wires then see the diagram below. If both
lines are already on one wire then skip this section. The accessory kit includes a splitter, in-line adapter and
cable to allow the lines to be combined onto one wire. This step will place Line 1 on the center two pins
and Line 2 on the two outside pins of the plug being inserted into the TELCO IN jack.
6" RJ-11 Cable
Incoming Telco Lines