
User's Manual


10
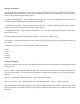
Step 9:InserttheUSBashdriveintothefrontoftheunit.DonotforcetheUSBashdriveintotheunit.Ifit
doesnottinoneway,tryturningoverandreinserting.
Step 10:TurnpowerswitchonrearofunittotheONposition.AftertheunitinitializestheSTATUSLEDonfront
of unit will turn solid blue. This process may take up to 15 seconds.
Step 11: Push the SPEAKER switch located on the front of the unit to the IN position. This speaker is for verify-
ingaudioplaybackandtestingpurposesonly–DONOTusethisforsettingstoresspeaker’svolumelevel!
Step 12:Withtheincludedscrewdriver ready,turnthestoresPAamplierbacktotheONposition.Oncethe
amplierison,adjustthevolumelevelpotlabeledBGMonthebottomoftheAlliancereceiver/messagerepeater
tomatchanacceptablevolumelevelonthestoressalesoor.DONOTusetheinternalspeakerontheunittoset
this level.
Ifanacceptablevolumelevelcannotbeachievedoraudioisdistorted/mufed,thentakethefollowingsteps:
a. Turn down the pot labeled BGM on the bottom of the unit.
b. TurnthevolumelevelUPonthestoresPAamplier.
c. Turn up the pot labeled BGM on the bottom of the unit.
d. Keep repeating above procedure until level is acceptable or go to step e.
e. MovetheRCAplugfromthe8Ωto600ΩoutputontherearoftheAlliancereceiver/messagerepeater.
f. Repeat step a through d.
Step 13:PushtheSPEAKERswitchtotheOUTposition.
Step 14: Receiver Install is Complete
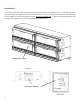
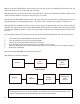
Background
Music
Receiver
Speakers
PA
Amplier
Before Install
Background
Music
Receiver
Speakers
PA
Amplier
Alliance
Receiver
After Install
Important Note: Some installation may have additional equipment already installed between
thebackgroundmusicreceiverandamplier.TheAlliancereceivermustfallsomewhereinthe
chainofequipmentbetweenthebackgroundmusicreceiverandamplier.