
User Manual


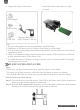
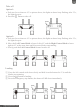
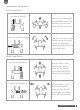

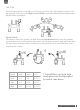
Table Of Contents

support@neheme.com
3
USB Adapter
Power Bank
Charging: Red LED
USB Port
Fully Charged: LED Off
2. Charge the battery of the drone. 3. Install the drone battery after it’s fully
charged.
Tips:
1. For your safety, please use the original battery and USB cable.
2. Flight time of the battery may be reduced when flying in cold weather.
3. Free the battery of any sharp objects that could puncture into the battery to avoid risks of
explosions and fire.
4. There is continuous beeping sound from the remote and the LED on the drone will flash
quickly when the battery of the drone is low.
5. To extend the battery’s lifespan, recharge it at least once every three months if not using
it for long periods of time.
FLIGHT OPERATION GUIDE
Note:
* Make sure you power on the drone first, then the remote in each flight.
* Do repeat the pairing procedure each time when the drone or remote is restarted.
* For all flight functions and modes, the operator and tail of the drone must be aligned.
Pair the Remote with the Drone
Step 1: Turn on the drone, then the remote. The LED on the drone start to flash, then put the
drone on a flat surface with the head forward.
Step 2: Push the Left Control Stick forward to the top, then pull it backward till the bottom.
Pairing is successful when the LED on the drone is solid on.