
Operation Manual


37Chapter 6 . Camera and Photos
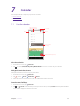
3. Follow the onscreen instructions to take the photo. Slowly move your camera horizontally or vertically,
ensuring that the arrow
stays level with the center line .
4. With the capturing, the squares will gradually change to orange. You can tap or press the
Volume button to end the capture.
5. The camera automatically stitches the photos together and saves them.
Note:
Excessive deviation and moving too fast will lead to fail in capture.
Professional mode
In professional mode, you can adjust the parameters manually.
1. Open Camera, swipe the viewfinder left and select the Professional or tap Professional directly.
2. Tap to display flash mode’s three options and select a flash mode. Toggle to enable or disable HDR.
3. You can set the functions like the following:
• Adjust the exposure compensation: Tap EV and drag the slider to adjust the exposure compensation.
This setting changes the brightness of the image. Touch and hold a setting to lock it.
• Adjust the ISO: Tap ISO and drag the slider to set the ISO. The ISO determines the camera’s sensitivity
to light. Increasing the ISO will create a brighter image, but there will be a noticeable increase in noise.
• Set the white balance: Tap WB and drag the slider to select a white balance. You can choose from filament
lamp, fluorescent lamp, daylight, cloudy and shadows. You can also adjust the color temperature.
• Change the focus mode: Tap MF and drag the slider to manually focus. Touch and hold an area of the
screen to lock the focus.
4. Tap to switch between the front camera and rear camera.
5. Choose the view you want to capture, position the camera, and then tap or press the Volume button
to start shooting.
Continuous shot
Use continuous shot when you want to take a photo of a moving subject, such as during a football match. The
camera will capture several images in quick succession.
1. Touch and hold the or press and hold the Volume button to start the burst sequence. The number of
captured photos will be displayed in the bottom of the viewfinder.
2. Release or Volume button to stop the burst shooting.
3. Tap the image thumbnail or go to
Photos -> Camera to view the photos.
Note:
1. This feature is not available in Panorama mode, Beauty mode.
2. You can take up to 40 photos in one burst sequence, provided that there is enough storage space on your phone.
6. 5 Camera and video settings
Go to Camera -> to configure the following camera settings.
Common settings
• GPS location info: Save the location where the photo was taken (only when your phone is connected to the
Internet and enabled location access).
1 ) Tap to switch on and then take a photo.
2 ) Go to Photos, select the photo and tap to view the location information.
• Anti-flicker: Tap to select the anti-flicker Auto, Off, 50Hz or 60Hz.
• Volume key:
• Tap Shoot, you can use the Volume button to shoot.