DOUBLE OVEN [en] INSTRUCTION MANUAL U2ACM7HH0B
en Table of contents [ en] I NSTRUCTI ON MANUAL 8 Intended use . . . . . . . . . . . . . . . . . . . . . . . . . . . . . 4 ( Important safety information . . . . . . . . . . . . . . . 5 General information Halogen lamp. . . . . Meat thermometer . Cleaning function . . . . . . . . . . . . . . . . . . . . . . . . . . . . . . . . . . . . . . . . . . . . . . . . . . . . . . . . . . . . . . . . . . . . . . . . . . . . . . . . . . . . . . . . . . . . . . . . . . . . . . . . . . .5 .
en Intended use J Tested for you in our cooking studio. . . . . . . . 33 General information . . . . . . . . Baking . . . . . . . . . . . . . . . . . . Roasting, braising and grilling Ready meals . . . . . . . . . . . . . Desserts . . . . . . . . . . . . . . . . . Acrylamide in foodstuffs . . . . . Drying. . . . . . . . . . . . . . . . . . . Preserving . . . . . . . . . . . . . . . Prove dough. . . . . . . . . . . . . . Defrosting. . . . . . . . . . . . . . . . Keeping warm . . . . . . . . . . . .
Important safety information (Important safety information I mpor t ant saf et y i nf or mat i on General information : Warning – Risk of fire! Combustible items stored in the cooking compartment may catch fire. Never store combustible items in the cooking compartment. Never open the appliance door if there is smoke inside. Switch off the appliance and unplug it from the mains or switch off the circuit breaker in the fuse box. Risk of fire! ■ Loose food remnants, fat and meat juices may catch fire.
en Causes of damage : Warning – Risk of electric shock! When replacing the cooking compartment bulb, the bulb socket contacts are live. Before replacing the bulb, unplug the appliance from the mains or switch off the circuit breaker in the fuse box. Meat thermometer : Warning – Risk of electric shock! The insulation of an incompatible meat thermometer may be damaged. Only use the meat thermometer which is recommended for this appliance.
Environmental protection ■ ■ ■ ■ Extremely dirty seal: If the seal is very dirty, the appliance door will no longer close properly during operation. The fronts of adjacent units could be damaged. Always keep the seal clean. Never operate the appliance if the seal is damaged or missing. ~ "Cleaning" on page 20 Appliance door as a seat, shelf or worktop: Do not sit on the appliance door, or place or hang anything on it. Do not place any cookware or accessories on the appliance door.
Getting to know your appliance en Note: Depending on the appliance model, individual details and colours may differ. *Getting to know your appliance Control panel In this section, we will explain the indicators and controls. You will also find out about the various functions of your appliance. Get i ng t o know your ap l i ance You can set your appliance's various functions on the control panel. Below, you will see an overview of the control panel and the layout of the controls.
Getting to know your appliance en shown in large digits on the display refers to the function that this symbol represents. Types of heating and functions Use the function selector to set the types of heating and other functions. To make sure you always use the right type of heating to cook your food, we have explained the differences and applications below. Type of heating Temperature Use For baking and cooking on one or more levels.
en Getting to know your appliance Other functions Your new oven has yet more functions; see below for a brief description of these. Function Use r A 2 Main oven Interior lighting Switches on the interior lighting; all other functions remain off. Makes it easier to clean the cooking compartment, for example. Cleaning functions ~ "Cleaning function" on page 22 EasyClean š removes light soiling in the cooking compartment. F Remote start Start and operate the appliance via the Home Connect app.
Accessories _Accessories Your appliance is accompanied by a range of accessories. Here, you can find an overview of the accessories included and information on how to use them correctly. Ac es or i es Control accessories Always insert accessories between the two guide rods for the shelf position. Accessories can be pulled out approximately halfway without tipping. You can use the pull-out rails to pull the accessories out further.
en Accessories Locking function The accessories can be pulled out approximately halfway until they lock in place. The locking function prevents the accessories from tilting when they are pulled out. The accessories must be inserted into the cooking compartment correctly for the tilt protection to work properly. When inserting the wire rack, ensure that lug ‚ is at the rear and is facing downwards. The open side must be facing the appliance door and the outer rail must be facing downwards ¾.
Before using for the first time KBefore using for the first time Before you can use your new appliance, you must make some settings. You must also clean the cooking compartment and accessories. Bef or e usi ng f or t he f i r st t i me Initial use As soon as the appliance is connected to the power supply, ‚ƒ:‹‹ flashes in the display. Setting the time Use the ( or ) buttons to set the current time. After a few seconds, the time that has been set is adopted.
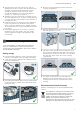
en Time-setting options Temperature display As soon as the appliance heats up, the / symbol appears in the display. The lines are filled from the bottom to the top as the cooking compartment heats up. When you are preheating the appliance, the optimal time to place your food in the cooking compartment is when the / symbol first goes out. ■ ■ 1 Appliance heats up (fig. !) Temperature has been reached (fig.
Time-setting options 2. Use the ( and) buttons to set the timer duration. – Default value for the ( button = 5 minutes – Default value for the ) button = 10 minutes en 4. Use the ( and ) buttons to set the cooking time. 5. Press the 0 button repeatedly until the y symbol is highlighted. ( and ) buttons to set the end time. The appliance applies the settings after a few seconds. The end time is shown in the display. Once the appliance starts, the time begins counting down. 6.
en Childproof lock AChildproof lock Your appliance is equipped with a childproof lock so that children cannot switch it on accidentally or change any settings. Chi l dpr o f l ock Notes ■ You can go to the basic settings to specify whether you want the option to set the childproof lock. ~ "Basic settings" on page 16 ■ If a hob is connected, it will not be affected by the childproof lock on the oven. Automatic childproof lock The control panel is locked so that the appliance cannot be switched on.
Meat thermometer Changing the basic settings The function selector must be set to the "Off" position. 1. Press and hold the ! button for approx. four seconds. The first basic setting appears in the display, e.g. ™‹‹ ‹. 2. Use the temperature selector to change the setting as required. 3. Use the ) or ( button to continue going through all the basic settings, and use the temperature selector if you want to change any of these settings. 4.
Sabbath mode en Food Tenderloin or sirloin, medium rare Tenderloin or sirloin, well done Core temperature in °C 55-62 65-75 Veal Joint of veal or hock, lean Joint of veal, shoulder Knuckle of veal 75-80 75-80 85-90 Lamb Leg of lamb, medium rare Leg of lamb, well done Saddle of lamb, medium rare 60-65 70-80 55-60 Setting the core temperature If you have placed your dish with the meat probe in the cooking compartment, you can set the core temperature.
Home Connect If you would like to cancel Sabbath mode, switch the appliance off by turning the function selector to the "Off" position. oHome Connect This appliance is Wi-Fi-capable and can be remotely controlled using a mobile device. If the appliance is not connected to the home network, the appliance functions in the same way as an oven with no network connection and can still be operated via the display.
Cleaning en Setting •’‹… Remote control behaviour Selection/display Declaration of Conformity ‹ = Monitoring Constructa Neff Vertriebs-GmbH hereby declares that the appliance with functionality meets the basic requirements and other relevant provisions of Directive 2014/53/EU. A detailed RED Declaration of Conformity can be found online at www.neff-international.com among the additional documents on the product page for your appliance.
Cleaning Area Cleaning Appliance exterior Stainless steel Hot soapy water: front Clean with a dish cloth and then dry with a soft cloth. Remove flecks of limescale, grease, starch and albumin (e.g. egg white) immediately. Corrosion can form under such flecks. Special stainless steel cleaning products suitable for hot surfaces are available from our after-sales service or from specialist retailers. Apply a very thin layer of the cleaning product with a soft cloth.
Cleaning function en ■ Use suitable ovenware for roasting, e.g. a roasting dish. .Cleaning function Your appliance is equipped with a self-cleaning function and EasyClean. You can use the self-cleaning function to clean the cooking compartment. Use the EasyClean cleaning aid for intermediate cleaning of the cooking compartment. Dirt is softened beforehand using EasyClean. It can then be removed more easily.
Cleaning function Top oven q 1. Use the function selector to set the ˜ symbol. "PYRO" appears in the display. 2. Use the temperature selector to set the cleaning level. Note: Once cleaning starts, the cleaning level can no longer be changed. The length of the selected level appears in the display. The cleaning function starts after a few seconds. The cooking time counts down in the display. Ventilate the kitchen while the cleaning function is running.
Rails en ■ Repeat the cleaning aid after the cooking compartment has cooled down. 2. Then insert the rail into the front socket „, until the rail also rests against the cooking compartment wall here, and press it downwards … (figure "). 1 2 pRails D With good care and cleaning, your appliance will retain its appearance and remain fully functional for a long time to come. This will tell you how to remove the shelves and clean them.
Rails 2. Then push the shelf support into the front socket „ until the shelf support also rests against the cooking compartment wall, and then press it downwards … (fig. "). en 2. Keep the "PUSH" tab pushed back and swing the rail out (fig. "). 2 2 1 D E F G 3. Pull the rail out towards you until the retainer at the back unhooks (fig. #). Fitting and removing the pull-out rails On appliance models with shelf supports, you must change the basic settings to "Telescopic rails: Yes".
Appliance door en 2. Push the retainer at the back in between the lower and the upper bar (fig. "). 2 qAppliance door With good care and cleaning, your appliance will retain its appearance and remain fully functional for a long time to come. This will tell you how to clean the appliance door. Ap l i ance do r Main oven – Fitting and removing the glass panels 3. Push on the "PUSH" tab and swing the rail in so that the retainer ends up between the two bars (fig. #). 4.
Appliance door Removing the appliance door 1. Open the appliance door fully and push it in the direction of the appliance. 2. Fold up the two locking levers on the left and right (figure !). 3. Close the appliance door as far as it goes ‚. With both hands, grip the door on the left- and right-hand side and pull it up and out (figure "). 1I en Removing the door cover The stainless steel inlay in the door cover may become discoloured. To carry out thorough cleaning, you can remove the cover.
Appliance door en Removing the door from the appliance 1. Open the appliance door slightly. 2. Press on the right and left side of the cover (figure !). 3. Remove the cover (figure "). 1 2 Fitting the door on the appliance When fitting the intermediate panel, make sure that the arrow is in the top right of the panel and that it aligns with the arrow on the metal panel. 1. Insert the intermediate panel at the bottom into the retainer and push it in firmly at the top (figure !). 2.
Appliance door Top oven – Fitting and removing the glass panels To facilitate cleaning, you can remove the glass panels from the appliance door. The appliance door hinges each have a locking lever. When the locking levers are closed (fig. !), the appliance door is secured in place. It cannot be detached. When the locking levers are open in order to detach the appliance door (fig. "), the hinges are locked. They cannot snap shut. 1 en 4. Set the appliance door down carefully on a level surface. 5.
Appliance door en ■ Risk of injury! ■ The hinges on the appliance door move when opening and closing the door, and you may be trapped. Keep your hands away from the hinges. Components inside the appliance door may have sharp edges. Wear protective gloves. 7. Place both spacers at the arrows on the first inner panel (fig. '). Fitting panels 1. Slide each inner panel back in and make sure that the number on the inner panel is to the bottom right (fig. !). 2.
Trouble shooting 12. Attach the cover and use two screws to secure it (fig. -). en 3Trouble shooting If a fault occurs, there is often a simple explanation. Before calling the after-sales service, please refer to the fault table and attempt to correct the fault yourself. Tr oubl e sho t i ng Rectifying faults yourself 13. When fitting the appliance door, ensure that both hinges are inserted straight into the opening (fig. .). Place both hinges at the bottom on the outer panel and use them as a guide.
en Trouble shooting : Warning – Risk of injury! Incorrect repairs are dangerous. Do not attempt to repair the appliance yourself. Repairs must only be carried out by one of our trained after-sales engineers. If the appliance is defective, call the after-sales service. : Warning – Risk of electric shock! Incorrect repairs are dangerous. Repairs may only be carried out and damaged power cables replaced by one of our trained after-sales technicians.
Customer service 4Customer service Our after-sales service is there for you if your appliance needs to be repaired. We will always find an appropriate solution, also in order to avoid after-sales personnel having to make unnecessary visits. Cust omer ser vi ce E number and FD number When calling us, please give the full product number (E no.) and the production number (FD no.) so that we can provide you with the correct advice.
en Tested for you in our cooking studio information can be found in the baking tips listed after the settings tables. Remove unused accessories from the cooking compartment. This will ensure that you achieve the best possible cooking results and energy savings of up to 20 per cent. Accessories Only use original accessories supplied with your appliance. These have been tailored to the cooking compartment and the operating modes of your appliance.
Tested for you in our cooking studio en Baking in the main oven Baking on one level Food Dish 2x Ø20cm tins Shelf position 2 Type of heat- Temperature ing in °C 150-170* ‚ Victoria sponge cake Light fruit cake High Ø20cm tin 2 Rich fruit cake High Ø23cm tin 2 Fruit crumble Flat glass dish 3 Sponge Cake (fatless), 3 eggs Springform cake tin Ø26cm 2 Swiss roll Swiss roll tin 3 Fruit Pie Plate Ø20cm or pie tin 2 Quiche Quiche tin (dark coated) 3 (White) Bread Loaf tin (1x900g or 2x
en Tested for you in our cooking studio Food Dish 4x loaf tins Shelf position 3+1 Type of heat- Temperature ing in °C 170-190* ‚ (White) Bread, 2 levels Pizza, homemade, 2 levels Universal pan + baking tray 3+1 ‚ Type of heat- Temperature ing in °C 160-170* ƒ ƒ ƒ ƒ ƒ ƒ ƒ 180-200 Time in minutes 30-40 35-45 * Preheat ** Preheat for 5 mins; do not use rapid heat-up function Baking in the top oven Baking on one level Food Dish Victoria sponge cake 2x Ø20cm tins Shelf position 1 Swiss roll S
Tested for you in our cooking studio The baked item looks good, but is not cooked properly in the middle. The baked item cannot be turned out of the dish when it is turned upside down. en Use a lower temperature and bake slightly longer; if necessary, add slightly less liquid. For baked items with a moist topping, bake the base first. Sprinkle it with almonds or breadcrumbs and then place the topping on top. Allow the baked item to cool down for 5 to 10 minutes after baking.
en Tested for you in our cooking studio the possible heating types and additional information. ~ "Meat thermometer" on page 17 Grilling flat items Flat pieces of poultry, meat and fish, such as steaks, drumsticks and burgers, can be cooked effectively using the "Grill" heating function. It is also excellent for toasting bread. Recommended setting values The table lists values for poultry, meat and fish, with default values for the weight.
Tested for you in our cooking studio Food Dish Pork, belly Cookware, uncovered Shelf po- Type of sition heating 2 ƒ Pork, gammon joint Cookware, uncovered 2 Chicken, whole Wire rack****** 2 Chicken portion, bone-in, 200-250 g each Cookware, uncovered 2 Duck, 2-3 kg Cookware, uncovered 2 Turkey, crown Wire rack 2 Turkey, thighs Cookware, uncovered 2 Turkey, whole, 4-8 kg Wire rack 1 Fish, braised, whole 300 g, e.g. trout Cookware, covered 2 Fish, braised, whole 1,5 kg, e.g.
en Tested for you in our cooking studio Food Dish Cookware, uncovered Shelf position 2 Type of heat- Temperature ing in °C 160 ‡ Beef, top side / top rump Time in minutes Lamb, leg (bone-in) Cookware, uncovered 2 160-170 25+15 Lamb, shoulder (bone-in) Cookware, uncovered 2 170-180 15+15 Lamb, shoulder (boned and rolled) Cookware, uncovered 2 160-170 20+15 Rack of lamb** Cookware, uncovered 2 170-190* 15+25 Pork, roast joint Cookware, uncovered 2 180-200 30+40 Pork, loin join
Tested for you in our cooking studio Food Dish Fish fillets/chops, each 150g Grilling white bread en Type of heat- Grill setting ing 240 ˆ Time in minutes Wire rack Shelf position 3 Wire rack 3 ˆ 3-5 ‚Ÿ£ 15-20 * Preheat ** Turn frequently Ready meals Baking on one level Here, you will find the ideal settings for preparing chilled and frozen meals.
en Tested for you in our cooking studio Baking in the top oven Food Dish Wire rack Shelf position 1 Type of heat- Temperature ing in °C 180-200 ƒ Pizza, frozen, thin base Oven chips, Croquettes, frozen Universal pan 1 Fish fingers, frozen Universal pan 1 Chicken nuggets, frozen Universal pan 1 ƒ ƒ ƒ Time in minutes 10-20 200-220 25-35 190-200 10-15 190-210* 20-25 * Preheat Desserts You can make your own soufflés and yogurt using your appliance.
Tested for you in our cooking studio Turn very juicy fruit and vegetables several times. After drying, remove the dried fruit and vegetables from the paper immediately. In the table, you will find settings for drying various foodstuffs. The temperature and drying time are dependent on the type, moisture, ripeness and thickness of the food to be dried. The longer you leave en the food to be dried, the better it will be preserved.
en Tested for you in our cooking studio Meal Accessory/cookware Vegetables, e.g. cucumbers 1-litre preserving jars Stone fruit, e.g. cherries, damsons 1-litre preserving jars Pomes, e.g. apples, strawberries 1-litre preserving jars Shelf posi- Type of tion heating 1 ‚ 1 1 Prove dough Your yeast dough will prove considerably more quickly using this heating function than at room temperature and will not dry out. Do not start the appliance if the cooking compartment is not completely cool.
Tested for you in our cooking studio en Dish Accessories/cookware Shelf posi- Heating tion function Temperature in °C Cake, moist Baking tray 2 50 Cooking time in mins 70-90 Cake, dry Baking tray 2 60 60-75 Keeping warm ■ You can keep cooked dishes warm using the top/ bottom heating type at 70 °C. This will avoid condensation developing, and means you will not have to wipe out the cooking compartment. Do not keep cooked dishes warm for longer than two hours.
en Tested for you in our cooking studio Food Dish 2 x 20 cm black cake tins Shelf posi- Type of tion heating 1 ƒ Temperature in °C / Grill setting 190 - 210 Time in minutes 60 - 70 Double-crusted apple pie Double-crusted apple pie, 2 levels 2 x 20 cm black cake tins 3+1 160 - 180 70 - 90 Grilling white bread Wire rack 4 5-6 Beef burger, 12 pieces Wire rack 4 ‚Ÿ£/‰ ‚Ÿ£/‰ ‚ ˆ ˆ 25 - 30*** * Preheat; do not use rapid heat-up function. ** Preheat 5 mins; do not use rapid heat-up function.
*9001462315* 9001462315 000901 en