
Installation Instruction

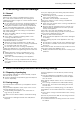
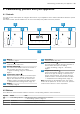
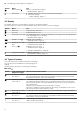
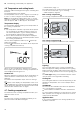
Table Of Contents
- Double oven
- en
- Table of contents
- 1 Safety
- 2 Preventing material damage
- 3 Environmental protection and saving energy
- 4 Familiarising yourself with your appliance
- 5 Accessories
- 6 Before using for the first time
- 7 Basic operation
- 8 Time-setting options
- 9 Meat thermometer
- 10 Childproof lock
- 11 Rapid heating
- 12 Sabbath mode
- 13 Basic settings
- 14 Home Connect
- 15 Cleaning and servicing
- 16 Cleaning functions
- 17 Shelf supports
- 18 Appliance door
- 18.1 Detaching the lower appliance door
- 18.2 Attaching the lower appliance door
- 18.3 Removing the door panes from the lower the appliance door
- 18.4 Installing the door panes for the lower the appliance door
- 18.5 Detaching the upper appliance door
- 18.6 Attaching the upper appliance door
- 18.7 Removing the door panes from the upper appliance door
- 18.8 Installing the door panes for the upper the appliance door
- 19 Troubleshooting
- 20 Disposal
- 21 Customer Service
- 22 Declaration of Conformity
- 23 How it works
- 24 Installation instructions

Familiarising yourself with your appliance en
7
4 Familiarising yourself with your appliance
4.1 Controls
You can use the control panel to configure all functions of your appliance and to obtain information about the operat-
ing status.
On certain models, specific details such as colour and shape may differ from those pictured.
1
5 7 83 4
2 6
1
Buttons
→"Buttons", Page7
2
Main oven
Controls for the main oven
3
Function selector
You can turn the function selector clockwise or
anti-clockwise from the zero setting.
→"Types of heating", Page8→"Functions",
Page9
4
Temperature selector
Use the temperature selector to set the temper-
ature for the type of heating or select the set-
ting for other functions. You can turn the tem-
perature selector clockwise and anti-clockwise.
→"Temperature and setting levels", Page10
5
Display
→"Display", Page8
6
Top oven
Controls for the top oven
7
Function selector
You can turn the function selector clockwise or
anti-clockwise from the zero setting.
→"Types of heating", Page8 →"Functions",
Page9
8
Temperature selector
Use the temperature selector to set the temper-
ature for the type of heating or select the set-
ting for other functions. You can turn the tem-
perature selector clockwise and anti-clockwise.
→"Temperature and setting levels", Page10
Note:Depending on the appliance type, the control
knobs can be pushed in. To click it in or out, push the
control knob in when it is in the off position.
4.2 Buttons
The buttons are touch-sensitive surfaces. Press the corresponding button to select a function.
Symbol Name Use
Time-setting options Sets the time, timer, cooking time or end time
→"Time-setting options", Page13
Left arrow Decreases the adjustment values
Right arrow Increases the adjustment values