Double oven [en] User manual and installation instructions U2ACM7HH0B 2
en Safety Table of contents USER MANUAL 1 Safety .................................................................... 2 2 Preventing material damage ............................... 5 3 Environmental protection and saving energy ....................................................................... 5 4 Familiarising yourself with your appliance ........ 6 5 Accessories........................................................ 10 6 Before using for the first time ...........................
Safety from the cooking compartment, heating elements and accessories. Opening the appliance door creates a draught. Greaseproof paper may come into contact with the heating element and catch fire. ▶ Never place greaseproof paper loosely over accessories when preheating the appliance and while cooking. ▶ Always cut greaseproof paper to size and use a plate or baking tin to hold it down. WARNING ‒ Risk of burns! The appliance and its parts that can be touched become hot during use.
en Safety Children may breathe in or swallow small parts, causing them to suffocate. ▶ Keep small parts away from children. ▶ Do not let children play with small parts. 1.5 Halogen bulb WARNING ‒ Risk of burns! The bulbs in the cooking compartment get very hot. There is still a risk of burning for some time after they have been switched off. ▶ Do not touch the glass cover. ▶ Avoid contact with your skin when cleaning.
Preventing material damage en 2 Preventing material damage 2.1 General ATTENTION! Objects on the cooking compartment floor at over 50 °C will cause heat to build up. The baking and roasting times will no longer be correct and the enamel will be damaged. ▶ Do not place any accessories, greaseproof paper or foil of any kind on the cooking compartment floor. ▶ Only place cookware on the cooking compartment floor if a temperature above 50 °C has been set.
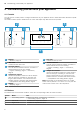
en Familiarising yourself with your appliance 4 Familiarising yourself with your appliance 4.1 Controls You can use the control panel to configure all functions of your appliance and to obtain information about the operating status. On certain models, specific details such as colour and shape may differ from those pictured.
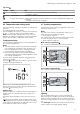
Familiarising yourself with your appliance Symbol Name Rapid heating Information en Use Starts or cancels rapid heating → "Rapid heating", Page 15 ¡ Displays the current cooking compartment temperature ¡ Set basic settings → "Basic settings", Page 16 4.3 Display The display shows the current settings, options or relevant information. The red bar above or below a symbol indicates which value is active or can be changed.
en Familiarising yourself with your appliance Symbol Type of heating and temperature range Bread baking setting 180 - 240 °C Pizza setting 30 - 275 °C Bottom heating 30 - 250 °C Full-surface grill 30 - 275 °C From 275 °C: Circo-roasting 30 - 250 °C Top/bottom heating 30 - 275 °C What it's used for/how it works For baking bread, bread rolls and baked goods that require high temperatures. Cook pizza or dishes that require a lot of heat from below.
Familiarising yourself with your appliance en Top oven Symbol Name Oven light Use Illuminate the cooking compartment without heating. → "Lighting", Page 9 Remote start Start and operate the appliance via the Home Connect app. → Page 17 Pyrolytic self-cleaning Set the cleaning function, which cleans the cooking compartment virtually independently. → "Pyrolytic self-cleaning ", Page 21 4.6 Temperature and setting levels 4.
en Accessories Cooling fan The cooling fan switches on automatically during operation. The hot air escapes above the door. ATTENTION! Do not cover the ventilation slot above the appliance door. The appliance overheats. ▶ Ensure that the ventilation slots are unobstructed. To ensure that the appliance cools down more quickly after operation, the cooling fan continues to run for a certain period afterwards. Appliance door If you open the appliance door during operation, the operation continues.
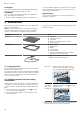
Before using for the first time Wire rack or baking tray Position the accessory so that its edge is behind the lug on the pullout rail. en 2. Insert the universal pan between the two guide rods for a shelf position. In so doing, the wire rack is on top of the upper guide rod. Wire rack on universal pan Note: The pull-out rails lock in place when they are fully pulled out. Gently push the pull-out rails back into the cooking compartment. 4.
en Basic operation 7 Basic operation 7.1 Switching on the appliance ▶ Turn the function selector to any position other than the "Off" position . a The appliance is switched on. 7.2 Switching off the appliance ▶ Turn the function selector to the "Off" position . a The appliance is switched off. 7.3 Setting the type of heating and temperature 1. Use the function selector to set the type of heating. 2. Use the temperature selector to set the temperature or grill setting.
Time-setting options 8.3 Setting the cooking time You can set a cooking time for operation of up to 23 hours 59 minutes. Requirements ¡ The type of heating and temperature or setting are set. ¡ Operation with the meat probe has not been set. ¡ Operation with Sabbath mode has not been set. 1. Press the button repeatedly until the symbol for the oven being switched on and the symbol are highlighted. 2. Use the or button to set the cooking time.
en Meat thermometer 9 Meat thermometer Cook with precision by inserting the meat probe into the food and setting a core temperature on the appliance. Once the set core temperature has been reached in the food, the appliance stops automatically. The meat probe can be used in the main oven . The time-setting options for cooking time and end time, as well as the cleaning function, cannot be used with the meat probe and the Sabbath setting at the same time.
Childproof lock en 10 Childproof lock You can secure your appliance to prevent children from accidentally switching it on or changing the settings. Note: You can go to the basic settings → Page 16 to specify whether you want the option to set the childproof lock. You can only use the childproof lock to lock the control elements of the appliance. In addition, you can lock the appliance door. → "Basic settings", Page 16 10.
en Basic settings 4. Once the time has elapsed, the display shows the time as zero. The appliance stops heating up and responds again as usual outside of Sabbath mode. Switch off the appliance. The appliance automatically switches off after approx. 10 to 20 minutes. ‒ 13 Basic settings You can configure the basic settings for your appliance to meet your needs. 13.1 Overview of the basic settings Here you can find an overview of the basic settings and factory settings.
Home Connect en ▶ Turn the function selector. a All changes are discarded and not saved. 13.3 Discarding changes to the basic settings 14 Home Connect This appliance is network-capable. Connecting your appliance to a mobile device lets you control its functions via the Home Connect app, adjust its basic settings and monitor its operating status. The Home Connect services are not available in every country.
en Home Connect Setting Selection or display Remote start – Deactivated – Manual1 – Permanent Software update – Update available – Start update Remote Diagnostics – Not authorised1 – Authorised 1 Explanation When remote start is deactivated, you can only view the operating status of the appliance in the app. For manual remote start, you must activate the remote start each time before you can start the appliance via the app.
Cleaning and servicing en 15 Cleaning and servicing To keep your appliance working efficiently for a long time, it is important to clean and maintain it carefully. ▶ Do not use cleaning products with a high alcohol content. ▶ Do not use hard scouring pads or cleaning sponges. 15.1 Cleaning products ▶ Do not use any special cleaners for cleaning the ap- In order to avoid damaging the various oven surfaces on the appliance, do not use unsuitable cleaning products.
en Cleaning and servicing Cooking compartment Area Enamel surfaces Suitable cleaning agents ¡ Hot soapy water ¡ Vinegar water ¡ Oven cleaner Glass cover for the oven light Rails ¡ Hot soapy water Pull-out system ¡ Hot soapy water AccessorIes ¡ Hot soapy water ¡ Oven cleaner ¡ Hot soapy water Meat probe ¡ Hot soapy water Information Soak any heavily soiled areas and use a brush or steel wool. Leave the appliance door open to dry the cooking compartment after cleaning it.
Cleaning functions en 16 Cleaning functions Use the cleaning functions to clean the appliance. 16.1 Pyrolytic self-cleaning The Pyrolytic self-cleaning cleaning function cleans the cooking compartment almost by itself. Use the cleaning function to clean the cooking compartment every two to three months. If required, you can use the cleaning function more frequently. The cleaning function requires approx. 2.5–4.8 kilowatt hours.
en Cleaning functions Setting the cleaning function for the top oven Ventilate the kitchen while the cleaning function is running. WARNING ‒ Risk of harm to health! The cleaning function heats up the cooking compartment to a very high temperature so that food left over from roasting, grilling and baking will burn off. This process releases vapours, which can irritate mucous membranes. ▶ Keep the kitchen well ventilated while the cleaning function is running. ▶ Do not remain in the room for long periods.
Shelf supports a Once the cleaning aid has run through to the end, an audible signal sounds. Note: If flashes in the display when the cleaning aid is switched on, this indicates that the cooking compartment has not completely cooled down. Switch off the appliance. Wait until the cooking compartment has cooled down and switch the cleaning aid back on. 2. Clean the smooth surfaces in the cooking compart- 3. 4.
en Shelf supports 1. Push on the tab marked PUSH behind the rail, and push the rail to the rear. 2. Keep the PUSH tab pushed back rail outwards 17.4 Attaching the pull-out rail Note: The pull-out rails only fit on the right or left. Make sure when you fit them that you can pull them out towards the front. 1. Insert the pull-out rail between the two bars. and swing the . 2. Push the retainer in between the lower and the upper bar. 3.
Appliance door 4. Pull the pull-out rail out as far as it will go and slide it back in. en 17.6 Attaching the rails in the top cooking compartment Notes ¡ The rails only fit on the right or left. ¡ For both shelf supports, ensure that the hooks that are attached at the rear are pointing upwards. 1. First, push the rail into the middle of the rear socket until the rail rests against the cooking compartment wall, and then push this back . 2.
en Appliance door 2. WARNING ‒ Risk of injury! When the hinges are not secured, they can snap shut with great force. ▶ Make sure that the locking levers are always either fully closed or (when detaching the oven door) fully open. Open the locking levers on the left- and right-hand hinges. 1. Note: Ensure that the appliance door slides onto the hinges without any resistance. If you feel any resistance, check whether you are sliding it in at the correct opening.
Appliance door Components inside the appliance door may have sharp edges. ▶ Wear protective gloves. 1. Open the appliance door slightly. 2. Push on the left- and right-hand side of the door cover from the outside 3. Remove the door cover until it is released. . en 10. WARNING ‒ Risk of injury! Scratched glass in the appliance door may develop into a crack. ▶ Do not use any harsh or abrasive cleaners or sharp metal scrapers to clean the glass on the oven door, as they may scratch the surface.
en Appliance door 5. Push the front pane to the appliance until the left- and right-hand hook is opposite the support 1. . WARNING ‒ Risk of injury! When the hinges are not secured, they can snap shut with great force. ▶ Make sure that the locking levers are always either fully closed or (when detaching the oven door) fully open. Open the locking levers on the left- and right-hand hinges. Locking levers opened 6. Push the front pane in at the bottom until you hear it click into place. 7.
Appliance door 1. Note: Ensure that the appliance door slides onto the hinges without any resistance. If you feel any resistance, check whether you are sliding it in at the correct opening. Slide the appliance door straight onto the two hinges. Slide the appliance door on as far as it will go. en 3. Close the appliance door fully . Grab hold of the appliance door with both hands (on the left and right) and pull it upwards and out . 4. Carefully place the appliance door on a level sur- face. 5.
en Appliance door 10. Pull out the upper intermediate pane down carefully on a flat surface. 11. Pull out the next intermediate pane down carefully on a flat surface. and set it 3. Push the intermediate pane upwards until it is in the retainer . and set it 4. Slide in a second intermediate pane. When doing 12. WARNING ‒ Risk of injury! Scratched glass in the appliance door may develop into a crack.
Appliance door 8. Secure the left- and right-hand spacers with one screw each. 9. Slide the inner pane in. In doing so, ensure that the inner pane is in the retainer . en 12. Attach the door cover and use a screw to secure it on the left- and right-hand sides . 13. Note: Ensure that the appliance door slides onto the hinges without any resistance. If you feel any resistance, check whether you are sliding it in at the correct opening. Slide the appliance door straight onto the two hinges.
en Troubleshooting 19 Troubleshooting You can rectify minor faults on your appliance yourself. Read the troubleshooting information before contacting after-sales service. This will avoid unnecessary costs. WARNING ‒ Risk of injury! Improper repairs are dangerous. ▶ Repairs to the appliance should only be carried out by trained specialist staff. ▶ If the appliance is defective, call Customer Service. WARNING ‒ Risk of electric shock! Incorrect repairs are dangerous.
Disposal Fault A message with appears in the display, e.g. - . HomeConnect is not working correctly. en Cause and troubleshooting Electronics fault 1. Press the button. ‒ If required, reset the time. a If the fault was a one-off, the error message disappears. 2. If the error message appears again, call the after-sales service. Quote the exact error message and the E no. of your appliance. → "Customer Service", Page 34 Different causes are possible. ▶ Go to www.home-connect.com. 19.
en Customer Service 21 Customer Service If you have any queries on use, are unable to rectify faults on the appliance yourself or if your appliance needs to be repaired, contact Customer Service. Function-relevant genuine spare parts according to the corresponding Ecodesign Order can be obtained from Customer Service for a period of at least 10 years from the date on which your appliance was placed on the market within the European Economic Area.
How it works en 23 How it works Here, you can find the ideal settings for various types of food as well as the best accessories and cookware. We have perfectly tailored these recommendations to your appliance. 23.1 Cooking tips Observe this information when preparing food. ¡ The temperature and cooking time depend on the amount of food and the recipe. Settings ranges are specified for this reason. Try using the lower values to start with.
en How it works 23.
How it works Food Accessories/cookware en Shelf pos- Type of Temperature Cooking ition heating in °C/grill time in mins setting 2 170-180 25+206 2 170-180 20+207 Pork, gammon joint Cookware without lid Chicken, whole Cookware without lid 1 Preheat the appliance. Do not use the rapid heating function. 2 Preheat the appliance. 3 Preheat the appliance for five minutes. Do not use the rapid heating function. 4 Preheat the appliance to 150 °C using HotAir. 5 Preheat the appliance for 20 minutes.
en How it works ¡ Universal pan: Level 3 Baking tray: Level 1 ¡ Baking tins/dishes on the wire rack First wire rack: Level 3 Second wire rack: Level 1 Shelf positions for baking on three levels: ¡ Baking tray: Level 4 Universal pan: Level 3 Baking tray: Level 1 Baking with two springform cake tins: Position baking tins/dishes either next to one another or offset on different shelves so that they are not directly one above the other in the cooking compartment.
Installation instructions en Recommended settings for grilling Selection for the top oven Food Accessories/cookware Shelf pos- Type of ition heating Browning toast Wire rack 3 Temperature in Cook°C ing time in mins 4-6 24 Installation instructions Observe this information when installing the appliance. 24.1 General installation instructions Follow these instructions before you start with the installation of the appliance.
en Installation instructions 24.2 Appliance dimensions 24.4 Corner installation You will find the dimensions of the appliance here Observe the installation dimensions and the installation instructions when installing in a corner. 24.3 Installation in a tall unit ¡ To ensure that the appliance door can be opened, you must take the minimum dimensions into consideration when installing in a corner. The dimension is dependent on the thickness of the unit front and the handle.
Installation instructions 24.6 Installing the appliance en 5. Centre the appliance. 1. Remove the transport locks on the right and left and then dispose of them. 2. The appliance must be transported by two people using the carry handles on the right and left, while securing the front of the appliance with one hand. 3. Place the appliance in the unit and fold the carry handles down. There must be an air gap of at least 5 mm between the appliance and adjacent unit fronts. 6.
Valid within Great Britain: Imported to Great Britain by BSH Home Appliances Ltd.