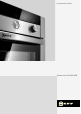
[en] Instruction manual Double oven U17M52.
Ú Table of contents e[nuoIrs]ctimanul Important safety information.....................................................4 Causes of damage .............................................................................5 Energy and environment tips ....................................................5 Saving energy......................................................................................5 Environmentally-friendly disposal.....................................................5 Your new appliance ...
: Important safety information Read these instructions carefully. Only then will you be able to operate your appliance safely and correctly. Retain the instruction manual and installation instructions for future use or for subsequent owners. This appliance is only intended to be fully fitted in a kitchen. Observe the special installation instructions. Check the appliance for damage after unpacking it. Do not connect the appliance if it has been damaged in transport.
Risk of injury! Scratched glass in the appliance door may develop into a crack. Do not use a glass scraper, sharp or abrasive cleaning aids or detergents. Risk of electric shock! ■ Incorrect repairs are dangerous. Repairs may only be carried out by one of our trained after-sales engineers. If the appliance is faulty, unplug the mains plug or switch off the fuse in the fuse box. Contact the after-sales service. ■ The cable insulation on electrical appliances may melt when touching hot parts of the appliance.
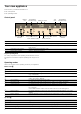
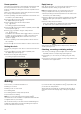
Your new appliance In this section, you will find information on ■ the control panel ■ the operating modes Control panel %RWWRP RYHQ 7HPSHUDWXUH LQGLFDWRU ODPS (OHFWURQLF FORFN 7RS RYHQ 7HPSHUDWXUH LQGLFDWRU ODPS 2SHUDWLQJ PRGH VHOHFWRU Control element KJ 7HPSHUDWXUH VHOHFWRU &ORFN IXQFWLRQ EXWWRQ 2SHUDWLQJ PRGH VHOHFWRU 5RWDU\ VHOHFWRU 7HPSHUDWXUH VHOHFWRU Use Clock function button Selects the required clock function or Rapid heat up (
Your accessories In this section, you will find information on ■ ■ Your accessories the correct way to insert the accessories into the cooking compartment ■ the shelf positions ■ the optional accessories D D Accessories The following accessories are included with your appliance: Wire rack for baking in baking tins, roasting in roasting dishes and grilling Shelf positions Universal pan, enamelled for baking moist cakes, roasting, grilling and collecting drops of liquid during cooking Note: When ba
Before using the appliance for the first time In this section, you can read about ■ How to set the clock after connecting up your appliance ■ How to clean your appliance before using it for the first time Setting the clock Note: When you press the KJ clock function button, you have 3 seconds to set the clock using the rotary selector. Should this have been insufficient for you, you can amend the clock time later. ‹:‹‹ flashes in the clock display. 1.
Clock function Use Q Timer You can use the minute minder as an egg timer or a kitchen timer. The appliance does not switch on or off automatically x Cooking time Bottom oven õ: The oven switches off automatically after a set cooking time (e.g. ‚:„‹ hours). y End of operation Bottom oven õ :The oven switches off automatically at a set time (e.g.: ‚ƒ:„‹ ). Preset operation Bottom oven õ: The oven switches on and off automatically. Cooking time and end of operation have been combined.
Preset operation Rapid heat up The bottom oven switches on automatically and switches off at the time preselected for the end of operation. To set this function, combine the cooking time and end of operation clock functions. With 3 CircoTherm®, you can shorten the heat up time if your selected temperature setting is higher than 100 °C. Bear in mind that food which spoils easily should not be left in the cooking compartment for too long. 1. Set the operating mode and temperature for the bottom oven.
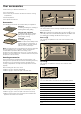
Baking on one level If you are baking on one level with 3 CircoTherm®, always place a round tin in the centre of the wire rack (figure A) and always place a loaf tin diagonally (figure B). $ Place the lower baking tin to the left (figure A) and the upper baking tin to the right (figure B) on the wire rack. % $ % Four baking tins on two levels If you are baking on one level with 3CircoTherm®, always place two round baking tins diagonally to each other on the wire rack (figure C).
Meal Jamtartes Swiss roll Tart Pies Biscuits Baiser Pavlova Fruit crumble Yorkshire pudding Vol au vents Quiche (White) bread Homemade pizza Jacket potatoes Oven Setting Level Temperature Time in minutes õ 3 1 180 - 190* 15 - 20 õ % 2 200 - 210* 15 - 20 ô % 1 190 - 210* 15 - 25 õ 3 1+3 180 - 190* 20 - 25 õ 3 1 180 - 190* 10 - 15 õ % 2 190 - 200* 10 - 15 ô % 1 180 - 190* 10 - 15 õ 3 1 160 - 170* 50 - 60 õ 0 1 180 - 190* 35 - 45 õ 3 1+3 160 - 170*
The details given in the table are guidelines and apply to the universal pan. If you are baking on more than one level, only use the 3 CircoTherm® operating mode. We recommend that you set the lower of the specified temperatures the first time. Lower temperatures will generally allow more even browning. Meal Oven Setting Observe the notes in the table about preheating.
The cake is too moist in the centre Set a slightly lower temperature. Note: Higher temperatures may not mean shorter baking times (cooked on the outside, but not on the inside). Select a longer baking time and allow the cake mixture to prove for longer. Add less liquid to the mixture. The cake collapses when you take it out of Use less liquid for the mixture. the oven Set a longer baking time or a slightly lower temperature.
Cooking time and temperature The cooking time and temperature depend on the size, height, type and quality of the food and the roasting dish. As a general rule: the larger the item, the lower the temperature and the longer the roasting time. The values for cooking time apply to 0.5 - 2 kg of food. For greater weights, reduce the temperature and increase the cooking time. For multiple pieces, apply the cooking time for the weight of the heaviest piece.
Casseroles Diced meat (beef, pork, lamb, chicken) Braising steak Chicken pieces (boned) Oven Setting Level Temperature in °C Time in minutes (per 500 g) õ 3 1 140 40 + 80 õ $ 1 140* 40 + 80 õ 3 1 140 45 + 80 õ $ 1 140* 45 + 80 õ 3 1 140 50 + 70 õ $ 1 140* 50 + 70 * Preheat oven Tips and tricks Crust too thick and/or roast too dry Reduce the temperature or shorten the roasting time. Check the shelf height.
Radiant grilling Grilling table For grilling large quantities of flat items, use the Full-surface + grill. The details given in the table are guidelines and apply to the enamelled universal pan with wire insert. The values may vary depending on the type and amount of items to be grilled. For grilling small quantities of flat items, use the (Centre-area grill. Place the food to be grilled in the centre of the wire rack. Using the Centre-area grill operating mode will save energy.
Meal Oven Setting Level Temperature in °C Time in minutes Roast joint õ 4 1 180 200 120 - 150*** Steaks, 1 - 2 cm thick õ + 3 270* 1st side: 9 - 12 Pork 2nd side: 6 - 8 ô + 2 270* 1st side: 9 - 12 2nd side: 6 - 8 Chops, 2 - 3 cm thick õ + 3 270 1st side: 10 - 13 2nd side: 8 - 12 ô + 2 270 1st side: 10 - 13 2nd side: 8 - 12 Burgers, 1 - 2 cm thick õ + 3 270 1st side: 10 - 12 2nd side: 6 - 8 ô + 2 270 1st side: 10 - 12 2nd side: 6 - 8 Sausages, 2 - 4 cm thick õ
Defrosting In this section, you can read about ■ how to defrost using 3 CircoTherm® ■ how to use the A Defrost operating mode Defrosting with CircoTherm® Frozen meals Temperature in °C Defrosting time in minutes Raw frozen products/ foods 50 30 - 90 Bread/Bread rolls (750 - 1,500 g) 50 30 - 60 Use 3 CircoTherm® to defrost and cook frozen products.
Cleaning the appliance exterior Appliance part/surface Cleaning agent/aid Stainless steel surfaces Apply commercially available washing-up liquid with a soft, damp cloth or chamois; dry with a soft cloth. Use cleaners for matted stainless steel if very dirty. Painted surfaces Apply commercially available washing-up liquid with a soft, damp cloth or chamois; dry with a soft cloth. Control panel Apply commercially available washing-up liquid with a soft, damp cloth or chamois; dry with a soft cloth.
Self-cleaning surfaces Removing and fitting the appliance door The rear wall, ceiling and side walls of the cooking compartment are coated with self-cleaning enamel. This coating absorbs and disintegrates splashes from baking and roasting while the oven is in operation. You can remove the appliance door to clean it more thoroughly. Large splashes only disappear after the oven has been used several times. Discolouration on the self-cleaning surfaces does not affect the self-cleaning function.
Cleaning the door panels Fitting the intermediate panel To facilitate cleaning, you can remove the inner door panels from the appliance door. Note: During installation, make sure that the lettering "top right" is upside down at the bottom left. : Risk of injury! Insert the intermediate panel towards the back as far as it will go. The components inside the appliance door may have sharp edges. Take care not to cut yourself. Wear protective gloves.
3. Clean the hook-in rack with washing-up liquid and a sponge or brush. 4. Align the hook-in rack with the kink (a) facing upwards, so that the shelf positions match. 5. Insert the hook-in rack at the rear as far as it will go. 6. Push the hook-in rack towards the rear. 7. Insert the hook-in rack at the front as far as it will go. 8. Push the hook-in rack downwards. Faults and repairs It is not always necessary to call the after-sales service. Sometimes, you can find a remedy yourself.
Changing the door seal If the door seal is defective, it must be replaced. Replacement seals for your appliance can be obtained from the after-sales service. $ % The door seal is attached in four places (figure A). When replacing it, disconnect and attach the hooks at all four points (figure B). Check again to ensure that the seal is seated correctly in the corners in particular. After-sales service Our after-sales service is there for you if your appliance needs to be repaired.
Test dishes These tables have been produced for test institutes to facilitate the inspection and testing of the various appliances. Please note the information in the tables about preheating. The table values do not include Rapid heat up. Test dishes tested to standard EN 50304/EN 60350 (2009) and IEC 60350. Note: For baking, use the lower of the temperatures indicated first.
Constructa Neff Vertriebs-GmbH Carl-Wery-Straße 34 D-81739 München *9000724853* 9000724853 940313