Induction hob [en] User manual T6..S6...
en Safety Futher information and explanations are available online: Table of contents 1 Safety 1 Safety .................................................................... 2 Observe the following safety instructions. 2 Avoiding material damage................................... 4 3 Environmental protection and saving energy ....................................................................... 5 4 Suitable cookware................................................
Safety is safe to use this induction hob as intended. If these conditions are satisfied, and if, in addition, non-metal cooking utensils and cookware with non-metal handles are used, it is safe to use this induction hob as intended. 1.
en Avoiding material damage If metallic objects come into contact with the fan that is located on the underside of the hob, this may cause an electric shock. ▶ Do not store long, pointed metallic objects in the drawers below the hob. WARNING ‒ Risk of injury! Saucepans may suddenly jump due to liquid between the saucepan base and the hotplate. ▶ Always keep hotplates and saucepan bases dry. ▶ Never use icy-cold cookware that has been in the freezer.
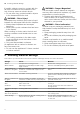
Environmental protection and saving energy Damage Overheating Scratches Cause Hot cookware on the control panel or on the frame. Material residue between the hob and the rotary knob TwistPad®. en Measure Never place hot cookware on these areas. Keep the rotary knob TwistPad® contact area clean. ATTENTION! A fan is located on the underside of this hob. ▶ If a drawer is located on the underside of the hob, do not store any small or pointed objects, paper or tea towels in it.
en Suitable cookware Cookware Materials Recommended cook- Stainless steel cookware in a sandwich ware design that distributes the heat well. Properties This cookware distributes the heat evenly, heats up quickly, and ensures that it can be detected easily. Ferromagnetic cookware made of enamelled This cookware heats up quickly and ensures steel, cast iron or special induction cookware that it can be detected easily. made of stainless steel. Suitable The base is not fully ferromagnetic.
Familiarising yourself with your appliance en 5 Familiarising yourself with your appliance 5.1 Cooking with induction In comparison to conventional hobs, induction technology brings with it a series of changes and has a number of benefits such as time savings when cooking and frying, energy savings as well as greater ease of cleaning and care. It also offers improved heat control as the heat is generated directly in the cookware. 5.
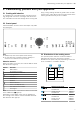
en TwistPad® 5.4 Cooking zone 5.5 Residual heat indicator Before you start cooking, check whether the size of the cookware fits the cooking zone that you want to use for cooking: The hob has a residual heat indicator for each cooking zone. Do not touch the cooking zone if the residual heat indicator is lit. Area Display / Cooking zone type Single-circuit cooking zone Flex Zone → "FlexZone", Page 10 Extended FlexZone → "Extended FlexZone", Page 11 Meaning The cooking zone is hot.
Basic operation 7.3 Setting the power level in the cooking zones The cooking zone has 17 power levels, which are displayed from to with intermediate values. Select the best power level for the food and the planned cooking process. 1. Select the cooking zone. To do this, touch TwistPad® at the level for the required hob. a lights up brighter. 2. Turn the TwistPad® until the required power level lights up in the display. a The power level has been set.
en FlexZone Poultry breast, frozen Rissoles (3 cm thick) Hamburgers (2 cm thick) Fish and fish fillet, plain Fish and fish fillet, breaded Fish, breaded and frozen, e.g. fish fingers Prawns and scampi Sautéing fresh vegetables and mushrooms Stir-fry, vegetables, meat cut in strips Asian-style Frozen dishes, e.g. stir-fries Pancakes, cooked one after the other 1 Without lid 2 Preheat to power level 8 - 8. 5-6 4. - 5.
Extended FlexZone 2. Press . a lights up. The FlexZone is connected. Note: If you move or lift the cookware from an active connected cooking zone, an automatic search starts. Each item of cookware that is found within the cooking zone during this search is heated at the previously selected power level. en 8.3 FlexZone disconnecting ▶ Touch . a The cooking zones are separated and work independently of each other.
en Time-setting options 10.2 Activating PowerMove Requirement: Only place one item of cookware on a flexible zone. 1. Select one of the two cooking zones in the flexible zone. 2. Press . a and the power level for the area in which the container is located light up. a The function is switched on. Note: You can change the power levels during cooking. 10.3 Deactivating PowerMove ▶ Touching a goes out. a The function has been deactivated.
PowerBoost en 12 PowerBoost You can use this function to heat up large volumes of water more quickly than with . This function is available for all cooking zones, provided the other cooking zone in the same group is not in use. 1. Select the cooking zone. 2. Touch . The and displays light up. a The function is switched on. Note: You can also switch on this function when cooking with a connected FlexZone. 12.2 Switching off PowerBoost 1. Select the cooking zone. 2. Touch .
en PowerTransfer 15 PowerTransfer You can use this function to transfer the power level and the programmed cooking time from one cooking zone to another. 15.1 PowerTransfer Requirement: Move the cookware to a cooking zone which is not switched on, which you have not yet preset and on which no other cookware has been placed. 1. Move the cookware. 2. Select the new cooking zone to implement the set- tings. The appliance sets the power level for the original cooking zone to .
Frying Sensor 16.4 Switching on the Frying Sensor Cookware 1. Place empty cookware on the cooking zone. 2. Select the cooking zone and touch . 3. Within the next 5 seconds, use the rotary knob TwistPad® to select the required temperature level. a The functions starts. flashes until the set target temperature is reached. a Once the target temperature has been reached, a signal tone sounds and stops flashing. 4. Add the frying fat and then the food to the frying pan.
en Childproof lock 17 Childproof lock The hob is equipped with a childproof lock. This prevents children from switching on the hob. 17.1 Switching on Childproof lock Requirement: The hob must be switched off. ▶ Touch and hold for 4 seconds. a The display lights up for 10 seconds. a The hob is locked. 17.2 Switching off Childproof lock ▶ Touch and hold for 4 seconds. a The lock is released. 17.
Basic settings en Display 1 Setting Automatic switch-off of the cooking zones. Value – switched off.1 - - minutes until the appliance switches off automatically. Duration of the timer end signal tone – 10 seconds – 30 seconds - 1 minute 1. Power limitation - Switched off. Maximum power of the hob 1. Enables the total power of the hob to be lim - 1000 W. Lowest power setting. ited, if necessary, based on the conditions of . - 1500 W.
en Cookware test 21 Cookware test The quality of the cookware has a major influence on the speed and the result of the cooking process. You can use this function to test the quality of the cookware. Before the test, ensure that the size of the cookware base corresponds to the size of the cooking zone being used. Access is via the basic settings. → Page 16 21.
Home Connect en 22.2 Overview of the Home Connect settings You can adjust the settings and network settings for Home Connect by going to your hob's basic settings.
en Hob-based hood control ¡ We recommend that you install security updates as soon as possible. 22.5 Remote diagnostics Customer Service can use Remote Diagnostics to access your appliance if you contact them, have your appliance connected to the Home Connect server and if Remote Diagnostics is available in the country in which you are using the appliance.
Cleaning and servicing en 23.3 Overview of the hood control settings In the basic settings for your hob, you can adjust the behaviour of your extractor hood depending on whether the hob or individual cooking zones are switched on or off. Setting 1 Selection Connection between hob and extractor hood – Not connected/disconnected – No function – Connected to WLAN home network (Wi-Fi) – Connected to WLAN and extractor hood Automatic fan start-up – Switched off.
en Troubleshooting 24.4 Cleaning TwistPad® To clean the twist knob, use lukewarm water with a little washing-up liquid. Do not use abrasive or corrosive cleaning agents. Do not clean it in the dishwasher or immerse it in water, as this may damage it. 25 Troubleshooting You can rectify minor faults on your appliance yourself. Read the troubleshooting information before contacting after-sales service. This will avoid unnecessary costs. WARNING ‒ Risk of injury! Improper repairs are dangerous.
Disposal Fault Cause and troubleshooting Extended FlexZone does not switch on. ▶ Touch any sensor to confirm the fault display. You can use the remaining cooking zones to continue cooking. Contact the technical after-sales service. The cooking zone has been operating continuously for an extended period. ▶ Individual safety switch-off is switched on. Touch any button to switch off the display so that you can set the cooking zone again.
en Customer Service MT NL AT SE NO CH 5 GHz WLAN (Wi-Fi): For indoor use only. PL TR AL BA MD 5 GHz WLAN (Wi-Fi): For indoor use only. ME PT IS RO UK (NI) MK RS SI SK UK FI UA 28 Customer Service If you have any queries on use, are unable to rectify faults on the appliance yourself or if your appliance needs to be repaired, contact Customer Service.
Test dishes en 29.5 Cooking rice pudding with the lid on 29.9 Preparing crêpes Milk temperature: 7 °C 1. Heat the milk until it starts to rise up. Heat up without a lid. Stir after heating for 10 min. 2. Set the recommended power level and add rice, sugar and salt to the milk. The cooking time, including heating up, is approx. 45 minutes. ¡ 16 cm saucepan, ingredients: 190 g short-grain rice, 90 g sugar, 750 ml milk with 3.5% fat content and 1 g salt – Heating up: Duration approx. 5 min. 30 sec.
Valid within Great Britain: Imported to Great Britain by BSH Home Appliances Ltd.