T59.F6...
: : : : : : ,(& 2 Ø = cm
en Table of contents [ en] I NSTRUCTI ON MANUAL 8 Intended use . . . . . . . . . . . . . . . . . . . . . . . . . . . . . 5 ( Important safety information . . . . . . . . . . . . . . . 6 ] Causes of damage . . . . . . . . . . . . . . . . . . . . . . . . 7 Overview . . . . . . . . . . . . . . . . . . . . . . . . . . . . . . . . . . . 7 7 Environmental protection . . . . . . . . . . . . . . . . . . 8 Energy-saving advice . . . . . . . . . . . . . . . . . . . . . . . . . .
en 4 Customer service . . . . . . . . . . . . . . . . . . . . . . . . 40 E number and FD number . . . . . . . . . . . . . . . . . . . . . 40 E Test dishes . . . . . . . . . . . . . . . . . . . . . . . . . . . . . 41 Produktinfo Additional information on products, accessories, replacement parts and services can be found at www.neff-international.com and in the online shop www.neff-eshop.
Intended use 8Intended use Read these instructions carefully. Please keep the instruction and installation manual, as well as the appliance certificate, in a safe place for later use or for subsequent owners. Check the appliance after removing it from the packaging. If it has suffered any damage in transport, do not connect the appliance, contact the Technical Assistance Service and provide written notification of the damage caused, otherwise you will lose your right to any type of compensation.
en Important safety information (Important safety information I mpor t ant saf et y i nf or mat i on :Warning – Risk of fire! Hot oil and fat can ignite very quickly. Never leave hot fat or oil unattended. Never use water to put out burning oil or fat. Switch off the hotplate. Extinguish flames carefully using a lid, fire blanket or something similar. Risk of fire! ■ The hotplates become very hot. Never place combustible items on the hob. Never place objects on the hob.
Causes of damage en ]Causes of damage Caution! Rough pan bases may scratch the hob. ■ Avoid leaving empty pots and pans on the hotplate. Doing so may cause damage. ■ Do not place hot pans on the control panel, the indicator area, or the hob frame. Doing so may cause damage. ■ Hard or pointed objects dropped on the hob may damage it. ■ Aluminium foil and plastic containers will melt if placed on the hotplate while it is hot. The use of laminated sheeting is not recommended on the hob.
en Environmental protection 7Environmental protection In this section, you can find information about saving energy and disposing of the appliance. Envi r onment al pr ot ect i on Energy-saving advice ■ ■ ■ ■ ■ ■ Always use the correct lid for each pan. Cooking without a lid uses a lot more energy. Use a glass lid to provide visibility and avoid having to lift the lid. Use pans with flat bases. Bases that are not flat use a lot more energy.
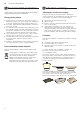
Induction cooking Some induction cookware does not have a fully ferromagnetic base: ■ ■ If the base of the cookware is only partially ferromagnetic, only the area that is ferromagnetic will heat up. This may mean that heat will not be distributed evenly. The non-ferromagnetic area may not heat up to a sufficient temperature for cooking. The ferromagnetic area will also be reduced if the material from which the base of the cookware is made contains aluminium, for example.
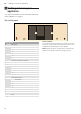
en Getting to know your appliance *Getting to know your appliance You can find information on the dimensions and power of the hotplates in~ Page 2 Get i ng t o know your ap l i ance The control panel Touch controls Main switch # 0 Main menu 1 Childproof lock 4 ! 0 Basic settings Info menu Time menu œ Stopwatch function . Timer z p/g Lock the control panel for cleaning 0...
Getting to know your appliance en The hotplates Hotplates Simple hotplate Û Þ á Use cookware that is a suitable size Middle simple hotplate Use cookware that is a suitable size Flexible cooking zone See section ~ "Flex Zone" Only use cookware that is suitable for induction cooking; see section ~ "Induction cooking" Overview of the menus The intuitive menu structure helps you to find your way around the control panel of your hob. You can find out more about the most important menus in this section.
Operating the appliance en Cooking modes menu The hob has a number of different cooking modes. To access the cooking modes menu, touch the ¢ symbol in the status bar. Cooking modes Power level ~ Û Cooking assistant Frying sensor | PowerMove £ Function Allows you to select the heat setting for the cooking zone. A preset list of dishes for frying and boiling. The hob automatically detects the temperature as frying progresses.
Operating the appliance Selecting a hotplate and heat setting The hob must be switched on. 1. Touch the symbol for the hotplate you require to select the hotplate. The settings area for the hotplate you have selected will appear on the display panel. en To change the heat setting: Select the hotplate and set the new heat setting in the settings area. Switching off the hotplate Select the hotplate and set the heat setting to 0 in the settings area.
en Operating the appliance Cooking table The table shows which heat setting is suitable for each type of food. The cooking time may vary depending on the type, weight, thickness and quality of the food. Heat setting Cooking time (mins) Melting Chocolate coating Butter, honey, gelatine 1 - 1.5 1-2 - Heating and keeping warm Stew, e.g. lentil stew Milk* Heating sausages in water* 1.5 - 2 1.5 - 2.
Operating the appliance Roasting/frying with little oil* Escalope, plain or breaded Escalope, frozen Chop, plain or breaded** Steak (3 cm thick) Poultry breast (2 cm thick)** Poultry breast, frozen** Rissoles (3 cm thick)** Hamburgers (2 cm thick)** Fish and fish fillet, plain Fish and fish fillet, breaded Fish, breaded and frozen, e.g.
en Flex Zone |Flex Zone Recommendations If the hob has more than one flexible cooking zone, place the cookware on top so that it covers only one of the flexible cooking zones. Otherwise, the hotplates will not be activated as intended and the cooking result will not be satisfactory. You can use each flex zone as a single hotplate or as two independent hotplates, as required. It consists of four inductors that work independently of each other.
Move function uMove function This function activates the entire flexible cooking zone, which is divided into three cooking areas and which has preset heat settings. Only use one item of cookware. The size of the cooking area depends on the cookware used and whether it is positioned correctly. Move f unct i on Cooking areas en Activation 1. Select a hotplate from the flexible cooking zone. 2. Touch the ¢ symbol in the hotplate's settings area. 3. Select the | PowerMove option.
en Time-setting options OTime-setting options Ti me- set i ng opt i ons Your hob has three timer functions: ■ ■ ■ Programming the cooking time Kitchen timer Stopwatch function Programming the cooking time The hotplate automatically switches off after the time that is set has elapsed. Setting procedure: 1. 2. 3. 4. Select the cooking zone and required power setting. Touch x Cooking time. Set the cooking time you require. Touch Start.
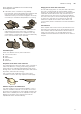
PowerBoost function en vPowerBoost function xShortBoost function The PowerBoost function enables you to heat up large quantities of water faster than when using heat setting 9. This function can always be activated for a hotplate, provided the other hotplate in the same group is not in use (see illustration). The ShortBoost function enables you to heat cookware faster than when using heat setting 9. After deactivating the function, select the appropriate heat setting for your food.
en Keep warm function Deactivating Select the hotplate and set a different heat setting in the settings area. This function has now been deactivated. Note: In certain circumstances, the ShortBoost function can switch itself off automatically in order to protect the electronic elements inside the hob. zKeep warm function This function is suitable for melting chocolate or butter and for keeping food warm. Ke p war m f unct i on Activation 1. Select a hotplate. 2. Select the « symbol in the settings area.
Transferring settings en sTransferring settings cFrying Sensor You can use this function to transfer the heat setting and the programmed cooking time from one hotplate to another. To transfer the settings, move the cookware from the cooking zone that is switched on to another cooking zone. This function can be used to fry food while maintaining the suitable frying pan temperature. The cooking zones that have this function are identified by the roasting function symbol.
en Frying Sensor Temperature settings Temperature setting 1 Very low 2 Low 3 Medium - low 4 Medium - high 5 High Suitable for Preparing and reducing sauces, sweating vegetables and frying food in extra virgin olive oil, butter or margarine. Frying food using extra virgin olive oil, butter or margarine, e.g. omelettes. Frying fish and Thick food, e.g. meatballs and sausages. Frying steaks, medium or well-done, frozen, breaded and fine foods, e.g. escalope, fresh ragout and vegetables.
Frying Sensor en Temperature setting 3 Total frying time after the signal tone sounds (min) 8 - 20 Fish fillet, plain1 4 10 - 20 Fish fillet, breaded1 3 10 - 20 Prawns1 4 4-8 Scampi1 4 4-8 Frying fish, whole1 3 10 - 20 Fried eggs in butter4 2 2-6 Fried eggs in oil2 4 2-6 Scrambled eggs3 2 4-9 Omelettes5 2 3-6 Pancakes5 5 1,5 - 2,5 French toast5 3 4-8 Shredded raisin pancake5 3 10 - 15 Garlic3 2 2 - 10 Glazed onion3 2 2 - 10 Onion rings3 3 5 - 10 Courgette1 3
en Frying Sensor Temperature setting Total frying time after the signal tone sounds (min) Tomato sauce with vegetables3 1 25 - 35 Béchamel sauce3 1 10 - 20 Cheese sauce3 1 10 - 20 Reducing sauces3 1 25 - 35 Sweet sauces3 1 15 - 25 Escalope1 4 15 - 20 Cordon bleu1 4 10 - 30 Poultry breast1 4 10 - 30 Chicken nuggets1 4 10 - 15 Gyros3 4 10 - 15 Kebab3 4 10 - 15 Fish fillet, plain1 3 10 - 20 Fish fillet, breaded1 3 10 - 20 Fish fingers1 4 8 - 12 French fries3 5 4-6
Childproof lock Setting procedure Select the appropriate temperature setting from the table. Place the empty frying pan on the hotplate. en AChildproof lock You can use the childproof lock to prevent children from switching on the hob. Chi l dpr o f l ock 1. Select a hotplate. 2. Touch ¢ and select the Û FryingSensor option. 3. Select the required temperature setting. The function has now been activated.
en Wipe protection kWipe protection Wiping over the control panel while the hob is switched on may alter the settings. To avoid doing this, you can use the hob's "Lock control panel for cleaning" function. Wipe pr ot ect i on Activation Touch the z sensor panel. An audible signal will sound. The control panel will remain locked for 30 seconds. You will now be able to clean the surface of the control panel without altering the settings.
Basic settings en QBasic settings Basi c set i ngs Settings Language Home Connect Ventilation control Signal tones Signal duration Button tone Control panel brightness FlexZone PowerMove levels Childproof lock EasyAdjust Brand logo Restore the settings Max. power consumption Energy consumption Cookware test Appliance info. Factory settings -------- Description and options You can change the language of the appliance.
en Energy consumption indicator [Energy consumption indicator This function indicates the total amount of energy consumed by this hob the last time it was used for cooking. Once switched off, the energy consumption in kWh will be displayed for 10 seconds. You can find out how to switch this function on in the section on ~ "Basic settings" Ener gy consumpt i on i ndi cat or tCookware check This function can be used to check the speed and quality of the cooking process depending on the cookware.
Home Connect oHome Connect Note: Home Connect is due to be introduced for NEFF from the end of 2018. Home Con ect This appliance is WLAN-enabled and settings can be sent to the appliance via a mobile device. If the appliance is not connected to the home network, the appliance functions in the same way as a hob with no network connection. The hob can always be operated via the control panel. The availability of the Home Connect function depends on the availability of Home Connect services in your country.
en Home Connect Manual registration in the home network 1. Touch the 0 sensor and then select option 4 MyProfile, to open the basic settings. 2. Touch the "Home Connect" setting. 3. Touch "Use assistant to configure settings" to launch the Home Connect assistant. You will be asked to press the WPS button on your router. 4. Select "WPS not supported". $XWRPDWLF QHWZRUN ORJLQ 7. Follow the prompt in the app and enter the name and password for your home network (Wi-Fi).
Home Connect en Home Connect settings You can adjust Home Connect to suit your requirements at any time. In the basic settings for your hob, navigate to the Home Connect settings to display network and appliance information. Setting Use assistant to configure settings Connect to app Configure settings via app Wi-Fi Disconnect Appliance information Description and options The hob can be set up to automatically log into your home network, or you can do this manually.
en Home Connect Deactivating WLAN If Wi-Fi has been activated, you can use the Home Connect functions. Note: In networked standby mode, your appliance requires a maximum of 2 W. 1. Touch the option 2. Touch 3. Touch 4. Touch 0 sensor and then select 4 MyProfile, to open the basic settings. the "Home Connect" setting. "Wi-Fi". "Off". :L )L Connecting to the network Con ect i ng t o t he net wor k 1. Touch the 0 sensor and then select option 4 MyProfile, to open the basic settings. 2.
Home Connect Settings via app Using the Home Connect app, you can easily access the basic settings for your hob and send settings for the cooking zones to the hob. Notes Before you can change the basic settings, the hob must be switched off. ■ If the appliance is being operated by means of the controls on the appliance itself, this mode of operation always has priority. During this time, it is not possible to operate the appliance using the Home Connect app.
en Hood connection Declaration of Conformity Constructa Neff Vertriebs-GmbH hereby declares that the appliance with functionality meets the basic requirements and other relevant provisions of Directive 2014/53/EU. A detailed RED Declaration of Conformity can be found online at www.neff-international.com among the additional documents on the product page for your appliance. eHood connection You can connect this appliance to a compatible extractor hood and control the functions of the hood via your hob.
Hood connection Setting up Resetting connection Both the hob and the extractor hood must be switched on before you can connect them to each other. To do this, refer to the section entitled "Connecting to the hob" in the instruction manual for your extractor hood. You can reset the saved connections to your home network and to the extractor hood at any time. Connecting directly 1. Touch the 0 sensor and then select option 4 MyProfile, to open the basic settings. 2. Touch the "Hood controls" setting. 3.
en Hood connection Hood control settings You can adapt the hood controls on the hob to suit your needs at any time. Ho d cont r ol set i ngs Note: The settings will only be displayed if the appliance is connected to an extractor hood.
Cleaning en DCleaning Suitable maintenance and cleaning products can be purchased from the after-sales service or in our e-Shop. Cl eani ng Hob Cleaning Always clean the hob after cooking. This will prevent food deposits from becoming burned on. Only clean the hob after the residual heat indicator has gone out. Clean the hob with a damp dish cloth and dry it with a cloth or towel to prevent limescale build-up. Only use cleaning agents that are suitable for this type of hob.
en Frequently Asked Questions (FAQ) {Frequently Asked Questions (FAQ) Fr equent l y Asked Quest i ons ( FAQ) Use No image appears on the display panel. The brightness may not be set correctly. Look at the display panel from above and set the brightness in the basic settings. Further information on the settings can be found in the section entitled ~ "Basic settings". Noises Why I can hear noises while I'm cooking? Noises may be generated while using the hob depending on the base material of the cookware.
Trouble shooting en Cleaning How do I clean the hob? Using a special glass-ceramic cleaning agent produces the best results. We advise against using harsh or abrasive cleaning agents, dishwater detergent (concentrated) or scouring pads. You can find more information on cleaning and caring for your hob in the section on ~ "Cleaning" 3Trouble shooting Faults often have simple explanations. Please read the information and tips provided below before calling the after-sales service.
en Customer service Problem Solution The operating voltage is incorrect/outside of the normal oper- Contact your energy supplier. ating range. “Š‹‹‹/“Š‹‚‹ The hob is not connected properly —…‹‹ Disconnect the hob from the power supply. Check that it has been connected as shown in the circuit diagram. Demo mode If the 6 symbol is shown on the display, demo mode is active. The appliance does not heat up in demo mode. Disconnect the appliance from the power supply.
Test dishes en ETest dishes This table has been produced for test institutes to facilitate the testing of our appliances. The data in the table refer to our Schulte-Ufer cookware accessories (4-piece cooking set for induction hob Z9442X0) with the following dimensions: Test di shes ■ ■ ■ ■ Saucepan: 16 cm Ø, 1.2 l for 14.5 cm Ø hotplates Pot: 16 cm Ø, 1.7 l for 14.5 cm Ø hotplates Pot: 22 cm Ø, 4.
en Test dishes Test dishes Preheating Heat set- Cooking time Cookware Lid ting (min:sec) Cooking rice pudding Rice pudding, cooked with the lid on Temperature of the milk: 7 ºC Heat the milk until it starts to rise up. Set the recommended heat setting and add rice, sugar and salt to the milk. The cooking time, including preheating, is approx. 45 minutes. Ingredients: 190 g short-grain rice, 90 g sugar, 750 ml milk (3.
&RQVWUXFWD 1HII 9HUWULHEV *PE+ &DUO :HU\ 6WUDH ' 0QFKHQ 5HJLVWHU \RXU SURGXFW RQOLQH ZZZ QHII LQWHUQDWLRQDO FRP *9001294664* 9001294664 970622(10) en