
Operation Manual
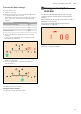
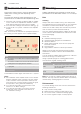
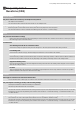
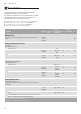
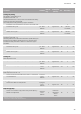


Table Of Contents
- [en] Instruction manual
- Table of contents
- [en] Instruction manual
- ( Important safety information 5
- ] Causes of damage 6
- 7 Environmental protection 7
- f Induction cooking 7
- * Getting to know your appliance 9
- 1 Operating the appliance 10
- w CombiZone function 13
- u Move function 13
- O Time-setting options 14
- v PowerBoost function 15
- z Keep warm function 16
- A Childproof lock 16
- k Wipe protection 17
- b Automatic safety cut-out 17
- Q Basic settings 18
- [ Energy consumption indicator 19
- t Cookware check 20
- D Cleaning 20
- { Frequently Asked Questions (FAQ) 21
- 3 Trouble shooting 22
- 4 Customer service 23
- E Test dishes 24
- Additional information on products, accessories, replacement parts and services can be found at www.neff-international.com and in the online shop www.neff-eshop.com
- 8 Intended use
- Intended use
- Read these instructions carefully. Please keep the instruction and installation manual, as well as the appliance certificate, in a safe place for later use or for subsequent owners.
- Check the appliance after removing it from the packaging. If it has suffered any damage in transport, do not connect the appliance, contact the Technical Assistance Service and provide written notification of the damage caused, otherwise you will los...
- This appliance must be installed according to the installation instructions included.
- This appliance is intended for private domestic use and the household environment only. The appliance must only be used for the preparation of food and beverages. The cooking process must be supervised. A short cooking process must be supervised with...
- This appliance is intended for use up to a maximum height of 4000 metres above sea level.
- Do not use covers. These can cause accidents, due to overheating, catching fire or materials shattering, for example.
- Do not use inappropriate child safety shields or hob guards. These can cause accidents.
- This appliance is not intended for operation with an external clock timer or a remote control.
- This appliance may be used by children over the age of 8 years old and by persons with reduced physical, sensory or mental capabilities or by persons with a lack of experience or knowledge if they are supervised or are instructed by a person responsi...
- Children must not play with, on, or around the appliance. Children must not clean the appliance or carry out general maintenance unless they are at least 8 years old and are being supervised.
- Keep children below the age of 8 years old at a safe distance from the appliance and power cable.
- We advise that you exercise caution using or standing near an induction hob while it is in operation, if you wear a pacemaker or a similar medical device. Consult your doctor or the device manufacturer concenring its conformity or any possible incomp...
- ( Important safety information
- ] Causes of damage
- 7 Environmental protection
- f Induction cooking
- Induction cooking
- Advantages of induction cooking
- Induction cooking is very different from traditional cooking methods, as heat builds up directly in the item of cookware. This offers numerous advantages:
- Only use ferromagnetic cookware for induction cooking, such as:
- To check whether your cookware is suitable for induction cooking, refer to the section on ~ "Cookware check".
- To achieve a good cooking result, the ferromagnetic area on the base of the pan should match the size of the hotplate. If a hotplate does not detect an item of cookware, try placing it on another hotplate with a smaller diameter.
- Some induction cookware does not have a fully ferromagnetic base:
- Never use diffuser hobs or pans made from:
- The material(s) from which the base of the cookware is made can affect the cooking result. Using pots and pans made from materials that distribute heat evenly through them, such as stainless-steel pans with a three- layer base, saves time and energy.
- Use cookware with a flat base; if the base of the cookware is uneven, this may impair the heat supply.
- If no pan is placed on the selected hotplate, or if it is made of unsuitable material or is not the correct size, the power level displayed on the hotplate indicator will flash. Place a suitable pan on the hotplate to stop the flashing. If this takes...
- Do not heat empty pans, nor use pans with a thin base. The hob is equipped with an internal safety system. However, an empty pan may heat up so quickly that the "automatic switch off" function may not have time to react and the pan may reach very hig...
- Each hotplate has a lower limit for pan detection. This depends on the diameter of the ferromagnetic area of the cookware and the material from which its base is made. For this reason, you should always use the hotplate that best matches the diameter...
- * Getting to know your appliance
- Getting to know your appliance
- You can find information on the dimensions and power of the hotplates in~ Page 2
- Touching a symbol activates the respective function.
- The hob has a residual heat indicator for each hotplate. This indicates that a hotplate is still hot. Do not touch a hotplate while the residual heat indicator is lit up.
- The following are shown depending on the amount of residual heat:
- If you remove the cookware from the hotplate during cooking, the residual heat indicator and the selected heat setting will flash alternately.
- When the hotplate is switched off, the residual heat indicator will light up. Even after the hob has been switched off, the residual heat indicator will stay lit for as long as the hotplate is still warm.
- 1 Operating the appliance
- Operating the appliance
- This chapter explains how to set a hotplate. The table shows heat settings and cooking times for various meals.
- The main switch is used to switch the hob on and off.
- To switch on: Touch the # symbol. An audible signal sounds. The indicator next to the main switch and the hotplate indicators ‹ light up. The hob is ready to use.
- To switch off: Touch the # symbol until the indicator goes out. All hotplates are switched off. The residual heat indicator remains lit until the hotplates have cooled down sufficiently.
- Use the @ and A symbols to select the required heat setting.
- Heat setting ‚ = lowest setting.
- Heat setting Š = highest setting.
- Every heat setting has an intermediate setting. This is marked with a dot.
- The hob must be switched on.
- The heat setting is set.
- Select the hotplate and touch the @ or A symbol until the required heat setting appears.
- Select the hotplate and then touch the @ or A symbol until ‹ appears.
- The hotplate switches itself off and the residual heat indicator appears.
- The table shows which heat setting is suitable for each type of food. The cooking time may vary depending on the type, weight, thickness and quality of the food.
- w CombiZone function
- CombiZone function
- Using this function, the two left hotplates, which are the same size, can be linked together. When doing this, the same heat setting is set for both hotplates. This is especially suitable for cooking with elongated cookware.
- To achieve the best results, use suitable, oval cookware in the area of both hotplates. Position the cookware in the middle of the hotplates.
- When you are using cookware on just one of the two hotplates, it can be moved to the second hotplate. In this case, the heat setting and the selected settings are transferred.
- The hob must be on.
- Select one of the two hotplates assigned to the combi zone and use the @ or A symbol to set the heat settings.
- Select one of the two hotplates assigned to this function and touch the þ symbol.
- This deactivates the function. The two hotplates will now function independently.
- u Move function
- Move function
- You can use this function to link the two left hotplates, which are the same size, and select a different heat setting for each hotplate. Preset heat settings:
- Front hotplate = heat setting Š
- Rear hotplate = heat setting –
- The heat settings can be changed independently of one another for each hotplate.
- To ensure that the cookware is detected and heat is distributed evenly, correctly centre the cookware:
- Only use one piece of cookware which only covers one hotplate.
- Moving the cookware from one hotplate to another:
- Select one of the two hotplates assigned to the Move function and use the @ or A symbol to set the heat setting.
- Touch the ý symbol.
- This deactivates the function.
- O Time-setting options
- Time-setting options
- Your hob has two timer functions:
- The hotplate automatically switches off after the time that is set has elapsed.
- After a few seconds, the time begins to elapse.
- Select a hotplate. Touch the 0 symbol and use the @ or A symbols to change the cooking time, or set the time to ‹‹.
- The hotplate switches off. An audible signal sounds. ‹‹ lights up in the timer display for 60 seconds.
- Touch the 0 symbol. The displays go out and the audible signal ceases.
- You can use the kitchen timer to set a time of up to 99 minutes.
- This functions independently from the hotplates and from other settings. This function does not automatically switch off a hotplate.
- Touch the 0 symbol repeatedly until the V indicator lights up. Change or set the time to ‹‹ using the @ or A symbol.
- An audible signal sounds. ‹‹ appears in the timer display. The displays go out after 60 seconds.
- By pressing the 0 symbol, the displays go out and the audible signal ceases.
- v PowerBoost function
- PowerBoost function
- The PowerBoost function enables you to heat up large quantities of water faster than when using heat setting Š.
- This function can always be activated for a hotplate, provided the other hotplate in the same group is not in use (see illustration). Otherwise, ˜ and Š will flash in the display for the selected hotplate; the Š heat setting will then be set autom...
- z Keep warm function
- A Childproof lock
- Childproof lock
- You can use the childproof lock to prevent children from switching on the hob.
- The hob must be off.
- To activate: Touch the ‚ symbol for approx. 4 seconds. The ‚ indicator lights up for 10 seconds. The hob is locked.
- To deactivate: Touch the ‚ symbol for approx. 4 seconds. The lock is released.
- With this function, the childproof lock automatically activates when a hob is switched off.
- You can find out how to switch the automatic childproof lock on in the ~ "Basic settings" section
- k Wipe protection
- Wipe protection
- If you wipe over the control panel while the hob is switched on, settings may be altered. To avoid doing this, you can use the hob's "Lock control panel for cleaning" function.
- To activate: Touch the z symbol. You will hear an audible signal. The control panel is locked for 35 seconds. You can now wipe over the surface of the control panel without altering any settings.
- To deactivate: The control panel will be unlocked once 35 seconds have elapsed. To release the function early, touch the z symbol.
- b Automatic safety cut-out
- Automatic safety cut-out
- If a hotplate operates for an extended period and no settings are changed, the automatic safety shut-off is activated.
- The hotplate stops heating. ”, ‰ and the residual heat indicator œ or • flash alternately in the hotplate display.
- When you touch any symbol, the display switches off. The hotplate can now be set again.
- The point at which the safety shut-off becomes active depends on which heat setting has been set (after 1 to 10 hours). .
- Q Basic settings
- Basic settings
- The appliance has various basic settings. You can adapt these to suit your cooking habits.
- The hob must be off.
- The settings have been saved.
- Turn off the hob with the main switch.
- [ Energy consumption indicator
- Energy consumption indicator
- This function indicates the total amount of energy consumed by this hob the last time it was used for cooking.
- Once switched off, the energy consumption in kWh is displayed for 10 seconds.
- The picture shows an example with an energy consumption of ‚.‹‰ kWh.
- You can find out how to switch this function on in the section on ~ "Basic settings"
- t Cookware check
- Cookware check
- This function can be used to check the speed and quality of the cooking process depending on the cookware.
- The result is a reference value and depends on the properties of the cookware and the hotplate being used.
- Check the result using the following table:
- To activate the function again, select the @ or A symbol.
- D Cleaning
- Cleaning
- Suitable maintenance and cleaning products can be purchased from the after-sales service or in our e-Shop.
- Always clean the hob after cooking. This will prevent food deposits from becoming burned on. Only clean the hob after the residual heat indicator has gone out.
- Clean the hob with a damp dish cloth and dry it with a cloth or towel to prevent limescale build-up.
- Only use cleaning agents that are suitable for this type of hob. Observe the manufacturer's instructions on the product packaging.
- Never use:
- Stubborn dirt is best removed with a glass scraper, available from retailers. Observe the manufacturer's instructions.
- You can obtain a suitable glass scraper from customer services or through our online shop.
- Using a special sponge for cleaning glass-ceramic hobs achieves a great cleaning result.
- To prevent damage to the hob surround, observe the following instructions:
- { Frequently Asked Questions (FAQ)
- 3 Trouble shooting
- 4 Customer service
- Customer service
- Our after-sales service is there for you if your appliance needs to be repaired. We will always find an appropriate solution, also in order to avoid after-sales personnel having to make unnecessary visits.
- Please quote the E number (product number) and the FD number (production number) of your appliance when contacting the after-sales service.
- The rating plate bearing these numbers can be found:
- The E-number can also be found on the glass surface of the hob. You can check the customer index (KI) and FD number by going to the basic settings. Look up section~ "Basic settings" for this.
- Please note that a visit from an after-sales service engineer is not free of charge in the event of misuse of the appliance, even during the warranty period.
- Please find the contact data of all countries in the enclosed customer service list.
- Rely on the professionalism of the manufacturer. You can therefore be sure that the repair is carried out by trained service technicians who carry original spare parts for your appliances.
- E Test dishes
- [en] Instruction manual

Frequently Asked Questions (FAQ) en
21
{Frequently Asked
Questions (FAQ)
Frequently Asked Questions (FAQ)
Using the appliance
Why can't I switch on the hob and why is the childproof lock symbol lit?
The childproof lock is activated.
You can find information on this function in the section on ~ "Childproof lock"
Why are the displays flashing and why can I hear an audible signal?
Remove any liquid or food remains from the control panel. Remove any objects from the control panel.
You can find instructions on how to deactivate the audible signal in the section on ~ "Basic settings"
Noises
Why I can hear noises while I'm cooking?
Noises may be generated while using the hob depending on the base material of the cookware. These noises are a normal part of induc-
tion technology. They do not indicate a defect.
Possible noises:
A low humming noise like the one a transformer makes:
Occurs when cooking at a high heat setting. The noise disappears or becomes quieter when the heat setting is reduced.
Low whistling noise:
Occurs when the cookware is empty. This noise disappears when water or food is added to the cookware.
Crackling:
Occurs when using cookware made from different layers of material or when using cookware of different sizes and different materials at
the same time. The loudness of the noise can vary depending on the quantity of food being cooked or the cooking method.
High-pitched whistling noises:
Can occur when two hotplates are used at the highest heat setting at the same time. The whistling noises disappear or become quieter
when the heat setting is reduced.
Fan noise:
The hob is equipped with a fan that switches on automatically at high temperatures. The fan may continue to run even after you have
switched off the hob if the temperature detected is still too high.
Cookware
Which types of cookware can be used with an induction hob?
You can find information on which types of cookware can be used with an induction hob in the section on ~ "Induction cooking"
Why is the hotplate not heating up and why is the heat setting flashing?
The hotplate on which the cookware is standing is not switched on.
Check that you have switched on the correct hotplate.
The cookware is too small for the hotplate that is switched on or it is not suitable for induction cooking.
Check that the cookware is suitable for induction cooking and that it is placed on the hotplate that best corresponds to its size. You can find
information on the type, size and positioning of the cookware in the sections on ~ "Induction cooking", ~ "CombiZone function" and
~ "Move function"
Why is it taking so long for the cookware to heat up or why is it not heating up sufficiently despite being on a high heat setting?
The cookware is too small for the hotplate that is switched on or it is not suitable for induction cooking.
Check that the cookware is suitable for induction cooking and that it is placed on the hotplate that best corresponds to its size. You can find
information on the type, size and positioning of the cookware in the sections on ~ "Induction cooking", ~ "CombiZone function" and
~ "Move function"