[es] Instrucciones de uso ......... 3 [en] Instruction manual ............17 [el] Οδηγíες χρήσεως ..............30 T..D90..
T..D90..
Û Índice en[usIr]ctoideuso Consejos y advertencias de seguridad ....................................3 Causas de los daños .........................................................................5 Protección del medio ambiente ................................................5 Eliminación de residuos respetuosa con el medio ambiente ....5 Consejos para ahorrar energía ........................................................5 La Cocción por Inducción .........................................................
En el caso de llevar implantado un marcapasos o dispositivo médico similar deberá tener especial precaución al utilizar o acercarse a las placas de cocción de inducción cuando estén en funcionamiento. Consulte a su médico o al fabricante del dispositivo para asegurarse de que cumpla la normativa vigente e informarse de las posibles incompatibilidades. ¡Peligro de incendio! ■ El aceite caliente y la grasa se inflaman con facilidad. Estar siempre pendiente del aceite caliente y de la grasa.
Causas de los daños ■ ¡Atención! ■ ■ Las bases ásperas de los recipientes pueden rayar la placa de cocción. ■ No colocar nunca recipientes vacíos en las zonas de cocción. Pueden provocar daños. ■ No colocar recipientes calientes sobre el panel de mando, las zonas de indicadores o el marco de la placa. Pueden provocar daños. La caída de objetos duros o puntiagudos sobre la placa de cocción puede originar daños.
La Cocción por Inducción Ventajas de la Cocción por Inducción Recipientes no apropiados La Cocción por Inducción supone un cambio radical en la forma tradicional de calentamiento, el calor se genera directamente en el recipiente. Por este motivo, presenta una serie de ventajas: ■ acero fino normal ■ vidrio Ahorro de tiempo al cocinar y freír; al calentar directamente el recipiente. ■ barro ■ cobre Se ahorra energía. ■ aluminio Cuidados y limpieza más sencillos.
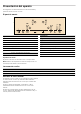
Presentación del aparato En la página 2 encontrará información sobre las medidas y potencias de las zonas de cocción.
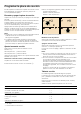
Programar la placa de cocción En este capítulo se muestra cómo ajustar una zona de cocción. En la tabla figuran los niveles de potencia y tiempos de cocción para distintos platos. 2. En los 10 segundos siguientes, pulsar el símbolo + ó -. Se muestra el ajuste básico: Símbolo + nivel de potencia 9 Símbolo - nivel de potencia 4 Encender y apagar la placa de cocción La placa de cocción se enciende y se apaga con el interruptor principal. Encender: pulsar el símbolo #. Suena una señal acústica.
Nivel de potencia Duración de cocción Espinacas ultracongeladas 3-4 15-25 min. Gulasch ultracongelado 3-4 30-40 min. Albóndigas de patata* 4.-5. 20-30 min. Pescado* 4-5 10-15 min. Salsas blancas, p.ej. bechamel 1-2 3-6 min. Salsas batidas, p. ej. salsa bernesa, salsa holandesa 3-4 8-12 min. Arroz (con doble cantidad de agua) 2-3 15-30 min. Arroz con leche 2-3 30-40 min. Patatas sin pelar 4-5 25-30 min. Patatas peladas con sal 4-5 15-25 min.
Seguro para niños La placa de cocción se puede asegurar contra una conexión involuntaria para impedir que los niños enciendan las zonas de cocción. Activar y desactivar el seguro para niños La placa de cocción debe estar apagada. Activar: pulsar el símbolo ‚ durante 4 segundos aproximadamente. El indicador ‚ se ilumina durante 10 segundos. La placa de cocción queda bloqueada.
Nota: Se puede programar automáticamente el mismo tiempo de cocción para todas las zonas. El tiempo programado transcurrirá de forma independiente para cada una de las zonas de cocción. En el capítulo Ajustes básicos se encuentra la información relativa a la programación automática del tiempo de cocción. El reloj avisador Modificar o cancelar el tiempo Ninguna zona de cocción debe estar seleccionada. Seleccionar la zona de cocción.
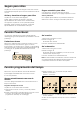
Visualizar el consumo de energía Con esta función se puede visualizar el consumo total de energía durante el tiempo que ha estado encendida la placa de cocción. En el capítulo Ajustes básicos se encuentra la información relativa a la activación de esta función. Tras apagar la placa de cocción, el consumo en kwh se visualizará durante 10 segundos. En la imagen se muestra un ejemplo con un consumo de ‚.‹‰ kwh. N:K Ajustes básicos El aparato presenta diversos ajustes básicos.
Acceder a los ajustes básicos 4. A continuación seleccionar el ajuste deseado con los símbolos + y -. La placa de cocción debe estar apagada. 1. Encender la placa de cocción. 2. En los siguientes 10 segundos, mantener pulsado el símbolo " durante 4 segundos. 5. Volver a pulsar el símbolo " durante más de 4 segundos. Los ajustes se habrán guardado correctamente. Salir En las indicaciones visuales se iluminan ™ y ‚ alternadamente y ‹ como ajuste predeterminado.
Reparar averías Normalmente las averías se deben a pequeños detalles. Antes de avisar al Servicio de Asistencia Técnica, deben tenerse en cuenta los siguientes consejos y advertencias. Indicador Avería Medida ninguno Se ha interrumpido el suministro de corriente Comprobar con ayuda de otros aparatos eléctricos, si eléctrica. se ha producido un corte en el suministro de corriente eléctrica.
Servicio de Asistencia Técnica Nuestro Servicio de Asistencia Técnica se encuentra a su disposición siempre que necesite la reparación de su aparato. Número de producto (E) y número de fabricación (FD) Siempre que se contacte con nuestro Servicio de Asistencia Técnica se debe facilitar el número de producto (E-Nr.) y el número de fabricación (FD-Nr.) del aparato. La etiqueta de características con los correspondientes números se encuentra en la tarjeta del aparato.
Precalentamiento Platos testados Zona de cocción Cocción Nivel de potencia Duración (Min:Seg) Tapa Nivel de potencia Tapa 8. aprox. 6:30 No 2 remover tras aprox. 10:00 Sí Cocer arroz con leche Recipiente: Olla Temperatura de la leche: 7 °C Calentar la leche hasta que empiece a subir. Cambiar el nivel de cocción recomendado y agregar el arroz, el azúcar y la sal a la leche Ingredientes: 190 g. de arroz de grano redondo, 23 g. de azúcar, 750 ml.
Ú Table of contents e[nuoIrs]ctimanul Safety precautions ...................................................................17 Elements that may damage the appliance ................................. 18 Protecting the environment.....................................................19 Environmentally-friendly disposal.................................................. 19 Energy-saving advice ...................................................................... 19 Induction cooking .........................
Risk of fire! ■ Hot oil and fat can ignite very quickly. Never leave hot fat or oil unattended. Never use water to put out burning oil or fat. Switch off the hotplate. Extinguish flames carefully using a lid, fire blanket or something similar. ■ The hotplates become very hot. Never place combustible items on the hob. Never place objects on the hob. ■ The appliance gets hot. Do not keep combustible objects or aerosol cans in drawers directly underneath the hob.
Overview The following table presents the most common damage caused: Damage Cause Measure Stains Food spillage Immediately remove spilt food using a glass scraper. Unsuitable cleaning products Only use cleaning products specifically designed for glass-ceramic hobs. Salt, sugar and sand Do not use the hob as a tray or working surface. Scratches Pans with rough bottoms may scratch Check pans.
Characteristics of the pan base Empty pans or those with a thin base The characteristics of the pan base may affect the uniformity of the cooking results. Pans made from materials which help diffuse heat, such as stainless steel sandwich pans, distribute heat uniformly, saving time and energy. Do not heat empty pans, nor use pans with a thin base. The hob is equipped with an internal safety system.
Programming the hob This section will show you how to program the hotplates. The table contains power levels and cooking times for several dishes. 2. In the following 10 seconds, press the + or - symbol The basic setting appears: + symbol = power level 9 - symbol = power level 4 Turning the hob on and off The hob is turned on and off using the main switch. To turn on: Press the # symbol. A beep sounds. The indicator located next to the main switch and the ‹ indicators of the hotplates light up.
Power level Cooking time Potato dumplings* 4.-5. 20-30 min. Fish* 4-5 10-15 min. White sauces (e.g., bechamel) 1-2 3-6 min. Whipped sauces (e.g., Bearnaise, Hollandaise) 3-4 8-12 min. 2-3 15-30 min. Slow cooking, simmering Boiling, steaming, sautéing Rice (with a double amount of water) Rice pudding 2-3 30-40 min. Unpeeled potatoes 4-5 25-30 min. Peeled potatoes with salt 4-5 15-25 min. Pasta* 6-7 6-10 min. Soups 3.-4. 15-60 min. Vegetables 2.-3. 10-20 min.
Childproof lock The hob can be protected against being accidentally turned on, to ensure that children do not switch on the hotplates. Activating and deactivating the childproof lock The hob should be turned off. To activate: press the symbol ‚ for 4 approximately seconds. The ‚ indicator lights up for 10 seconds. The hob is locked. Childproof lock With this function, the childproof lock automatically activates when a hob is switched off.
Note: The same cooking time can be automatically programmed for the all the hotplates. The programmed time passes independently for each of the hotplates. The Basic settings chapter provides information on automatically programming the cooking time. Changing or cancelling the time Selecting the hotplate . Press the 3 symbol and change the cooking time with the + or - symbols, or set to ‹‹. Once the time has elapsed The hotplate switches off.
Displaying energy consumption This function displays total energy consumption for the time the hob has been switched on. The Basic Settings chapter provides information on activating this function. After switching off the hob, the consumption in kWh is displayed for 10 seconds. An example is shown in the image with a consumption of ‚.‹‰ kWh. N:K Basic settings The device has several basic settings. These settings may be adapted to the user's individual needs.
Accessing the basic settings The hob should be turned off. 1. Switch on the hob. 3. Press the " symbol several times until the desired function indicator appears. 4. Next select the desired setting using the + and - symbols. 2. Within the next 10 seconds, press and hold the " symbol for 4 seconds. 5. Press the " symbol again for more than 4 seconds. The settings will have been correctly saved. In the display ™ and ‚ alternately light up and ‹ lights up as a default setting.
Indicator Malfunction Solution “§ + number / š + number / ¡ + number Electronic system malfunction. Unplug the hob from the mains. Wait about 30 seconds before plugging it in again.* ”‹ / ”Š There is an internal operating error. Unplug the hob from the mains. Wait about 30 seconds before plugging it in again.* ”ƒ The electronic system has overheated and the corresponding hotplate has been switched off. Wait until the electronic system has cooled down sufficiently.
Tested dishes This table has been prepared for assessment institutions to provide controls for our appliances. The data in the table refer to our Schulte-Ufer cookware accessories (4-piece cooking set for induction hob Z9442X0) with the following dimensions: ■ Saucepan: 16 cm Ø, 1.2 l for 14.5 cm Ø hotplates ■ Pot: 16 cm Ø, 1.7 l for 14.5 cm Ø hotplates ■ Pot: 22 cm Ø, 4.
Preheating Tested dishes Cooking Hotplate Power level Time (Min:S) Cover Power level Cover Ø 18 cm 9 1:30 No 7 No Ø 18 cm 9 1:30 No 7 No Ø 18 cm 9 Until the temperature of the oil reaches 180 °C No 9 No Pan-frying pork sirloin Cookware: Frying pan Sirloin initial temperature: 7 °C 2 pieces of sirloin (total weight approx. 200 g, 1 cm thick) Frying crêpes** Cookware: Frying pan 55 ml of crêpe batter Frying frozen potato chips Cookware: Pot Ingredients: 1.
Ù Πίνακας περιεχομένων Ο]e[lδηεςγχíρήσως Υποδείξεις ασφαλείας .................................................................. 30 Αιτίες βλαβών...........................................................................................32 Προστασία του περιβάλλοντος ................................................... 32 Απόσυρση σύμφωνα με τους κανόνες προστασίας του περιβάλλοντος..........................................................................................
Κρατάτε τα παιδιά που είναι κάτω των 8 ετών μακριά από τη συσκευή και το καλώδιο σύνδεσης. Σε περίπτωση εμφυτευμένου βηματοδότη ή κάποιας παρόμοιας ιατρικής συσκευής χρειάζεται ιδιαίτερη προσοχή κατά τη χρήση ή όταν πλησιάζετε τις επαγωγικές βάσεις εστιών ενώ λειτουργούν. Συμβουλευτεί τον γιατρό σας ή τον κατασκευαστή της συσκευής για να βεβαιωθείτε ότι πληροί τον ισχύοντα κανονισμό και ενημερωθείτε για τις πιθανές ασυμβατότητες. Κίνδυνος πυρκαγιάς! ■ Το καυτό λάδι και λίπος παίρνουν γρήγορα φωτιά.
Αιτίες βλαβών Προσοχή! ■ Οι τραχείς βάσεις των σκευών μπορεί να ραγίσουν τη βάση εστιών. ■ Ποτέ μην τοποθετείτε άδεια σκεύη στις εστίες. Μπορεί να προκληθεί βλάβη. ■ Μην τοποθετείτε θερμά σκεύη πάνω στο πεδίο χειρισμού, στην περιοχή των ενδείξεων ή στο πλαίσιο της βάσης εστιών. Μπορεί να προκληθεί βλάβη. ■ Η πτώση σκληρών ή αιχμηρών αντικειμένων πάνω στη βάση εστιών μπορεί να προκαλέσει βλάβη. ■ Το αλουμινόχαρτο και τα πλαστικά σκεύη λιώνουν πάνω σε θερμές εστίες.
Επαγωγικό Μαγείρεμα Πλεονεκτήματα του Επαγωγικού Μαγειρέματος Το Επαγωγικό Μαγείρεμα σημαίνει μια ριζική αλλαγή του παραδοσιακού τρόπου θέρμανσης, η θερμότητα μεταδίδεται απευθείας στο σκεύος. Για αυτόν τον λόγο, έχει διάφορα πλεονεκτήματα: ■ Εξοικονόμηση χρόνου κατά τη διάρκεια του μαγειρέματος, του ψησίματος και του τηγανίσματος, καθώς θερμαίνει απευθείας το σκεύος. ■ Εξοικονόμηση ενέργειας. ■ Πιο εύκολη φροντίδα και καθαριότητα. Τα τρόφιμα που έχουν υπερχειλίσει δεν καίγονται τόσο γρήγορα.
Για να γνωρίσετε τη συσκευή Στη σελίδα 2 θα βρείτε πληροφορίες για τις διαστάσεις και την ισχύ των εστιών μαγειρέματος.
Προγραμματισμός της βάσης εστιών Σ'αυτό το κεφάλαιο σας παρουσιάζεται ο τρόπος ρύθμισης μιας εστίας. Στον πίνακα υπάρχουν τα επίπεδα ισχύος και οι χρόνοι μαγειρέματος για διαφορετικά φαγητά. Άναμμα και σβήσιμο της βάσης εστιών Η βάση εστιών ανάβει και σβήνει με τον κύριο διακόπτη. 2. Μέσα στα επόμενα 10 δευτερόλεπτα, πατήστε το σύμβολο + ή -. Εμφανίζεται η βασική ρύθμιση: Σύμβολο + επίπεδο ισχύος 9 Σύμβολο - επίπεδο ισχύος 4 Άναμμα: Πατήστε το σύμβολο #. Ακούγεται ένα ηχητικό σήμα.
Επίπεδο ισχύος Διάρκεια μαγειρέματος Πατατοκεφτέδες* 4.-5. 20-30 λεπτά Ψάρι* 4-5 10-15 λεπτά Μαγείρεμα σε χαμηλή φωτιά, βράσιμο σε χαμηλή φωτιά Λευκές σάλτσες, π.χ. μπεσαμέλ 1-2 3-6 λεπτά Κτυπητές σάλτσες, π.χ.
Ασφάλεια για παιδιά Η βάση εστιών μπορεί να διασφαλιστεί ενάντια μιας ακούσιας σύνδεσης στο ηλεκτρικό ρεύμα για να εμποδίζει τα παιδιά να ανάβουν τις εστίες. Ενεργοποίηση και απενεργοποίηση της ασφάλειας για παιδιά Η βάση εστιών πρέπει να είναι σβησμένη. Αυτόματη ασφάλεια για παιδιά Με αυτήν τη λειτουργία, η ασφάλεια για παιδιά ενεργοποιείται αυτόματα όταν σβήνει η βάση εστιών.
Υπενθυμιστής χρόνου Υπόδειξη: Είναι δυνατός ο αυτόματος προγραμματισμός του ίδιου χρόνου μαγειρέματος για όλες τις εστίες. Ο προγραμματισμένος χρόνος θα παρέρχεται ανεξάρτητα για κάθε μία από τις εστίες. Στο κεφάλαιο Βασικές ρυθμίσεις παρουσιάζονται οι ρυθμίσεις που σχετίζονται με τον αυτόματο προγραμματισμό του χρόνου μαγειρέματος. Προγραμματισμός Αλλαγή ή ακύρωση χρόνου Καμία εστία δεν πρέπει να είναι επιλεγμένη. Επιλογή εστίας.
Απεικόνιση της κατανάλωσης ενέργειας Με αυτή τη λειτουργία μπορείτε να δείτε τη συνολική κατανάλωση ενέργειας κατά τη διάρκεια που είναι ενεργοποιημένη η βάση εστιών. Στο κεφάλαιο Βασικές ρυθμίσεις βρίσκονται οι πληροφορίες σχετικά με την ενεργοποίηση αυτής της λειτουργίας. Μόλις σβήσει η βάση εστιών, η κατανάλωση σε kwh απεικονίζεται για 10 δευτερόλεπτα. Στην εικόνα παρουσιάζεται ένα παράδειγμα με κατανάλωση σε ‚.‹‰ kwh. N:K Βασικές ρυθμίσεις Η συσκευή διαθέτει διάφορες βασικές ρυθμίσεις.
Πρόσβαση στις βασικές ρυθμίσεις Η βάση εστιών πρέπει να είναι σβησμένη. 4. Στη συνέχεια επιλέξτε την επιθυμητή ρύθμιση με τα σύμβολα + και -. 1. Ανάψτε τη βάση εστιών. 2. Μέσα στα επόμενα 10 δευτερόλεπτα, κρατήστε πατημένο το σύμβολο " για 4 δευτερόλεπτα. 5. Πατήστε ξανά το σύμβολο " για πάνω από 4 δευτερόλεπτα. Οι ρυθμίσεις έχουν αποθηκευτεί σωστά. Έξοδος Στις οπτικές ενδείξεις φωτίζονται ™ και ‚ εναλλάξ και ‹ ως προκαθορισμένη ρύθμιση.
Επιδιόρθωση βλαβών Συνήθως οι βλάβες οφείλονται σε ασήμαντους λόγους. Πριν ειδοποιήσετε το Τεχνικό Σέρβις, πρέπει να λάβετε υπόψη τις ακόλουθες συμβουλές και υποδείξεις. Οθόνη ένδειξης Βλάβη Λύση τίποτα Διακοπή παροχής ηλεκτρικού ρεύματος. Ελέγξτε με την βοήθεια άλλων ηλεκτρονικών συσκευών, εάν προκλήθηκε κάποια διακοπή παροχής ηλεκτρικού ρεύματος. Η σύνδεση της συσκευής στο ηλεκτρικό ρεύμα Ελέγξτε ότι η συσκευή συνδέθηκε σύμφωνα με το διάδεν έγινε σύμφωνα με το διάγραμμα συνδέσεων. γραμμα συνδέσεων.
Υπηρεσία τεχνικής εξυπηρέτησης πελατών Εάν η συσκευή σας πρέπει να επισκευαστεί, βρίσκεται στη διάθεσή σας η υπηρεσία τεχνικής εξυπηρέτησης των πελατών μας. Τα στοιχεία επικοινωνίας όλων των χωρών θα τα βρείτε στον πίνακα Υπηρεσίες τεχνικής εξυπηρέτησης πελατών που παραδίδεται μαζί.
Προθέρμανση Δοκιμασμένες συνταγές Εστία Επίπεδο ισχύος Διάρκεια (Λεπτά:Δευτ.) Μαγείρεμα Με καπάκ ι Επίπεδο ισχύος Με καπάκι Ναι Ετοιμάστε ρυζόγαλο Σκεύος: Κατσαρόλα Θερμοκρασία γάλακτος: 7 °C Ζεστάνετε το γάλα μέχρι να αρχίσει να ανεβαίνει η στάθμη του. Αλλάξτε την ενδεικνυόμενη βαθμίδα μαγειρέματος και προσθέστε το ρύζι, τη ζάχαρη και το αλάτι στο γάλα Συστατικά: 190 g. στρογγυλό ρύζι, 23 g. ζάχαρη, 750 ml. γάλα (3,5% λιπαρά) και μία πρέζα αλάτι Συστατικά: 250 g. στρογγυλό ρύζι, 30 g. ζάχαρη, 1 l.
Constructa Neff Vertriebs-GmbH Carl-Wery-Straße 34 D-81739 München *9000925351* 9000925351 00 930923