[es] Instrucciones de uso ......... 3 [en] Instruction manual ............18 [el] Οδηγíες χρήσεως ..............32 T..D89..
T..D89..
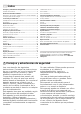
Û Índice en[usIr]ctoideuso Consejos y advertencias de seguridad ....................................3 Causas de los daños .........................................................................5 Protección del medio ambiente ................................................5 Eliminación de residuos respetuosa con el medio ambiente ....5 Consejos para ahorrar energía ........................................................5 La Cocción por Inducción .........................................................
No dejar que los niños jueguen con el aparato. La limpieza y el mantenimiento rutinario no deben encomendarse a los niños a menos que sean mayores de 8 años y lo hagan bajo supervisión. Mantener los niños menores de 8 años alejados del aparato y del cable de conexión. En el caso de llevar implantado un marcapasos o dispositivo médico similar deberá tener especial precaución al utilizar o acercarse a las placas de cocción de inducción cuando estén en funcionamiento.
recipientes para cocinar resistentes al calor. ■ Las ollas pueden saltar hacia arriba de forma repentina por la presencia de líquido entre la base del recipiente y la zona de cocción. Mantener siempre secas la zona de cocción y la base del recipiente. ¡Peligro de lesiones! Causas de los daños ¡Atención! ■ ■ ■ ■ ■ Las bases ásperas de los recipientes pueden rayar la placa de cocción. No colocar nunca recipientes vacíos en las zonas de cocción. Pueden provocar daños.
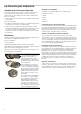
La Cocción por Inducción Ventajas de la Cocción por Inducción Recipientes no apropiados La Cocción por Inducción supone un cambio radical en la forma tradicional de calentamiento, el calor se genera directamente en el recipiente. Por este motivo, presenta una serie de ventajas: ■ acero fino normal ■ vidrio Ahorro de tiempo al cocinar y freír; al calentar directamente el recipiente. ■ barro ■ cobre Se ahorra energía. ■ aluminio Cuidados y limpieza más sencillos.
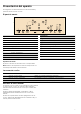
Presentación del aparato En la página 2 encontrará información sobre las medidas y potencias de las zonas de cocción.
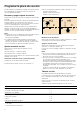
Programar la placa de cocción En este capítulo se muestra cómo ajustar una zona de cocción. En la tabla figuran los niveles de potencia y tiempos de cocción para distintos platos. 2. En los 10 segundos siguientes, pulsar el símbolo + ó -. Se muestra el ajuste básico: Símbolo + nivel de potencia 9 Símbolo - nivel de potencia 4 Encender y apagar la placa de cocción La placa de cocción se enciende y se apaga con el interruptor principal. Encender: pulsar el símbolo #. Suena una señal acústica.
Nivel de potencia Duración de cocción Espinacas ultracongeladas 3-4 15-25 min. Gulasch ultracongelado 3-4 30-40 min. Albóndigas de patata* 4.-5. 20-30 min. Pescado* 4-5 10-15 min. Salsas blancas, p.ej. bechamel 1-2 3-6 min. Salsas batidas, p. ej. salsa bernesa, salsa holandesa 3-4 8-12 min. Arroz (con doble cantidad de agua) 2-3 15-30 min. Arroz con leche 2-3 30-40 min. Patatas sin pelar 4-5 25-30 min. Patatas peladas con sal 4-5 15-25 min.
Función CombiZone Esta función permite combinar las dos zonas de cocción de la izquierda, del mismo tamaño, activando el mismo nivel de potencia en las dos. Está pensada especialmente para cocinar con un recipiente alargado. Consejos para el uso de recipientes Para obtener los mejores resultados se recomienda utilizar un recipiente que se ajuste al área determinada por ambas zonas de cocción, centrándolo respecto a la serigrafía. se mantendrán el nivel de potencia y los ajustes seleccionados.
Seguro para niños La placa de cocción se puede asegurar contra una conexión involuntaria para impedir que los niños enciendan las zonas de cocción. Activar y desactivar el seguro para niños La placa de cocción debe estar apagada. Activar: pulsar el símbolo ‚ durante 4 segundos aproximadamente. El indicador ‚ se ilumina durante 10 segundos. La placa de cocción queda bloqueada. Desactivar: pulsar el símbolo ‚ durante 4 segundos aproximadamente. Se ha desactivado el bloqueo.
Notas ■ Se puede programar automáticamente el mismo tiempo de cocción para todas las zonas. El tiempo programado transcurrirá de forma independiente para cada una de las zonas de cocción. En el capítulo Ajustes básicos se encuentra la información relativa a la programación automática del tiempo de cocción. ■ En la zona de cocción combinada, cuando estén activadas las funciones CombiZone o Move, el tiempo programado será el mismo para las dos zonas de cocción.
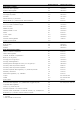
Visualizar el consumo de energía Con esta función se puede visualizar el consumo total de energía durante el tiempo que ha estado encendida la placa de cocción. En la imagen se muestra un ejemplo con un consumo de ‚.‹‰ kwh. Tras apagar la placa de cocción, el consumo en kwh se visualizará durante 10 segundos. N:K En el capítulo Ajustes básicos se encuentra la información relativa a la activación de esta función. Ajustes básicos El aparato presenta diversos ajustes básicos.
Indicador Función ™‹ Volver a los ajustes por defecto ‹ Ajustes personales.* ‚ Volver a los ajustes de fábrica. *Ajuste de fábrica Acceder a los ajustes básicos 4. A continuación seleccionar el ajuste deseado con los símbolos + y -. La placa de cocción debe estar apagada. 1. Encender la placa de cocción. 2. En los siguientes 10 segundos, mantener pulsado el símbolo " durante 4 segundos. 5. Volver a pulsar el símbolo " durante más de 4 segundos. Los ajustes se habrán guardado correctamente.
Reparar averías Normalmente las averías se deben a pequeños detalles. Antes de avisar al Servicio de Asistencia Técnica, deben tenerse en cuenta los siguientes consejos y advertencias. Indicador Avería Medida ninguno Se ha interrumpido el suministro de corriente Comprobar con ayuda de otros aparatos eléctricos, si eléctrica. se ha producido un corte en el suministro de corriente eléctrica.
Ruido del ventilador Para un uso adecuado del sistema electrónico, la placa de cocción debe funcionar a una temperatura controlada. Para esto, la placa de cocción está provista de un ventilador que se activa cuando la temperatura detectada es elevada. El ventilador también puede funcionar por inercia, después de que se haya apagado la placa de cocción, si la temperatura detectada es todavía demasiado elevada.
Precalentamiento Platos testados Zona de cocción Cocción Nivel de potencia Duración (Min:Seg) Tapa 1. Derretir la mantequilla, mezclar la harina y la sal y calentar todo 1 aprox. 3:00 No 2. Añadir la leche y llevar la salsa a ebullición, sin dejar de remover 7 aprox. 5:20 No Nivel de potencia Tapa 1 No Preparar salsa bechamel Recipiente: Cazo Temperatura de la leche: 7 °C Ingredientes: 40 g de mantequilla, 40 g de harina, 0,5 l de leche (3,5% materia grasa) y una piza de sal Ø 14,5 cm 3.
Ú Table of contents e[nuoIrs]ctimanul Safety precautions................................................................... 18 Elements that may damage the appliance ................................. 19 Protecting the environment .................................................... 20 Environmentally-friendly disposal.................................................. 20 Energy-saving advice ...................................................................... 20 Induction cooking ........................
Children must not play with, on, or around the appliance. Children must not clean the appliance or carry out general maintenance unless they are at least 8 years old and are being supervised. Keep children below the age of 8 years old at a safe distance from the appliance and power cable. We advise that you exercise caution using or standing near an induction hob while it is in operation, if you wear a pacemaker or a similar medical device.
Overview The following table presents the most common damage caused: Damage Cause Measure Stains Scratches Food spillage Immediately remove spilt food using a glass scraper. Unsuitable cleaning products Only use cleaning products specifically designed for glass-ceramic hobs. Salt, sugar and sand Do not use the hob as a tray or working surface. Pans with rough bottoms may scratch Check pans.
Unsuitable pans Never use diffuser hobs or pans made from: ■ common thin steel ■ glass ■ earthenware ■ copper ■ aluminium Characteristics of the pan base The characteristics of the pan base may affect the uniformity of the cooking results. Pans made from materials which help diffuse heat, such as stainless steel sandwich pans, distribute heat uniformly, saving time and energy.
The hotplates Hotplate $ Single-circuit hotplate Use cookware that is a suitable size. à Combined hotplate See the Combi zone function or Move function section. Only use cookware that is suitable for induction cooking; see the "Cookware" section. Residual heat indicator The hob has a residual heat indicator for each hotplate to show those which are still hot. Avoid touching them when this indicator is lit.
Cooking guidelines table The table below contains some examples. Cooking times depend on the power level, type, weight and quality of the food. As such they are approximate. When heating purées, creams and thick sauces, stir occasionally. Use power level 9 to begin cooking. Power level Cooking time Melting Chocolate, chocolate coating 1-1. - Butter, honey, gelatin 1-2 - Stew (e.g., lentils) 1.-2 - Milk** 1.-2. - Sausages heated in water** 3-4 - Frozen spinach 3-4 15-25 min.
Power level Cooking time Frozen foods (e.g., French fries, chicken nuggets) 8-9 fry one portion at a time Frozen croquettes 7-8 Meat (e.g., chicken pieces) 6-7 Fish, in breadcrumbs or batter 6-7 Frying** (150-200 g per serving with 1-2 l of oil) Greens, mushrooms, in breadcrumbs or batter (e.g., baby mushrooms) 6-7 Confectionery products (e.g.
Moving the cookware from one hotplate to another: Note: The display for the hotplate with the cookware lights up more brightly. Changing the heat setting Select one of the two hotplates which are included in the move function and change the heat setting in the settings range. Note: If the function is deactivated, the heat settings return to the preset values Deactivation Touch the ý symbol. Activation The function is deactivated. Combine the two hotplates with different heat settings.
Time programming function This function may be used in two different ways: ■ to automatically switch off a hotplate. ■ as a timer. Turning off a hotplate automatically The zone turns off automatically once the selected time has elapsed. Programming the cooking time. The hob must be switched on: 1. Select the hotplate and the desired power level. 2. Press the 3 symbol. The x indicator on the hotplate lights up. ‹‹ is displayed on the time program function display. 3. Press the + or - symbol.
Cleaning lock function Cleaning the control panel while the hob is switched on may change the settings. 35 seconds. The control panel surface can now be cleaned without the risk of changing the settings. In order to avoid this, the hob has a cleaning lock function. Press the " symbol. A signal sounds. The Ú indicator lights up along with the " symbol. The control panel is locked for Note: The lock does not affect the main switch. The hob may be switched off when desired.
Indicator Function ™† Automatic programming of cooking time. ‹ Switched off.* ‚-ŠŠ Automatic shut-off time. ™‡ Duration of the time program function warning signal ‚ 10 seconds. ƒ 30 seconds. „ 1 minute*. ™ˆ Power-Management function ‹ = Deactivated.* ‚ = 1,000 W. minimum power. ‚= 1,500 W. ƒ = 2,000 W. etc. Š or Š. = maximum power of the hob. ™Š Hotplate time selection ‹ Unlimited: the last hotplate programmed remains selected.* ‚ Limited: The hotplate will only remain selected for 10 seconds.
The best way to remove stubborn stains is to use a glass scraper. Follow the manufacturer's instructions. Suitable glass scrapers can be obtained through the Technical Assistance Service or from our online shop. Hob frame In order to avoid damage to the hob frame, follow the indications below: ■ Use only slightly soapy hot water ■ Do not use sharp or abrasive products ■ Do not use a glass scraper Fixing malfunctions Malfunctions are usually due to small details.
Noise from the fan For proper use of the electronic system, the temperature of the hob must be controlled. To do this, the hob has a fan which turns on when a high temperature is detected. The fan may also work by inertia after the hob has been switched off, if the temperature detected is still too high. The noises described are normal, they are part of induction heating technology and not a sign of malfunction.
Preheating Tested dishes Hotplate Cooking Power level Time (Min:S) Cover 1. Melt butter, mix in flour and salt and heat everything together 1 approx. 3:00 No 2. Add milk and bring the sauce to a boil, stirring continuously 7 approx. 5:20 No Power level Cover Making bechamel sauce Cookware: Saucepan Milk temperature: 7 °C Ingredients: 40 g of butter, 40 g of flour, 0.5 l of milk (3.5% fat) and a pinch of salt Ø 14.5 cm 3.
Ù Πίνακας περιεχομένων Ο]e[lδηεςγχíρήσως Υποδείξεις ασφαλείας .................................................................. 32 Αιτίες βλαβών...........................................................................................34 Προστασία του περιβάλλοντος ................................................... 34 Απόσυρση σύμφωνα με τους κανόνες προστασίας του περιβάλλοντος..........................................................................................
Τα παιδιά δεν επιτρέπεται να παίζουν με τη συσκευή. Ο καθαρισμός και η συντήρηση από το χρήστη δεν επιτρέπεται να πραγματοποιηθούν από παιδιά, εκτός εάν είναι 8 ετών και άνω και επιτηρούνται. Κρατάτε τα παιδιά που είναι κάτω των 8 ετών μακριά από τη συσκευή και το καλώδιο σύνδεσης. Σε περίπτωση εμφυτευμένου βηματοδότη ή κάποιας παρόμοιας ιατρικής συσκευής χρειάζεται ιδιαίτερη προσοχή κατά τη χρήση ή όταν πλησιάζετε τις επαγωγικές βάσεις εστιών ενώ λειτουργούν.
Χρησιμοποιείτε μόνο μαγειρικά σκεύη ανθεκτικά στη θερμότητα. ■ Οι κατσαρόλες μπορεί να πεταχτούν ξαφνικά ψηλά, όταν υπάρχει υγρό μεταξύ του πάτου της κατσαρόλας και της εστίας μαγειρέματος. Κρατάτε την εστία μαγειρέματος και τον πάτο της κατσαρόλας πάντοτε στεγνά. Κίνδυνος τραυματισμού! Αιτίες βλαβών Προσοχή! ■ Οι τραχείς βάσεις των σκευών μπορεί να ραγίσουν τη βάση εστιών. ■ Ποτέ μην τοποθετείτε άδεια σκεύη στις εστίες. Μπορεί να προκληθεί βλάβη.
Επαγωγικό Μαγείρεμα Πλεονεκτήματα του Επαγωγικού Μαγειρέματος Το Επαγωγικό Μαγείρεμα σημαίνει μια ριζική αλλαγή του παραδοσιακού τρόπου θέρμανσης, η θερμότητα μεταδίδεται απευθείας στο σκεύος. Για αυτόν τον λόγο, έχει διάφορα πλεονεκτήματα: ■ Εξοικονόμηση χρόνου κατά τη διάρκεια του μαγειρέματος, του ψησίματος και του τηγανίσματος, καθώς θερμαίνει απευθείας το σκεύος. ■ Εξοικονόμηση ενέργειας. ■ Πιο εύκολη φροντίδα και καθαριότητα. Τα τρόφιμα που έχουν υπερχειλίσει δεν καίγονται τόσο γρήγορα.
Για να γνωρίσετε τη συσκευή Στη σελίδα 2 θα βρείτε πληροφορίες για τις διαστάσεις και την ισχύ των εστιών μαγειρέματος.
Προγραμματισμός της βάσης εστιών Σ'αυτό το κεφάλαιο σας παρουσιάζεται ο τρόπος ρύθμισης μιας εστίας. Στον πίνακα υπάρχουν τα επίπεδα ισχύος και οι χρόνοι μαγειρέματος για διαφορετικά φαγητά. Άναμμα και σβήσιμο της βάσης εστιών Η βάση εστιών ανάβει και σβήνει με τον κύριο διακόπτη. 2. Μέσα στα επόμενα 10 δευτερόλεπτα ακουμπήστε το σύμβολο + ή το σύμβολο - berühren. Η βασική ρύθμιση εμφανίζεται: Σύμβολο +: Βαθμίδα μαγειρέματος 9 Σύμβολο -: Βαθμίδα μαγειρέματος 4 Άναμμα: Πατήστε το σύμβολο #.
Επίπεδο ισχύος Διάρκεια μαγειρέματος Πατατοκεφτέδες* 4.-5. 20-30 λεπτά Ψάρι* 4-5 10-15 λεπτά Μαγείρεμα σε χαμηλή φωτιά, βράσιμο σε χαμηλή φωτιά Λευκές σάλτσες, π.χ. μπεσαμέλ 1-2 3-6 λεπτά Κτυπητές σάλτσες, π.χ.
Λειτουργία CombiZone (συνδυασμένη ζώνη) Με αυτή τη λειτουργία μπορείτε να γεφυρώσετε τις δύο αριστερές εστίες μαγειρέματος του ιδίου μεγέθους. Σε αυτή την περίπτωση ρυθμίζεται για τις δύο εστίες μαγειρέματος η ίδια βαθμίδα μαγειρέματος. Είναι ιδιαίτερα κατάλληλη για το μαγείρεμα με μακρόστενα μαγειρικά σκεύη. Εάν σε μια από τις δύο εστίες μαγειρέματος χρησιμοποιηθεί μόνο ένα μαγειρικό σκεύος, μπορεί αυτό να μετατοπιστεί στη δεύτερη εστία μαγειρέματος.
Ενεργοποίηση Αλλαγή της βαθμίδας μαγειρέματος Συνδυάστε τις δύο εστίες μαγειρέματος με διαφορετικές βαθμίδες μαγειρέματος. Επιλέξτε μια από τις δύο εστίες μαγειρέματος που ανήκουν στη λειτουργία Move (μετατόπιση) και αλλάξτε τη βαθμίδα μαγειρέματος στην περιοχή ρυθμίσεων. 1. Επιλέξτε μια από τις δύο εστίες μαγειρέματος που ανήκουν στη λειτουργία Move (μετατόπιση). 2. Ακουμπήστε το σύμβολο ý. Οι ενδείξεις ó ανάβουν. Οι βαθμίδες μαγειρέματος εμφανίζονται στις ενδείξεις των δύο εστιών μαγειρέματος.
Λειτουργία προγραμματισμός χρόνου Αυτή η λειτουργία μπορεί να χρησιμοποιηθεί με δυο διαφορετικούς τρόπους: ■ για αυτόματο σβήσιμο μια εστίας. ■ για χρονόμετρο. Μόλις παρέλθει ο χρόνος Αυτόματο σβήσιμο μιας εστίας Η εστία σβήνει αυτόματα μόλις παρέλθει ο χρόνος που επιλέξατε. Προγραμματισμός του χρόνου μαγειρέματος. Η βάση εστιών πρέπει να είναι αναμμένη: 1. Επιλέξτε την εστία και το επίπεδο ισχύος που θέλετε. 2. Πατήστε το σύμβολο 3. Η ένδειξη x της εστίας φωτίζεται.
Λειτουργία προστασία κατά την καθαριότητα Εάν καθαρίζετε το πεδίο χειρισμού ενώ είναι αναμμένη η βάση εστιών, μπορεί να γίνει αλλαγή στις ρυθμίσεις. Για να αποφευχθεί αυτή η αλλαγή, η βάση εστιών διαθέτει τη λειτουργία προστασία κατά την καθαριότητα. Πατήστε το σύμβολο ". Ακούγεται ένα σήμα. Φωτίζεται η ένδειξη Ú που βρίσκεται δίπλα στο σύμβολο ". Το πεδίο χειρισμού κλειδώνει για περίπου 35 δευτερόλεπτα. Τώρα μπορείτε να καθαρίσετε την επιφάνεια του πεδίου χειρισμού χωρίς κίνδυνο αλλαγής των ρυθμίσεων.
Οθόνη ένδει- Λειτουργία ξης ™† Αυτόματος προγραμματισμός του χρόνου μαγειρέματος. ‹ Σβηστός.* ‚-ŠŠ Χρόνος αυτόματης αποσύνδεσης. ™‡ Διάρκεια του σήματος ειδοποίησης της λειτουργίας προγραμματισμός χρόνου ‚ 10 δευτερόλεπτα. ƒ 30 δευτερόλεπτα. „ 1 λεπτό*. ™ˆ Λειτουργία Power-Management ‹ = Απενεργοποιημένη.* ‚ = 1000 W. ελάχιστη ισχύς. ‚= 1500 W. ƒ = 2000 W. ... Š ή Š. = μέγιστη ισχύς της βάσης εστιών.
Ο καλύτερος τρόπος για απάλειψη της εναπομείνουσας βρωμιάς είναι η χρήση μια ξύστρας εστίας. Δείτε προσεχτικά τις υποδείξεις του κατασκευαστή. Μπορείτε να προμηθευτείτε τις κατάλληλες ξύστρες εστίας μέσω του τεχνικού σέρβις ή από το κατάστημά μας στο διαδίκτυο.
Θόρυβος του ανεμιστήρα Για μια κατάλληλη χρήση του ηλεκτρονικού συστήματος, η βάση εστιών πρέπει να λειτουργεί σε μια ελεγχόμενη θερμοκρασία. Για το λόγο αυτόν, η βάση εστιών διαθέτει έναν ανεμιστήρα ο οποίος ενεργοποιείται όποτε ανιχνεύεται υψηλή θερμοκρασία. Επίσης, ο ανεμιστήρας μπορεί να λειτουργεί λόγω αδράνειας μετά το σβήσιμο της βάσης εστιών αν η ανιχνευόμενη θερμοκρασία είναι ακόμη αρκετά υψηλή.
Προθέρμανση Δοκιμασμένες συνταγές Μαγείρεμα Επίπεδο ισχύος Διάρκεια (Λεπτά:Δευτ.) Με καπάκ ι 1. Λιώστε το βούτυρο, αναμείξτε το βούτυρο και το αλάτι και ζεστάνετε όλα τα υλικά μαζί 1 περίπου 3:00 Όχι 2.
Constructa Neff Vertriebs-GmbH Carl-Wery-Straße 34 D-81739 München *9000912301* 9000912301 02 931129