DOUBLE OVEN [en] INSTRUCTION MANUAL J1ACE4H.
en Table of contents [ en] I NSTRUCTI ON MANUAL 8 Intended use . . . . . . . . . . . . . . . . . . . . . . . . . . . . . 4 ( Important safety information . . . . . . . . . . . . . . . 4 General information . . . . . . . . . . . . . . . . . . . . . . . . . . . 4 Halogen lamp. . . . . . . . . . . . . . . . . . . . . . . . . . . . . . . . 5 Cleaning function . . . . . . . . . . . . . . . . . . . . . . . . . . . . . 5 ] Causes of damage . . . . . . . . . . . . . . . . . . . . . . . . 6 General information .
en Intended use 8Intended use Read these instructions carefully. Only then will you be able to operate your appliance safely and correctly. Retain the instruction manual and installation instructions for future use or for subsequent owners. This appliance is only intended to be fully fitted in a kitchen. Observe the special installation instructions. Check the appliance for damage after unpacking it. Do not connect the appliance if it has been damaged in transport.
Important safety information : Warning – Risk of scalding! Halogen lamp ■ : Warning – Risk of burns! The accessible parts become hot during operation. Never touch the hot parts. Keep children at a safe distance. Risk of scalding! ■ When you open the appliance door, hot steam can escape. Steam may not be visible, depending on its temperature. When opening, do not stand too close to the appliance. Open the appliance door carefully. Keep children away.
en Causes of damage ]Causes of damage Causes of damge General information Caution! ■ Accessories, foil, greaseproof paper or ovenware on the cooking compartment floor: do not place accessories on the cooking compartment floor. Do not cover the cooking compartment floor with any sort of foil or greaseproof paper. Do not place ovenware on the cooking compartment floor if a temperature of over 50 ºC has been set. This will cause heat to accumulate.
Environmental protection ■ ■ ■ en Open the appliance door as infrequently as possible when the appliance is in use. It is best to bake several cakes one after the other. The cooking compartment stays warm. This reduces the baking time for the second cake. You can place two cake tins next to each other in the cooking compartment. For longer cooking times, you can switch the appliance off 10 minutes before the end of the cooking time and use the residual heat to finish cooking.
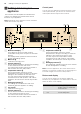
en Getting to know your appliance Control panel *Getting to know your appliance You can set your appliance's various functions on the control panel. Below, you will see an overview of the control panel and the layout of the controls. In this section, we will explain the indicators and controls. You will also find out about the various functions of your appliance. Get i ng t o know your ap l i ance Note: Depending on the appliance model, individual details and colours may differ.
Getting to know your appliance Display The value that can be set immediately or that is elapsing is shown in large digits in the display. en To use the individual time-setting options, tap the v button several times. If there is a red bar above or below a symbol, this means that the value being shown in large digits on the display refers to the function that this symbol represents. Types of heating and functions Use the function selector to set the types of heating and other functions.
en Getting to know your appliance Other functions Your new oven has yet more functions; see below for a brief description of these. Function Use r ° A Bottom oven š EasyClean q A Top oven ™ ecoClean Rapid heat-up Preheats the cooking compartment rapidly without accessories inside it. Interior lighting Switches on the interior lighting; all other functions remain off. Makes it easier to clean the cooking compartment, for example. Cleaning light dirt in the cooking compartment.
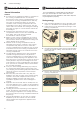
Accessories _Accessories Your appliance is accompanied by a range of accessories. Here, you can find an overview of the accessories included and information on how to use them correctly. en Make sure that the accessory is placed behind the lug ‚ on the pull-out rail. Example in the picture: Universal pan Ac es or i es D Control accessories The accessories supplied may differ depending on the appliance model. Wire rack For ovenware, cake tins and ovenproof dishes.
en Accessories Locking function The accessories can be pulled out approximately halfway until they lock in place. The locking function prevents the accessories from tilting when they are pulled out. The accessories must be inserted into the cooking compartment correctly for the tilt protection to work properly. When inserting the wire rack, ensure that lug ‚ is at the rear and is facing downwards. The open side must be facing the appliance door and the outer rail must be facing downwards ¾.
Before using for the first time KBefore using for the first time Before you can use your new appliance, you must make some settings. You must also clean the cooking compartment and accessories. Bef or e usi ng f or t he f i r st t i me Initial use As soon as the appliance is connected to the power supply, ‚ƒ:‹‹ flashes in the display. Setting the time Use the ( or ) buttons to set the current time. After a few seconds, the time that has been set is adopted. Changing the time 1.
en Time-setting options Rapid heating With Rapid heating, you can shorten the heat-up time. Only use rapid heating when a temperature of over 100 °C has been selected. To achieve an even cooking result, do not place your food into the cooking compartment until rapid heating is complete. 1. Set the function selector to °. 2. Use the temperature selector to set a temperature of above 100 °C. The oven starts to heat up after a few seconds. The ° symbol appears in the display. 3.
Time-setting options 1. Press the 0 button repeatedly until the Q symbol is selected. 2. Use the ( and) buttons to set the timer duration. – Default value for the ( button = 5 minutes – Default value for the ) button = 10 minutes en 1. Place the food onto the appropriate accessory in the cooking compartment and close the appliance door. 2. Set the heating type and temperature for the main oven r. 3. Press the 0 button repeatedly until the x symbol is highlighted. 4.
en Childproof lock AChildproof lock The bottom oven has a childproof lock to prevent children from switching it on or changing settings by accident. Chi l dpr o f l ock Notes ■ If a hob is connected, it will not be affected by the childproof lock on the oven. ■ After a power cut, the childproof lock will no longer be active. Automatic childproof lock The control panel for the main oven is locked so that the main oven cannot be switched on.
Cleaning agent All basic settings have now been applied. You can change the basic settings again at any time. Note: Following a power failure, the basic factory settings are restored. en DCleaning agent With good care and cleaning, your appliance will retain its appearance and remain fully functioning for a long time to come. We will explain here how you should correctly care for and clean your appliance.
en Cleaning agent Door panels Door handle Hot soapy water: Clean with a dish cloth and then dry with a soft cloth. Do not use a glass scraper or a stainless steel scouring pad. Hot soapy water: Clean with a dish cloth and then dry with a soft cloth. If descaler comes into contact with the door handle, wipe it off immediately. Otherwise, any stains will not be able to be removed.
Cleaning function This will regenerate the ceramic coating. When the cooking compartment has cooled down, remove the brown or white residue with water and a soft sponge. Note: When the appliance is running, reddish spots form on the surfaces. This is not rust, but residue from food. These spots are not harmful and do not impair the cleaning ability of the self-cleaning surfaces. en .Cleaning function Your appliance comes with the EasyClean cleaning aid.
en Cleaning function 4. To switch off, turn the function selector to the "Off" position. 5. Leave the appliance door ajar in the stop position (approx. 30°) for approx. one hour to allow the enamel surfaces in the cooking compartment to dry thoroughly. Alternatively, you can also run the rapid drying function for the cooking compartment. Running the rapid drying function for the cooking compartment 1.
Rails en 1. First, insert the rail in the middle of the rear socket ‚, pRails With good care and cleaning, your appliance will retain its appearance and remain fully functional for a long time to come. This will tell you how to remove the shelves and clean them. Rai l s until the rail rests against the cooking compartment wall, and push it back ƒ (figure !). 2.
en Rails Refitting the shelf supports The shelf supports are designed to fit on either the rightor the left-hand side (not both).For each of the shelf supports, make sure that the hooks at the back are at the top. Removing the pull-out rails 1. Push on the tab marked "PUSH" behind the end of the rail, and push the rail away from you (fig. !). 1 1.
Appliance door Fitting the pull-out rails The rails are designed to fit on either the right- or the left-hand side (not both).Make sure when you fit them that you can pull them out towards you. 1. The rail must sit between the two bars (fig. !). 1 en qAppliance door With good care and cleaning, your appliance will retain its appearance and remain fully functional for a long time to come. This will tell you how to clean the appliance door.
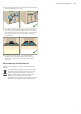
Appliance door en 5. Tilt the condensate trough up and remove it (fig. %). 4. Push each panel in at the top (fig. #). g Clean the panels with glass cleaner and a soft cloth. Wipe the condensate trough with a cloth and some hot soapy water. 5. Put the cover back in place and press on it until you hear it click into place (fig. $). 6. Open the appliance door again fully. 7. Close the two locking levers on the left and right (fig. %).
Appliance door : Warning Risk of injury! ■ If the hinges are not locked, they can snap shut with great force. Ensure that the locking levers are always fully closed or, when detaching the appliance door, fully open. ■ The hinges on the appliance door move when opening and closing the door, and you may be trapped. Keep your hands away from the hinges. Risk of injury! Removing panels 1. Open the appliance door fully. 2. Open the two locking levers on the left and right (fig. !). 3.
Trouble shooting en 6. Push the outer panel in at the top (fig. &). 3Trouble shooting If a fault occurs, there is often a simple explanation. Before calling the after-sales service, please refer to the fault table and attempt to correct the fault yourself. Tr oubl e sho t i ng Rectifying faults yourself 7. Put the cover back in place and press on it until you hear it click into place (fig. '). You can often easily rectify technical faults with the appliance yourself.
Customer service en Replacing the bulb in the top of the cooking compartment 4Customer service If the cooking compartment light bulb fails, it must be replaced. Heat-resistant, 25 watt, 230 V halogen bulbs are available from the after-sales service or specialist retailers. When handling the halogen bulb, use a dry cloth. This will increase the service life of the bulb. Only use these bulbs. Our after-sales service is there for you if your appliance needs to be repaired.
en Tested for you in our cooking studio JTested for you in our cooking studio Here, you can find a selection of dishes and the ideal settings for them. We will show you which type of heating and temperature are best suited to your dish. You will get information on suitable cooking accessories and the height at which they should be placed in the oven. You will also get tips about cookware and preparation methods. Your oven consists of a main and top oven. There are separate tables for the different ovens.
Tested for you in our cooking studio Baking on two or more levels Use CircoTherm hot air. Items that are placed in the oven on baking trays or in baking tins/dishes at the same time will not necessarily be ready at the same time. ■ Universal pan: Position 3 Baking tray: Position 1 en Baking tins For optimal cooking results, we recommend using darkcoloured metal baking tins. Tinplate baking tins, ceramic dishes and glass dishes extend baking time and mean that the baked item will not brown evenly.
en Tested for you in our cooking studio Food Dish Jacket potatoes, 2 levels Pizza, homemade, 2 levels *preheat universal pan + baking tray universal pan + baking tray Shelf position 3+1 3+1 Type of heating ‚ ‚ Temperature in °C 150 - 160 170 - 190 Time in minutes 75 - 90 35 - 50 Baking in the top oven Baking on one level Food Dish Victoria sponge cake Swiss roll Scones Biscuits Small cakes Jam tarts Meringue * Preheat 2x Ø20cm tins Swiss roll tin Baking sheet Baking sheet 12-cup-tin 12-cup-tin
Tested for you in our cooking studio The baked item looks good, but is not cooked properly in the middle. The baked item cannot be turned out of the dish when it is turned upside down. en Use a lower temperature and bake slightly longer; if necessary, add slightly less liquid. For baked items with a moist topping, bake the base first. Sprinkle it with almonds or breadcrumbs and then place the topping on top. Allow the baked item to cool down for 5 to 10 minutes after baking.
en Tested for you in our cooking studio Grilling flat items Flat pieces of poultry, meat and fish, such as steaks, drumsticks and burgers, can be cooked effectively using the "Grill" heating function. It is also excellent for toasting bread. Grilling Keep the appliance door closed when using the grill. Never grill with the appliance door open. Place the food to be grilled on the wire rack.
Tested for you in our cooking studio Food Dish Turkey, crown wire rack Turkey, thighs cookware, uncovered Fish, braised, whole 300g, e.g. trout cookware, covered Fish, braised, whole 1,5kg, e.g.
en Tested for you in our cooking studio Food Dish Shelf position 1 2 Turkey, thighs cookware uncovered Trout, whole, 300 g each wire rack * preheat ** do not turn *** slide in the universal pan underneath the wire rack Type of heating ‡ ‡ Temperature in °C 160 - 170 170 - 180 Time in minutes 30 + 30 20 - 25*** Grilling in the top oven Food Dish Wire rack Shelf position 3 Type of heat- Grill setting ing ˆ ‰* Beef, steaks, height 2-3cm Beef, burger, height 1-2cm Wire rack 3 ˆ ‰ Lamb, steaks,
Tested for you in our cooking studio Recommended setting values The table lists the optimal heating function for various types of food.The temperature and cooking time depend on the amount and consistency of the dough/ en mixture. Settings ranges are specified for this reason. Try using the lower values to start with. A lower temperature will result in more even browning. You can use a higher setting next time if necessary.
en Tested for you in our cooking studio Acrylamide in foodstuffs Acrylamide is mainly produced in grain and potato products prepared at high temperatures, such as potato crisps, chips, sliced bread, bread rolls, bread or fine baked goods (biscuits, gingerbread, spiced biscuit). Tips for keeping acrylamide to a minimum General ■ Keep cooking times as short as possible. ■ Cook food until it is golden brown, but not too dark. ■ Large, thick pieces of food contain less acrylamide.
Tested for you in our cooking studio Peel, core and chop fruit and vegetables appropriate to their type and fill the preserving jars with them up to approx. 2 cm below the rim. Fruit: Fill the preserving jars with the fruit along with a hot, skimmed sugar solution (approx. 400 ml for a 1litre jar). For one litre of water: ■ Approx. 250 g sugar for sweet fruit ■ Approx. 500 g sugar for sour fruit Vegetables: Fill the jars with the vegetables along with hot, boiled water.
en Tested for you in our cooking studio Food Dish Yeast dough, light Bowl, baking sheet Shelf posi- Type of tion heating 1 ƒ Yeast dough, heavy and rich Bowl, baking sheet 1 Defrosting For defrosting frozen fruit, vegetables and baked items. Poultry, meat and fish should ideally be defrosted in the refrigerator. Not suitable for cream cakes or cream gateaux. Use the following shelf positions when defrosting: ■ 1 wire rack: Position 1 The times indicated in the table are intended as a guide only.
Tested for you in our cooking studio Test dishes These tables have been produced for test institutes to facilitate appliance testing. As per EN 60350-1. Baking Items that are placed in the oven on baking trays or in baking tins/dishes at the same time will not necessarily be ready at the same time. Shelf positions for baking on two levels: ■ Universal pan: Position 3 Baking tray: Position 1 en Notes ■ The setting values apply to dishes placed into a cold cooking compartment.
*9001343663* 9001343663 990215 en