Microwave Oven [en] User manual and installation instructions HLAGD53.
en Safety Table of contents INFORMATION FOR USE 1 Safety .................................................................... 2 2 Preventing material damage ............................... 5 3 Environmental protection and saving energy ....................................................................... 6 4 Familiarising yourself with your appliance ........ 7 5 Accessories.......................................................... 8 6 Before using for the first time ..........................
Safety 1.4 Safe use WARNING ‒ Risk of fire! Combustible objects that are left in the cooking compartment may catch fire. ▶ Never store combustible objects in the cooking compartment. ▶ If smoke is emitted, the appliance must be switched off or the plug must be pulled out and the door must be held closed in order to stifle any flames. Loose food remnants, fat and meat juices may catch fire.
en Safety 1.5 Microwave CAREFULLY READ THE IMPORTANT SAFETY INSTRUCTIONS AND KEEP THEM SAFE FOR FUTURE USE WARNING ‒ Risk of fire! Using the appliance for anything other than its intended purpose is dangerous and may cause damage. For example, heated slippers and pillows filled with grain or cereal may catch fire, even several hours later. ▶ Never dry food or clothing with the appliance.
Preventing material damage WARNING ‒ Risk of scalding! There is a possibility of delayed boiling when a liquid is heated. This means that the liquid reaches the boiling temperature without the usual steam bubbles rising to the surface. Exercise caution even when only gently shaking the container. The hot liquid may suddenly boil over and splatter. ▶ Always place a spoon in the container when heating liquids. This prevents delayed boiling. WARNING ‒ Risk of injury! Unsuitable cookware may crack.
en Environmental protection and saving energy 2.2 Microwave Follow these instructions when using the microwave. ATTENTION! Metal touching the wall of the cooking compartment will cause sparks, which may damage the appliance or the inner door pane. ▶ Metal (e.g. a spoon in a glass) must be kept at least 2 cm from the cooking compartment walls and the inside of the door. Placing aluminium containers in the appliance may cause sparks, which will damage the appliance.
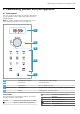
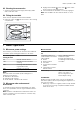
Familiarising yourself with your appliance en 4 Familiarising yourself with your appliance 4.1 Control panel You can use the control panel to configure all functions of your appliance and to obtain information about the operating status. Note: On certain models, specific details such as colour and shape may differ from those pictured. 5 4 3 2 1 1 2 3 4 5 Automatic door opener Open the door automatically. Touch fields Select functions. Clock button Set or display the time.
en Accessories Stop or pause the operation. Open the appliance door. Rotary selector Use the rotary selector to change the setting values that are shown on the display. The rotary selector can be pushed in. To engage or release the rotary selector, push the rotary selector. Automatic door opener When you press the automatic door opener, the appliance door springs open. You can fully open the appliance door manually. Notes ¡ In the event of a power cut, the automatic door opener does not work.
Basic operation 6.3 Cleaning the accessories ▶ Clean the accessory thoroughly with soapy water and a soft dish cloth. 6.4 Fitting the turntable en 2. Engage the turntable in the drive in the centre of the cooking compartment floor. 3. Check whether the turntable is correctly engaged. Note: The turntable can turn anti-clockwise or clockwise. Never use the appliance without the turntable. 1. Place the roller ring into the recess in the cooking compartment. 7 Basic operation 7.
en Grill Not microwave-safe 7.4 Configuring the microwave settings Cookware and accessor- Reason ies Metal cookware Metal does not allow microwaves to pass through. The food hardly heats up. Cookware with gold or sil- Microwaves can damage ver decoration gold and silver decoration. Tip: You can only use this kind of cookware if the manufacturer guarantees that it is microwave-safe. ATTENTION! Operating the appliance without food in the cooking compartment may lead to overloading.
Memory 8.4 Cancelling the operation ▶ Press twice or open the door and press once. 8.5 MicroCombi To reduce the cooking time, you can use the grill in combination with microwave mode. en 2. Press . 3. Use the rotary selector to set the required duration. Note: If you open the cooking compartment door during operation, the microwave interrupts the operation and pauses the set time that is counting down. When you close the cooking compartment door, the operation continues.
en Programmes 10.4 Defrosting with the automatic programmes You can use the four defrosting programmes to defrost meat, poultry and bread. Programme P01 P02 P03 P04 Food Minced meat Pieces of meat Chicken, chicken pieces Bread Cookware Open Open Open Open Weight range in kg 0.20–1.00 0.20–1.00 0.40–1.80 0.20–1.00 5. Note: Liquid is produced when you defrost meat Defrosting food using the automatic programmes 1. Take the food out of its packaging.
Basic settings en Cooking food using the combi cooking programme 1. Take the food out of its packaging. 2. Weigh the food. You require the weight in order to set the programme. 3. Place the food in microwave-safe, heat-resistant cookware that is not too big. 4. Set the programme. → Page 11 5. Once the programme has finished, leave the food to rest for another 5–10 minutes to allow the temperature to even out. 11 Basic settings You can configure the basic settings for your appliance to meet your needs.
en Cleaning and servicing 12 Cleaning and servicing To keep your appliance working efficiently for a long time, it is important to clean and maintain it carefully. ‒ ‒ 12.1 Cleaning products Only use suitable cleaning agents. WARNING ‒ Risk of electric shock! An ingress of moisture can cause an electric shock. ▶ Do not use steam- or high-pressure cleaners to clean the appliance. ATTENTION! Unsuitable cleaning agents damage the surfaces of the appliance. ▶ Do not use harsh or abrasive cleaning products.
Troubleshooting 12.5 Cleaning the control panel 1. Read the information on cleaning products. ATTENTION! Incorrect cleaning may damage the control panel. ▶ Never wipe the control panel with a wet cloth. 2. Clean the door panels with a soft dish cloth and 1. Read the information on cleaning products. → Page 14 2. Clean the control panel using a microfibre cloth or a en → Page 14 glass cleaner.
en Disposal Fault The appliance is not working. Cause and troubleshooting Door is not fully closed. ▶ Check whether food remains or foreign material are trapped in the door. Food takes longer The microwave power setting is set too low. than usual to heat up. ▶ Set a higher microwave power setting. → Page 10 You have placed a larger amount of food than normal in the appliance. ▶ Set a longer cooking time. You need double the time when you have double the amount. The food is colder than usual.
How it works en 15.1 Product number (E-Nr.) and production number (FD) You can find the product number (E-Nr.) and the production number (FD) on the appliance's rating plate. You will see the rating plate with these numbers if you open the appliance door. Make a note of your appliance's details and the Customer Service telephone number to find them again quickly. 16 How it works Here, you can find the ideal settings for various dishes as well as the best accessories and cookware.
en How it works Defrosting with the microwave Observe the recommended settings for using the microwave to defrost frozen food.
How it works 16.4 Heating With your appliance you can heat food. Heating food WARNING ‒ Risk of burns! Heated food gives off heat. The cookware may become hot. ▶ Always use oven gloves to remove cookware or accessories from the cooking compartment. WARNING ‒ Risk of scalding! There is a possibility of delayed boiling when a liquid is heated. This means that the liquid reaches the boiling temperature without the usual steam bubbles rising to the surface.
en How it works Heating in the microwave Observe the recommended settings for using the microwave to heat food. Food Amount Cooking time in mins 200 ml 500 ml 50 ml 100 ml 200 ml 200 g 400 g 350–500 g Microwave power setting in W 800 800 360 360 360 600 600 600 Beverages1 Beverages1 Baby food, e.g. baby bottles4 Baby food, e.g. baby bottles4 Baby food, e.g.
How it works Food Amount Accessories Chicken pieces, e.g. chicken quarters 800 g Chicken wings, marinated and frozen 800 g Cookware without lid + Wire rack Cookware without lid + Wire rack Cookware without lid Wire rack Cooking time in mins Information 30–40 Place with the skin side up. Do not turn the food. 360 15–25 Do not turn the food. Pork without rind, e.g. 750 g neck Bacon rashers Approx.
en How it works Food Amount Accessories Potatoes 750 g Cookware with lid Rice 125 g Cookware with lid Rice 250 g Cookware with lid Toasting bread 2– 4 slices Grilling bread 2– 6 slices 500 g Fruit, compote Sweet food, e.g. pudding, instant 1 500 ml Microwave power setting in W 600 Type of heating Cooking time in mins Information - 15–221 1. 2. - 1. 5–7 2. 12–15 1. 2. - 1. 6–8 2. 15–18 Add double the amount of liquid. Wire rack 1. 900 2. 180 1. 900 2.
Installation instructions en Cooking in combination with a microwave Food Potato gratin Microwave power setting in W 360 Type of heating Cooking time in mins 35–40 Note: Place a 22 cm diameter Pyrex dish on the turntable. 17 Installation instructions Observe this information when installing the appliance. 17.1 Safe installation Follow these safety instructions when installing the appliance.
en Installation instructions 17.4 Fitted units 17.7 Installing the appliance Here, you can find notes on safe installation. ATTENTION! Any shavings may impair the function of electrical components. ▶ Carry out cut-out work on the units before installing the appliance. ▶ Remove the shavings. 1. Secure the spacers to the appliance in accordance with the wall thickness. ¡ The minimum installation height is 850 mm. ¡ The installation cabinet must not have a back panel behind the appliance.
Installation instructions en 4. Check the clearance to the adjacent appliances. The clearance to the adjacent appliances must be at least 3 mm. 5. Remove any packaging material and adhesive film from the cooking compartment and the door.
Valid within Great Britain: Imported to Great Britain by BSH Home Appliances Ltd.