
Installation Instruction
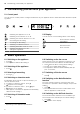
Table Of Contents
- Extractor hood
- en
- Table of contents
- 1 Safety
- 2 Avoiding material damage
- 3 Environmental protection and saving energy
- 4 Operating modes
- 5 Familiarising yourself with your appliance
- 6 Basic operation
- 6.1 Switching on the appliance
- 6.2 Switching off the appliance
- 6.3 Selecting a fan setting
- 6.4 Switching on intensive mode
- 6.5 Switching off intensive mode
- 6.6 Switching on the fan run-on
- 6.7 Switching off the fan run-on
- 6.8 Switching on the NoiseReduction function
- 6.9 Switching on the AirFresh function
- 6.10 Switching on automatic mode
- 6.11 Switching off automatic mode
- 6.12 Sensor control
- 6.13 Setting the sensor control
- 6.14 Setting the saturation indicator
- 6.15 Switching on the lighting
- 6.16 Setting the brightness
- 6.17 Switching on the audible signal
- 6.18 Switching off the signal tone
- 7 Home Connect
- 8 Hob-based hood control
- 9 Cleaning and servicing
- 10 Troubleshooting
- 11 Disposal
- 12 Customer Service
- 13 Accessories
- 14 Declaration of Conformity
- 15 Installation instructions
- 15.1 Scope of delivery
- 15.2 Safety clearances
- 15.3 Secure installation
- 15.4 General information
- 15.5 Instructions for the electrical connection
- 15.6 Information on the installation situation
- 15.7 Instructions for the exhaust air pipe
- 15.8 Instructions for the air extraction mode
- 15.9 Installation

HomeConnect en
7
6.10 Switching on automatic mode
1
The optimum fan setting is set automatically using a
sensor.
▶
Press .
6.11 Switching off automatic mode
1
▶
Press .
a The appliance starts at the previously selected fan
setting.
a The ventilation is automatically ended when the
sensor detects no further change in the room air
quality.
a Automatic mode runs for a maximum of four hours.
6.12 Sensor control
1
In automatic mode, a sensor in the appliance detects
the intensity of the cooking and roasting fumes. De-
pending on the setting of the sensor sensitivity, the op-
timum fan setting is automatically switched on. If the
sensor control system reacts too weakly or too
strongly, the setting for the sensor sensitivity may
change.
¡ Factory setting:5
¡ Lowest setting:0
¡ Highest setting:9
6.13 Setting the sensor control
Requirement:The appliance is switched on.
1.
Press and hold .
a The setting is displayed after approx. onesecond.
2.
Press or to change the setting.
3.
Release to save the setting.
6.14 Setting the saturation indicator
The saturation indicator must be adjusted depending
on the filter used.
Requirement:The appliance is switched on.
1.
Press and hold .
‒ To set circulating-air mode (non-regenerative fil-
ter), press or until indicator 2 appears on the
display.
‒ To set circulating-air mode (regenerative filter),
press or until indicator 3 appears on the dis-
play.
‒ To set air extraction mode, press or until indic-
ator 1 appears on the display.
2.
Release to save the setting.
6.15 Switching on the lighting
The lighting can be switched on and off independently
of the ventilation system.
▶
Press .
6.16 Setting the brightness
▶
Press and hold until the required brightness is
reached.
6.17 Switching on the audible signal
Requirement:The appliance is switched on.
▶
Press and hold and at the same time for ap-
prox. threeseconds until a signal sounds.
a appears on the display.
6.18 Switching off the signal tone
Requirement:The appliance is switched on.
▶
Press and hold and at the same time for ap-
prox. threeseconds until a signal sounds.
a appears on the display.
7 HomeConnect
This appliance is network-capable. Connecting your ap-
pliance to a mobile device lets you control its functions
via the HomeConnect app, adjust its basic settings
and monitor its operating status.
The HomeConnect services are not available in every
country. The availability of the HomeConnect function
depends on the availability of HomeConnect services
in your country. You can find information about this at:
www.home-connect.com.
The HomeConnect app guides you through the entire
login process. Follow the instructions in the HomeCon-
nect app to configure the settings.
Tips
¡ Please consult the documents supplied by
HomeConnect.
¡ Please also follow the instructions in the HomeCon-
nect app.
Notes
¡ Please note the safety precautions in this instruction
manual and make sure that they are also observed
when operating the appliance via the HomeCon-
nect app.
→"Safety", Page2
¡ Operating the appliance on the appliance itself al-
ways takes priority. During this time it is not possible
to operate the appliance using the HomeConnect
app.
¡ In networked standby mode, the appliance requires
a maximum of2W.
¡ If you need your device's MAC address to connect
to your home network, you can find this next to the
rating plate. →Page11
1
Depending on the appliance specifications