
Installation Instruction
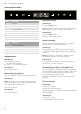
Table Of Contents
- Ú Table of contents
- [en] Instructions for installation and use
- ( Important safety information
- 7 Environmental protection
- Ç Operating modes
- 1 Operating the appliance
- Operating the appliance
- Note:
- Control panel model 1
- Setting the fan
- Noise reduction function
- AirFresh function
- Intensive setting
- Intermediate position for the glass front
- Fan run-on time
- Lighting
- Saturation display
- Audible signal
- Control panel model 2
- Setting the fan
- Noise reduction function
- AirFresh function
- Fan run-on time
- Intensive setting
- Intermediate position for the glass front
- AmbientLight
- 2. Touch the k symbol.
- 3. Within this 10-second period, touch the A or @ symbol until the colour you require is selected.
- Lighting
- Saturation display
- Audible signal
- Control panel model 3
- Setting the fan
- Noise reduction function
- AirFresh function
- Intensive setting
- Intermediate position for the glass front
- Fan run-on time
- Lighting
- Saturation display
- Audible signal
- Control panel variant 4
- Setting the fan
- Noise reduction function
- AirFresh function
- Fan run-on time
- Intensive setting
- Intermediate position for the glass front
- AmbientLight
- 2. Touch the k symbol.
- 3. Within this 10-second period, touch the A or @ symbol until the colour you require is selected.
- 2. Touch the ‘ symbol.
- 2. The sensor controller setting can be changed by touching the @ or A symbol.
- 3. Take your finger off the ‘ symbol.
- 2 Cleaning and maintenance
- Cleaning and maintenance
- : Warning
- : Warning
- : Warning
- : Warning
- : Warning
- : Warning
- : Warning
- 3 Trouble shooting
- 4 Customer service
- ( Important safety information
- K General information
- 5 Installation
- Installation
- Preparing for installation
- 2. Place the template against the line drawn on the wall and fasten it in place. Mark where the screws should be inserted.
- 3. Drill 8 mm diameter holes to a depth of 80 mm for fastening the appliance, remove the template and press in the wall plugs flush with the wall.
- 2. When mounting the appliance, ensure that it engages properly with the mounting supports.
- 3. If required, the appliance can be moved to the right or to the left.
- 4. Firmly tighten the screws for the mounting supports. Hold the bracket firmly when doing so. ¨
- 5. If no duct is to be fitted, screw in the two locking screws without the bracket. ©
- 2. Attach the exhaust air pipe to the reducing connector.
- 3. Use suitable means to seal both joints.
- : Warning
- : Warning
- Risk of electric shock!
- 2. Remove the pieces of protective film from both flue duct sections.
- 3. Push one flue duct section into the other.
- 4. Place flue ducts sections on the appliance.
- 5. Slide the inner flue duct section upwards, attach it to the left and right sides of the retaining bracket, and then slide it down to engage it. ¨
- 6. Screw the flue duct section to the sides of the retaining bracket using two screws. ©
- 7. Clip the lower flue duct section in at the retaining bracket. The connection cable must not be damaged. ª
en Important safety information
4
:Warning
Risk of burns!
The accessible parts become very hot when in
operation. Never touch hot parts. Keep
children at a safe distance.
:Warning
Risk of injury!
■ Components inside the appliance may have
sharp edges. Wear protective gloves.
Risk of injury!
■ Items placed on the appliance may fall
down. Do not place any objects on the
appliance.
Risk of injury!
■ The light emitted by LED lights is very
dazzling, and can damage the eyes (risk
group 1). Do not look directly into the
switched on LED lights for longer than 100
seconds.
:Warning
Risk of injury!
Risk of trapping body parts when opening and
closing the glass front. Do not reach into the
area behind the glass panel, and keep your
fingers away from the hinges.
:Warning
Hazard due to magnetism!
Permanent magnets are inserted in the
appliance front. They may affect electronic
implants, e.g. heart pacemakers or insulin
pumps. Wearers of electronic implants must
stay at least 10 cm away from the appliance
front.
:Warning
Risk of electric shock!
■ A defective appliance may cause electric
shock. Never switch on a defective
appliance. Unplug the appliance from the
mains or switch off the circuit breaker in the
fuse box. Contact the after-sales service.
Risk of electric shock!
■ Incorrect repairs are dangerous. Repairs
may only be carried out and damaged
power cables replaced by one of our
trained after-sales technicians. If the
appliance is defective, unplug the appliance
from the mains or switch off the circuit
breaker in the fuse box. Contact the after-
sales service.
Risk of electric shock!
■ Do not use any high-pressure cleaners or
steam cleaners, which can result in an
electric shock.
Causes of damage
Caution!
Risk of damage due to corrosion. Always
switch on the appliance while cooking to avoid
condensation. Condensate can produce
corrosion damage.
Always replace faulty bulbs to prevent the
remaining bulbs from overloading.
Risk of damage due to ingress of humidity into
the electronic circuitry. Never clean operator
controls with a wet cloth.
Surface damage due to incorrect cleaning.
Clean stainless steel surfaces in the direction
of the grain only. Do not use any stainless
steel cleaners for operator controls.
Surface damage due to strong or abrasive
cleaning agents. Never use strong and
abrasive cleaning agents.
Risk of damage from returning condensate.
Install the exhaust duct in such a way that it
falls away from the appliance slightly (1°
slope).
Risk of damage as a result of incorrect
loading of design elements. Do not pull design
elements.Do not place objects on the design
elements or hang objects from them.