
Installation Instruction


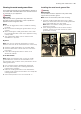
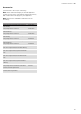
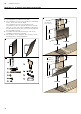
Table Of Contents
- Ú Table of contents
- [en] Instructions for installation and use
- ( Important safety information
- 7 Environmental protection
- Ç Operating modes
- 1 Operating the appliance
- Operating the appliance
- Note:
- Control panel model 1
- Setting the fan
- Noise reduction function
- AirFresh function
- Intensive setting
- Intermediate position for the glass front
- Fan run-on time
- Lighting
- Saturation display
- Audible signal
- Control panel model 2
- Setting the fan
- Noise reduction function
- AirFresh function
- Fan run-on time
- Intensive setting
- Intermediate position for the glass front
- AmbientLight
- 2. Touch the k symbol.
- 3. Within this 10-second period, touch the A or @ symbol until the colour you require is selected.
- Lighting
- Saturation display
- Audible signal
- Control panel model 3
- Setting the fan
- Noise reduction function
- AirFresh function
- Intensive setting
- Intermediate position for the glass front
- Fan run-on time
- Lighting
- Saturation display
- Audible signal
- Control panel variant 4
- Setting the fan
- Noise reduction function
- AirFresh function
- Fan run-on time
- Intensive setting
- Intermediate position for the glass front
- AmbientLight
- 2. Touch the k symbol.
- 3. Within this 10-second period, touch the A or @ symbol until the colour you require is selected.
- 2. Touch the ‘ symbol.
- 2. The sensor controller setting can be changed by touching the @ or A symbol.
- 3. Take your finger off the ‘ symbol.
- 2 Cleaning and maintenance
- Cleaning and maintenance
- : Warning
- : Warning
- : Warning
- : Warning
- : Warning
- : Warning
- : Warning
- 3 Trouble shooting
- 4 Customer service
- ( Important safety information
- K General information
- 5 Installation
- Installation
- Preparing for installation
- 2. Place the template against the line drawn on the wall and fasten it in place. Mark where the screws should be inserted.
- 3. Drill 8 mm diameter holes to a depth of 80 mm for fastening the appliance, remove the template and press in the wall plugs flush with the wall.
- 2. When mounting the appliance, ensure that it engages properly with the mounting supports.
- 3. If required, the appliance can be moved to the right or to the left.
- 4. Firmly tighten the screws for the mounting supports. Hold the bracket firmly when doing so. ¨
- 5. If no duct is to be fitted, screw in the two locking screws without the bracket. ©
- 2. Attach the exhaust air pipe to the reducing connector.
- 3. Use suitable means to seal both joints.
- : Warning
- : Warning
- Risk of electric shock!
- 2. Remove the pieces of protective film from both flue duct sections.
- 3. Push one flue duct section into the other.
- 4. Place flue ducts sections on the appliance.
- 5. Slide the inner flue duct section upwards, attach it to the left and right sides of the retaining bracket, and then slide it down to engage it. ¨
- 6. Screw the flue duct section to the sides of the retaining bracket using two screws. ©
- 7. Clip the lower flue duct section in at the retaining bracket. The connection cable must not be damaged. ª

Customer service en
19
Accessories
(not included in the scope of delivery)
Note: These instructions apply to several appliance
models. It may be the case that an optional accessory
that is listed does not apply for your appliance.
Note: Observe the installation instructions in the
accessory.
--------
Accessories Order number
Starter set for air-recirculation mode (flat hood
with chimney)
Easy-change filter for starter set
Z51AFU0X0
Z51AFA0X0
Starter set for air-recirculation mode (flat hood
without chimney)
Easy-change filter for starter set
Z51AFT0X0
Z51AFA0X0
Starter set for air-recirculation mode (angled hood
with chimney)
Easy-change filter for starter set
Z51AIU0X0
Z51AIA0X0
Starter set for air-recirculation mode (angled hood
without chimney)
Easy-change filter for starter set
Z51AIT0X0
Z51AIA0X0
Starter set for air-recirculation mode with filter
that can be regenerated (flat hood with chimney)
Z51AFS0X0
Starter set for air-recirculation mode with filter
that can be regenerated (angled hood with chim-
ney)
Z51AIS0X0
Starter set for air-recirculation mode with filter
that can be regenerated (flat hood without chim-
ney)
Z51AFR0X0
Starter set for air-recirculation mode with filter
that can be regenerated (angled hood without
chimney)
Z51AIR0X0
CleanAir air-recirculation module
Easy-change filter for CleanAir air-recirculation
module (cannot be regenerated)
Z51AXC0N0
Z5170X1
Easy-change filter for CleanAir air-recirculation
module (can be regenerated)
Z50XXP0X0