
Installation Instruction


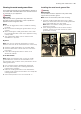
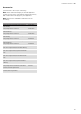
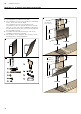
Table Of Contents
- Ú Table of contents
- [en] Instructions for installation and use
- ( Important safety information
- 7 Environmental protection
- Ç Operating modes
- 1 Operating the appliance
- Operating the appliance
- Note:
- Control panel model 1
- Setting the fan
- Noise reduction function
- AirFresh function
- Intensive setting
- Intermediate position for the glass front
- Fan run-on time
- Lighting
- Saturation display
- Audible signal
- Control panel model 2
- Setting the fan
- Noise reduction function
- AirFresh function
- Fan run-on time
- Intensive setting
- Intermediate position for the glass front
- AmbientLight
- 2. Touch the k symbol.
- 3. Within this 10-second period, touch the A or @ symbol until the colour you require is selected.
- Lighting
- Saturation display
- Audible signal
- Control panel model 3
- Setting the fan
- Noise reduction function
- AirFresh function
- Intensive setting
- Intermediate position for the glass front
- Fan run-on time
- Lighting
- Saturation display
- Audible signal
- Control panel variant 4
- Setting the fan
- Noise reduction function
- AirFresh function
- Fan run-on time
- Intensive setting
- Intermediate position for the glass front
- AmbientLight
- 2. Touch the k symbol.
- 3. Within this 10-second period, touch the A or @ symbol until the colour you require is selected.
- 2. Touch the ‘ symbol.
- 2. The sensor controller setting can be changed by touching the @ or A symbol.
- 3. Take your finger off the ‘ symbol.
- 2 Cleaning and maintenance
- Cleaning and maintenance
- : Warning
- : Warning
- : Warning
- : Warning
- : Warning
- : Warning
- : Warning
- 3 Trouble shooting
- 4 Customer service
- ( Important safety information
- K General information
- 5 Installation
- Installation
- Preparing for installation
- 2. Place the template against the line drawn on the wall and fasten it in place. Mark where the screws should be inserted.
- 3. Drill 8 mm diameter holes to a depth of 80 mm for fastening the appliance, remove the template and press in the wall plugs flush with the wall.
- 2. When mounting the appliance, ensure that it engages properly with the mounting supports.
- 3. If required, the appliance can be moved to the right or to the left.
- 4. Firmly tighten the screws for the mounting supports. Hold the bracket firmly when doing so. ¨
- 5. If no duct is to be fitted, screw in the two locking screws without the bracket. ©
- 2. Attach the exhaust air pipe to the reducing connector.
- 3. Use suitable means to seal both joints.
- : Warning
- : Warning
- Risk of electric shock!
- 2. Remove the pieces of protective film from both flue duct sections.
- 3. Push one flue duct section into the other.
- 4. Place flue ducts sections on the appliance.
- 5. Slide the inner flue duct section upwards, attach it to the left and right sides of the retaining bracket, and then slide it down to engage it. ¨
- 6. Screw the flue duct section to the sides of the retaining bracket using two screws. ©
- 7. Clip the lower flue duct section in at the retaining bracket. The connection cable must not be damaged. ª

en Cleaning and maintenance
16
2Cleaning and maintenance
Cl eani ng and mai nt enanc e
:Warning
Risk of burns!
The appliance becomes hot during operation. Allow the
appliance to cool down before cleaning.
:Warning
Risk of electric shock!
Penetrating moisture may result in an electric shock.
Clean the appliance using a damp cloth only. Before
cleaning, pull out the mains plug or switch off the circuit
breaker in the fuse box.
:Warning
Risk of electric shock!
Do not use any high-pressure cleaners or steam
cleaners, which can result in an electric shock.
:Warning
Risk of injury!
Components inside the appliance may have sharp
edges. Wear protective gloves.
:Warning
Risk of injury!
Risk of trapping body parts when opening and closing
the glass front. Do not reach into the area behind the
glass panel, and keep your fingers away from the
hinges.
Cleaning agents
To ensure that the different surfaces are not damaged
by using the wrong cleaning product, follow the
instructions in the table. Do not use any of the following:
■ Harsh or abrasive cleaning agents, e.g. scouring
powder or liquid scouring cleaner,
■ Cleaning products with a high alcohol content,
■ Hard scouring pads or cleaning sponges,
■ Pressure washers or steam cleaners,
■ Cleaning products that dissolve limescale,
■ Aggressive all-purpose cleaning products,
■ Oven spray.
Note: Wash new sponge cloths thoroughly before use.
Note: Follow all instructions and warnings included with
the cleaning products.
--------
Removing metal grease filter
1. Open the glass front slowly and fully. Hold the glass
front in the centre when doing so, gripping it firmly.
2. Open the lock and swing down the metal grease
filter. When you do this, take hold of the metal
grease filter from underneath with your other hand.
3. Take the metal grease filter out of the holder.
Notes
– Fat may accumulate in the bottom of the metal
grease filter.
– Hold the metal grease filter level to prevent
grease from dripping out.
Area Cleaning products
Stainless steel Hot soapy water:
Clean with a dish cloth and then dry with a
soft cloth.
Clean stainless steel surfaces in the direction
of the grain only.
Special stainless steel cleaning products are
available from our after-sales service or from
specialist retailers.Apply a very thin layer of
the cleaning product with a soft cloth.
Painted surfaces Hot soapy water:
Clean using a damp dish cloth and then dry
with a soft cloth.
Do not use stainless steel cleaner.
Aluminium and plastic Hot soapy water:
Clean with a soft cloth.
Glass Glass cleaner:
Clean with a soft cloth. Do not use a glass
scraper.
Controls Hot soapy water:
Clean using a damp dish cloth and then dry
with a soft cloth.
Risk of electric shock caused by penetrating
moisture.
Risk of damage to the electronics caused by
penetrating moisture. Never clean controls
with a wet cloth.
Do not use stainless steel cleaner.