
Installation Instruction

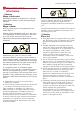
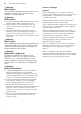
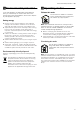
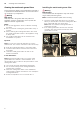

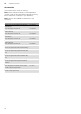
Table Of Contents
- [en] Instructions for installation and use
- Ú Table of contents
- [en] Instructions for installation and use
- ( Important safety information
- Important safety information
- : Warning
- : Warning
- Danger of death!
- Risk of poisoning from flue gases that are drawn back in.
- Always ensure adequate fresh air in the room if the appliance is being operated in exhaust air mode at the same time as room air- dependent heat-producing appliance is being operated.
- Room air-dependent heat-producing appliances (e.g. gas, oil, wood or coal- operated heaters, continuous flow heaters or water heaters) obtain combustion air from the room in which they are installed and discharge the exhaust gases into the open air t...
- In combination with an activated vapour extractor hood, room air is extracted from the kitchen and neighbouring rooms - a partial vacuum is produced if not enough fresh air is supplied. Toxic gases from the chimney or the extraction shaft are sucked ...
- Safe operation is possible only when the partial vacuum in the place where the heat- producing appliance is installed does not exceed 4 Pa (0.04 mbar). This can be achieved when the air needed for combustion is able to enter through openings that can...
- In any case, consult your responsible Master Chimney Sweep. He is able to assess the house's entire ventilation setup and will suggest the suitable ventilation measures to you.
- Unrestricted operation is possible if the vapour extractor hood is operated exclusively in the circulating-air mode.
- : Warning
- : Warning
- : Warning
- : Warning
- : Warning
- : Warning
- Causes of damage
- 7 Environmental protection
- Ç Operating modes
- 1 Operating the appliance
- 2 Cleaning and maintenance
- Cleaning and maintenance
- : Warning
- : Warning
- : Warning
- : Warning
- : Warning
- Cleaning agents
- Removing metal grease filter
- 1. Open the glass front slowly and fully. Hold the glass front in the centre when doing so, gripping it firmly.
- 2. Open the lock and swing down the metal grease filter. When you do this, take hold of the metal grease filter from underneath with your other hand.
- 3. Take the metal grease filter out of the holder.
- Notes
- Cleaning the metal mesh grease filters
- : Warning
- Installing the metal mesh grease filter
- : Warning
- 3 Trouble shooting
- 4 Customer service
- Customer service
- To book an engineer visit and product advice
- Accessories
- ( Important safety information
- Important safety information
- : Warning
- : Warning
- : Warning
- Danger of death!
- Risk of poisoning from flue gases that are drawn back in.
- Always ensure adequate fresh air in the room if the appliance is being operated in exhaust air mode at the same time as room air- dependent heat-producing appliance is being operated.
- Room air-dependent heat-producing appliances (e.g. gas, oil, wood or coal- operated heaters, continuous flow heaters or water heaters) obtain combustion air from the room in which they are installed and discharge the exhaust gases into the open air t...
- In combination with an activated vapour extractor hood, room air is extracted from the kitchen and neighbouring rooms - a partial vacuum is produced if not enough fresh air is supplied. Toxic gases from the chimney or the extraction shaft are sucked ...
- Safe operation is possible only when the partial vacuum in the place where the heat- producing appliance is installed does not exceed 4 Pa (0.04 mbar). This can be achieved when the air needed for combustion is able to enter through openings that can...
- In any case, consult your responsible Master Chimney Sweep. He is able to assess the house's entire ventilation setup and will suggest the suitable ventilation measures to you.
- Unrestricted operation is possible if the vapour extractor hood is operated exclusively in the circulating-air mode.
- : Warning
- : Warning
- : Warning
- : Warning
- : Warning
- : Warning
- K General information
- 5 Installation
- Installation
- Preparing for installation
- Installation
- Wall-mounting the appliance and levelling it
- 1. First remove the protective film from the back of the appliance and, following installation, remove the rest of the film.
- 2. When mounting the appliance, ensure that it engages properly with the mounting supports.
- 3. If required, the appliance can be moved to the right or to the left.
- 4. Firmly tighten the screws for the mounting supports. Hold the bracket firmly when doing so. ¨
- 5. If no duct is to be fitted, screw in the two locking screws without the bracket. ©
- Connecting the pipes
- Attaching the flue duct
- : Warning
- : Warning
- Risk of electric shock!
- Components inside the appliance may have sharp edges. These may damage the connecting cable. Do not kink or pinch the connecting cable during installation.
- 1. Separate the flue duct sections by removing the adhesive tape.
- 2. Remove the pieces of protective film from both flue duct sections.
- 3. Push one flue duct section into the other.
- Notes
- 4. Place flue ducts sections on the appliance.
- 5. Slide the inner flue duct section upwards, attach it to the left and right sides of the retaining bracket, and then slide it down to engage it. ¨
- 6. Screw the flue duct section to the sides of the retaining bracket using two screws. ©
- 7. Clip the lower flue duct section in at the retaining bracket. The connection cable must not be damaged. ª
- Note:

Trouble shooting en
9
3Trouble shooting
Tr oubl e shoot i ng
Malfunctions often have simple explanations. Please
read the following notes before calling the after-sales
service.
:Warning
Risk of electric shock!
Incorrect repairs are dangerous. Repairs may only be
carried out and damaged power cables replaced by
one of our trained after-sales technicians. If the
appliance is defective, unplug the appliance from the
mains or switch off the circuit breaker in the fuse box.
Contact the after-sales service.
Malfunction table
--------
LED lights
Defective LED lights may be replaced by the
manufacturer, their customer service or a qualified
technician (electrician) only.
:Warning
Risk of injury!
The light emitted by LED lights is very dazzling, and can
damage the eyes (risk group 1). Do not look directly
into the switched on LED lights for longer than 100
seconds.
4Customer service
Cu s t o mer ser vi ce
When calling us, please quote the product number (E
no.) and the production number (FD no.) so that we can
provide you with the correct advice. These numbers can
be found on the rating plate on the top of the appliance.
You can make a note of the numbers of your appliance
and the telephone number of the after-sales service in
the space below to save time should it be required.
Please be aware that a visit by an after-sales engineer
will be charged if a problem turns out to be the result of
operator error, even during the warranty period.
Please find the contact data of all countries in the
enclosed customer service list.
To book an engineer visit and product advice
Rely on the professionalism of the manufacturer. You
can therefore be sure that the repair is carried out by
trained service technicians who carry original spare
parts for your appliances.
Problem Possible cause Solution
The appliance
does not work
The plug is not
plugged in.
Connect the appliance to the
electricity supply
Power cut Check whether other kitchen
appliances are working
Faulty fuse Check in the fuse box to make
sure that the fuse for the
appliance is OK
The lighting does
not work.
The LED lights
are defective.
Call the after-sales service.
The button illumi-
nation does not
work.
The control unit is
faulty.
Call the aftersales service.
E no. FD no.
After-sales serviceO
GB 0344 892 8989
Calls charged at local or mobile rate.
IE 01450 2655
0.03 € per minute at peak. Off peak 0.0088 €
per minute.
Z-Nr:FD:E-Nr:
Type: