
Installation Instruction
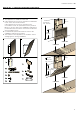
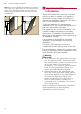

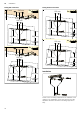
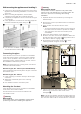


Table Of Contents
- [en] Instructions for installation and use
- Ú Table of contents
- [en] Instructions for installation and use
- ( Important safety information
- Important safety information
- : Warning
- : Warning
- Danger of death!
- Risk of poisoning from flue gases that are drawn back in.
- Always ensure adequate fresh air in the room if the appliance is being operated in exhaust air mode at the same time as room air- dependent heat-producing appliance is being operated.
- Room air-dependent heat-producing appliances (e.g. gas, oil, wood or coal- operated heaters, continuous flow heaters or water heaters) obtain combustion air from the room in which they are installed and discharge the exhaust gases into the open air t...
- In combination with an activated vapour extractor hood, room air is extracted from the kitchen and neighbouring rooms - a partial vacuum is produced if not enough fresh air is supplied. Toxic gases from the chimney or the extraction shaft are sucked ...
- Safe operation is possible only when the partial vacuum in the place where the heat- producing appliance is installed does not exceed 4 Pa (0.04 mbar). This can be achieved when the air needed for combustion is able to enter through openings that can...
- In any case, consult your responsible Master Chimney Sweep. He is able to assess the house's entire ventilation setup and will suggest the suitable ventilation measures to you.
- Unrestricted operation is possible if the vapour extractor hood is operated exclusively in the circulating-air mode.
- : Warning
- : Warning
- : Warning
- : Warning
- : Warning
- : Warning
- Causes of damage
- 7 Environmental protection
- Ç Operating modes
- 1 Operating the appliance
- 2 Cleaning and maintenance
- Cleaning and maintenance
- : Warning
- : Warning
- : Warning
- : Warning
- : Warning
- Cleaning agents
- Removing metal grease filter
- 1. Open the glass front slowly and fully. Hold the glass front in the centre when doing so, gripping it firmly.
- 2. Open the lock and swing down the metal grease filter. When you do this, take hold of the metal grease filter from underneath with your other hand.
- 3. Take the metal grease filter out of the holder.
- Notes
- Cleaning the metal mesh grease filters
- : Warning
- Installing the metal mesh grease filter
- : Warning
- 3 Trouble shooting
- 4 Customer service
- Customer service
- To book an engineer visit and product advice
- Accessories
- ( Important safety information
- Important safety information
- : Warning
- : Warning
- : Warning
- Danger of death!
- Risk of poisoning from flue gases that are drawn back in.
- Always ensure adequate fresh air in the room if the appliance is being operated in exhaust air mode at the same time as room air- dependent heat-producing appliance is being operated.
- Room air-dependent heat-producing appliances (e.g. gas, oil, wood or coal- operated heaters, continuous flow heaters or water heaters) obtain combustion air from the room in which they are installed and discharge the exhaust gases into the open air t...
- In combination with an activated vapour extractor hood, room air is extracted from the kitchen and neighbouring rooms - a partial vacuum is produced if not enough fresh air is supplied. Toxic gases from the chimney or the extraction shaft are sucked ...
- Safe operation is possible only when the partial vacuum in the place where the heat- producing appliance is installed does not exceed 4 Pa (0.04 mbar). This can be achieved when the air needed for combustion is able to enter through openings that can...
- In any case, consult your responsible Master Chimney Sweep. He is able to assess the house's entire ventilation setup and will suggest the suitable ventilation measures to you.
- Unrestricted operation is possible if the vapour extractor hood is operated exclusively in the circulating-air mode.
- : Warning
- : Warning
- : Warning
- : Warning
- : Warning
- : Warning
- K General information
- 5 Installation
- Installation
- Preparing for installation
- Installation
- Wall-mounting the appliance and levelling it
- 1. First remove the protective film from the back of the appliance and, following installation, remove the rest of the film.
- 2. When mounting the appliance, ensure that it engages properly with the mounting supports.
- 3. If required, the appliance can be moved to the right or to the left.
- 4. Firmly tighten the screws for the mounting supports. Hold the bracket firmly when doing so. ¨
- 5. If no duct is to be fitted, screw in the two locking screws without the bracket. ©
- Connecting the pipes
- Attaching the flue duct
- : Warning
- : Warning
- Risk of electric shock!
- Components inside the appliance may have sharp edges. These may damage the connecting cable. Do not kink or pinch the connecting cable during installation.
- 1. Separate the flue duct sections by removing the adhesive tape.
- 2. Remove the pieces of protective film from both flue duct sections.
- 3. Push one flue duct section into the other.
- Notes
- 4. Place flue ducts sections on the appliance.
- 5. Slide the inner flue duct section upwards, attach it to the left and right sides of the retaining bracket, and then slide it down to engage it. ¨
- 6. Screw the flue duct section to the sides of the retaining bracket using two screws. ©
- 7. Clip the lower flue duct section in at the retaining bracket. The connection cable must not be damaged. ª
- Note:

Installation en
17
Wall-mounting the appliance and levelling it
1. First remove the protective film from the back of the
appliance and, following installation, remove the rest
of the film.
2. When mounting the appliance, ensure that it
engages properly with the mounting supports.
3. If required, the appliance can be moved to the right
or to the left.
4. Firmly tighten the screws for the mounting supports.
Hold the bracket firmly when doing so. ¨
5. If no duct is to be fitted, screw in the two locking
screws without the bracket. ©
Connecting the pipes
If the extractor hood is to be operated in exhaust-air
mode, the pipes must be connected. If the extractor
hood is to be operated in air-recirculation mode, an
optional accessory must be fitted. To do this, refer to
the installation instructions provided.
Note: If an aluminium pipe is being used, smooth the
connection area beforehand.
Exhaust air pipe, dia. 150 mm (recommended size)
Fit the exhaust air pipe directly to the air-pipe connector
and seal the joint.
Exhaust air pipe, dia. 120 mm
1. Fit the reducing connector directly to the air-pipe
connector.
2. Attach the exhaust air pipe to the reducing
connector.
3. Use suitable means to seal both joints.
Attaching the flue duct
If the extractor hood is to be operated in exhaust-air
mode, a flue duct must be fitted.
The flue duct does not need to be fitted for air-
recirculation mode.
:Warning
Risk of injury!
From sharp edges during installation. Always wear
protective gloves while installing the appliance.
:Warning
Risk of electric shock!
Components inside the appliance may have sharp
edges. These may damage the connecting cable. Do
not kink or pinch the connecting cable during
installation.
1. Separate the flue duct sections by removing the
adhesive tape.
2. Remove the pieces of protective film from both flue
duct sections.
3. Push one flue duct section into the other.
Notes
– To prevent scratches, lay paper over the edges of
the outer flue duct section to protect the surface.
– The slots of the inner flue duct section point
downwards.
4. Place flue ducts sections on the appliance.
5. Slide the inner flue duct section upwards, attach it to
the left and right sides of the retaining bracket, and
then slide it down to engage it. ¨
6. Screw the flue duct section to the sides of the
retaining bracket using two screws. ©
7. Clip the lower flue duct section in at the retaining
bracket. The connection cable must not be
damaged. ª
Note: If an air-recirculation optional accessory has been
fitted and the extractor hood is to be operated without a
flue duct, the cable must be wound onto the connector.