
Installation Instruction
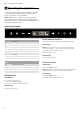
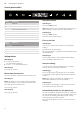
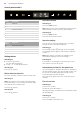
Table Of Contents
- Ú Table of contents
- [en] Instructions for installation and use
- ( Important safety information
- 7 Environmental protection
- Ç Operating modes
- 1 Operating the appliance
- Operating the appliance
- Note:
- Control panel model 1
- Setting the fan
- Noise reduction function
- AirFresh function
- Intensive setting
- Intermediate position for the glass front
- Fan run-on time
- Lighting
- Saturation display
- Audible signal
- Control panel model 2
- Setting the fan
- Noise reduction function
- AirFresh function
- Fan run-on time
- Intensive setting
- Intermediate position for the glass front
- AmbientLight
- 2. Touch the k symbol.
- 3. Within this 10-second period, touch the A or @ symbol until the colour you require is selected.
- Lighting
- Saturation display
- Audible signal
- Control panel model 3
- Setting the fan
- Noise reduction function
- AirFresh function
- Intensive setting
- Intermediate position for the glass front
- Fan run-on time
- Lighting
- Saturation display
- Audible signal
- Control panel variant 4
- Setting the fan
- Noise reduction function
- AirFresh function
- Fan run-on time
- Intensive setting
- Intermediate position for the glass front
- AmbientLight
- 2. Touch the k symbol.
- 3. Within this 10-second period, touch the A or @ symbol until the colour you require is selected.
- 2. Touch the ‘ symbol.
- 2. The sensor controller setting can be changed by touching the @ or A symbol.
- 3. Take your finger off the ‘ symbol.
- 2 Cleaning and maintenance
- Cleaning and maintenance
- : Warning
- : Warning
- : Warning
- : Warning
- : Warning
- : Warning
- : Warning
- 3 Trouble shooting
- 4 Customer service
- ( Important safety information
- K General information
- 5 Installation
- Installation
- Preparing for installation
- 2. Place the template against the line drawn on the wall and fasten it in place. Mark where the screws should be inserted.
- 3. Drill 8 mm diameter holes to a depth of 80 mm for fastening the appliance, remove the template and press in the wall plugs flush with the wall.
- 2. When mounting the appliance, ensure that it engages properly with the mounting supports.
- 3. If required, the appliance can be moved to the right or to the left.
- 4. Firmly tighten the screws for the mounting supports. Hold the bracket firmly when doing so. ¨
- 5. If no duct is to be fitted, screw in the two locking screws without the bracket. ©
- 2. Attach the exhaust air pipe to the reducing connector.
- 3. Use suitable means to seal both joints.
- : Warning
- : Warning
- Risk of electric shock!
- 2. Remove the pieces of protective film from both flue duct sections.
- 3. Push one flue duct section into the other.
- 4. Place flue ducts sections on the appliance.
- 5. Slide the inner flue duct section upwards, attach it to the left and right sides of the retaining bracket, and then slide it down to engage it. ¨
- 6. Screw the flue duct section to the sides of the retaining bracket using two screws. ©
- 7. Clip the lower flue duct section in at the retaining bracket. The connection cable must not be damaged. ª
Operating the appliance en
7
Intensive setting
You can use the intensive setting if there is a large
build-up of odours and fumes/vapours.
Switching on
Touch the ˜ symbol. ˜ƒ will light up on the display.
Touch the ˜ symbol again to switch back to intensive
mode ˜‚.
Note: After approx. 6 minutes, the extractor hood
automatically switches back to fan setting 3.
Switching off
If you want to end intensive mode before the preset
time expires, touch the ˜ symbol.
Intermediate position for the glass front
On some appliances, the glass front can be adjusted to
an intermediate position. The intermediate position can
be used for eliminating particularly strong cooking
smells and large amounts of steam.
Take hold of the glass front in the centre and open it
carefully.
Fan run-on time
Switching on
Touch the 9 symbol.
The fan will run at fan setting 1.
After approximately 10 minutes, the fan will switch itself
off automatically.
Switching off
Touch the 9 symbol.
This immediately stops fan run-on.
Lighting
The lighting can be switched on and off independently
of the fan.
Touch the 6 symbol.
Setting the brightness
Press and hold the 6 symbol until the required
brightness is reached.
Saturation display
If the metal grease filters or activated charcoal filter are/
is saturated, the corresponding symbols will flash once
the appliance has been switched off:
■ Metal grease filter: ”ª
■ Activated charcoal filter: ’ª
■ Metal grease filter and activated charcoal filter: ”ª
and ’ª
If you have not yet done so, the metal grease filters
should now be cleaned or the activated charcoal filter
replaced. ~ "Cleaning and maintenance" on page 16
The saturation indicators can be reset while they are
flashing. To do this, touch the A symbol.
Switching over the display for air recirculation mode
For air recirculation mode, the electronic controller must
be switched over accordingly:
■ The extractor hood must be connected and switched
off.
■ Touch and hold the Q symbol and touch the @ or
A symbol until "2" lights up for air recirculation mode
(filters that cannot be regenerated). Take your finger
off the Q symbol. This will switch the electronic
controller over to air recirculation mode (filters that
cannot be regenerated).
■ Touch and hold the Q symbol and touch the @ or
A symbol until "3" lights up for air recirculation mode
(filters that can be regenerated). Take your finger off
the Q symbol. This will switch the electronic
controller over to air recirculation mode (filters that
can be regenerated).
■ Repeatedly touching and holding the Q symbol and
touching the @ or A symbol until "1" lights up
switches the electronic controller back over to air
extraction mode.
Audible signal
Switching on
Touch and hold the # and Q symbols at the same
time for approximately 3 seconds when the fan is
switched off. An audible signal will sound as an
acknowledgement.
When the signal tone is activated, ‚ will be lit.
Switching off
Touch and hold the # and Q symbols at the same
time for approximately 3 seconds when the fan is
switched off. An audible signal will sound as an
acknowledgement.
When the signal tone is deactivated, ‹ will be lit.