Extractor hood [en] User manual and installation instructions D92PBC0N0, D92PBC0N0B, D62PBC0N0, D72PBC0N0B, D62PBC0N0B 2
en Safety Table of contents USER MANUAL 1 Safety .................................................................... 2 2 Avoiding material damage................................... 4 3 Environmental protection and saving energy ....................................................................... 4 4 Operating modes ................................................. 5 5 Familiarising yourself with your appliance ........ 6 6 Basic operation ....................................................
Safety WARNING ‒ Risk of poisoning! Risk of poisoning from flue gases being drawn back in. Room-air-dependent heat-producing appliances (e.g. gas, oil, wood or coaloperated heaters, continuous flow heaters or water heaters) obtain combustion air from the room in which they are installed and discharge the exhaust gases into the open through an exhaust gas system (e.g. a chimney). With the extractor hood switched on, air is extracted from the kitchen and the adjacent rooms.
en Avoiding material damage WARNING ‒ Risk of electric shock! If the appliance or the power cord is damaged, this is dangerous. ▶ Never operate a damaged appliance. ▶ Never pull on the power cord to unplug the appliance. Always unplug the appliance at the mains. ▶ If the appliance or the power cord is damaged, immediately unplug the power cord or switch off the fuse in the fuse box. ▶ Call customer services. → Page 9 Incorrect repairs are dangerous.
Operating modes Only use the additional functions if required. en ¡ Switching off additional functions reduces power consumption. 4 Operating modes You can use your appliance in air extraction mode or circulating-air mode. 4.1 Air extraction mode The air which is drawn in is cleaned by the grease filters and conveyed to the exterior by a pipe system.
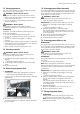
en Familiarising yourself with your appliance 5 Familiarising yourself with your appliance 5.1 Control panel Switching on fan setting 1 You can use the control panel to configure all functions of your appliance and to obtain information about the operating status. Switching on fan setting 2 Switching on fan setting 3 Switching the lighting on or off 6 Basic operation 6.1 Selecting a fan setting Notes ¡ The appliance does not need to be switched on and off separately.
Cleaning and servicing en 7.2 Cleaning products 7.5 Cleaning grease filters manually You can obtain suitable cleaning products from aftersales service or the online shop. The grease filters filter the grease from the cooking vapour. Regularly cleaned grease filters guarantee a high level of grease removal. We recommend cleaning the grease filters every two months. WARNING ‒ Risk of electric shock! An ingress of moisture can cause an electric shock.
en Troubleshooting 2. The lock on the grease filter clicks into place. 3. If the grease filter has been inserted incorrectly, carefully push the lock forwards, remove the grease filter and insert it correctly. 8 Troubleshooting You can rectify minor faults on your appliance yourself. Read the troubleshooting information before contacting after-sales service. This will avoid unnecessary costs. WARNING ‒ Risk of injury! Improper repairs are dangerous.
Customer Service en This appliance is labelled in accordance with European Directive 2012/19/EU concerning used electrical and electronic appliances (waste electrical and electronic equipment - WEEE). The guideline determines the framework for the return and recycling of used appliances as applicable throughout the EU. 10 Customer Service If you have any queries on use, are unable to rectify faults on the appliance yourself or if your appliance needs to be repaired, contact Customer Service.
en Installation instructions 12.1 Scope of delivery 12.3 Appliance dimensions After unpacking all parts, check for any damage in transit and completeness of the delivery. You will find the dimensions of the appliance here 12.2 Safety clearances Comply with the safety clearances for the appliance. For Australia and New Zealand the minimum safety clearance above electrical cooktops must be 600 mm.
Installation instructions 12.4 Secure installation Follow these safety instructions when installing the appliance. WARNING ‒ Risk of poisoning! Risk of poisoning from flue gases being drawn back in. Room-air-dependent heat-producing appliances (e.g. gas, oil, wood or coaloperated heaters, continuous flow heaters or water heaters) obtain combustion air from the room in which they are installed and discharge the exhaust gases into the open through an exhaust gas system (e.g. a chimney).
en Installation instructions The grease deposits in the grease filter may catch fire. ▶ Never work with naked flames close to the appliance (e.g. flambéing). ▶ Do not install the appliance near a heatproducing appliance for solid fuel (e.g. wood or coal) unless a closed, non-removable cover is present. There must be no flying sparks. WARNING ‒ Risk of injury! Components inside the appliance may have sharp edges. ▶ Wear protective gloves.
Installation instructions 12.6 Instructions for the electrical connection In order to safely connect the appliance to the electrical system, follow these instructions. WARNING ‒ Risk of electric shock! It must always be possible to disconnect the appliance from the electricity supply. The appliance must only be connected to a protective contact socket that has been correctly installed. ▶ The mains plug for the mains power cable must be easily accessible after the appliance is installed.
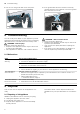
en Installation instructions 7. Screw in the safety screw with the washer. 8. Establish the electrical connection. Piping Note: If you are using an aluminium pipe, smooth the connection area beforehand. We recommend the piping with an exhaust air pipe diameter of 150 mm. Establishing the exhaust air connection (exhaust pipe, 150 mm diameter) 1. Secure the exhaust pipe to the air pipe connector. 2. Establish the connection to the exhaust air opening. 3. Seal the joints. Installing the appliance 1.
Installation instructions en 4. Screw the upper flue cover to the sides of the retain- ing bracket using the 2 screws. 5. Note: To prevent scratches, lay soft towels over the edges of the outer flue duct to protect the surface. Place the lower flue duct on the appliance and pull it slightly apart. 6. Use 2 long screws to screw the lower flue duct section tightly to the appliance from below. 7. Note: Align the flue duct before tightening the 2 screws.
Valid within Great Britain: Imported to Great Britain by BSH Home Appliances Ltd.