EXTRACTOR HOOD [en] Instructions for installation and use
en Ú Table of contents [ e n ] I n s t r u c t i o n s f o r i n s t al a t i o n a n d u s e INSTRUCTION MANUAL.......................................................... 2 8 Intended use ..........................................................2 ( Important safety information ...............................3 7 Environmental protection.....................................4 1 Operating the appliance .......................................4 e Connecting to a hob ...........................................
Important safety information (Important safety information :Warning – Danger of suffocation! Packaging material is dangerous to children. Never allow children to play with packaging material. I mpor t ant saf et y i nf or mat i on : Warning – Risk of fire! Fatty deposits in the grease filter may catch fire. Regularly clean the grease filter. Never operate the appliance without a grease filter. Risk of fire!deposits in the grease filter may ■ Grease catch fire.
Environmental protection en 7Environmental protection Your new appliance is particularly energy-efficient. Here you can find tips on how to save even more energy when using the appliance, and how to dispose of your appliance properly. Environmentally-friendly disposal Dispose of packaging in an environmentally-friendly manner.
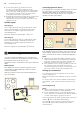
Operating the appliance en Setting the fan Switching off the appliance Switching on Press the ‘ or # button to switch off automatic mode. ■ ■ Touch the # symbol. The fan starts at setting ƒ. Touch + or - to alter the fan speed. The fan switches off automatically if the sensor no longer detects a change in the air quality of the room. The automatic mode lasts 4 hours at most. Switching off Touch the # symbol.
en ■ ■ Connecting to a hob Touch and hold the Q symbol and touch the @ or A symbol until "3" lights up for air recirculation mode (filters that can be regenerated). Take your finger off the Q symbol. This will switch the electronic controller over to air recirculation mode (filters that can be regenerated). Repeatedly touching and holding the Q symbol and touching the @ or A symbol until "1" lights up switches the electronic controller back over to air extraction mode.
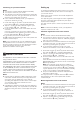
Home Connect Connecting via your home network Setting up Notes You require a router that has WPS functionality. ■ You require access to your router. ■ The extractor hood cannot be switched on during the connection process. You can cancel the process at any time by pressing the # symbol. ■ In the networked standby mode, your appliance requires a maximum of 2 W. To implement settings via Home Connect, you must have installed and set up the Home Connect app on your mobile device.
en Home Connect 3. Use the "Home Connect" SSID and the "Home Connect" key to log your mobile device into the extractor hood network. Notes ■ You can continue to use your extractor hood as normal while updates are downloading. ■ Depending on your personal settings in the app, software updates can also be set to download automatically. ■ We recommend that you install security updates as soon as possible.
Cleaning and maintenance 2Cleaning and maintenance :Warning – Risk of injury! Items placed on the appliance may overload the fasteners, potentially causing the appliance to fall off the wall.Do not place items on the appliance. Cl eani ng and mai nt enance : Warning – Risk of electric shock! Penetrating moisture may result in an electric shock. Clean the appliance using a damp cloth only. Before cleaning, pull out the mains plug or switch off the circuit breaker in the fuse box.
en Cleaning and maintenance 4. Clean the accessible parts of the housing. Clean the inside of the appliance. : Warning – Risk of injury! 3. If the metal grease filter has not been inserted correctly, open the lock and reinsert the metal grease filter correctly. Components inside the appliance may have sharp edges. Wear protective gloves. Cleaning the metal mesh grease filters These instructions apply to several appliance variants.
Trouble shooting en 3Trouble shooting 4Customer service Malfunctions often have simple explanations. Please read the following notes before calling the after-sales service. When calling us, please quote the product number (E no.) and the production number (FD no.) so that we can provide you with the correct advice. These numbers can be found on the rating plate on the top of the appliance (to access it, you will need to remove the activated charcoal filter).
Installation instructions en INSTALLATION INSTRUCTIONS Installation instructions I ns t al at i on i ns t r uc t i ons (Important safety information Read these instructions carefully. Only then will you be able to operate your appliance safely and correctly. Retain the instruction manual and installation instructions for future use or for subsequent owners. Check the appliance for damage after unpacking it. Do not connect the appliance if it has been damaged in transport.
General information : Warning – Risk of injury! Components inside the appliance may have sharp edges. Wear protective gloves. Risk of injury! ■ The appliance may fall down if it has not been properly fastened in place. All fastening components must be fixed firmly and securely. Risk of injury! ■ The appliance is heavy. To move the appliance, 2 people are required. Use only suitable tools and equipment.
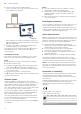
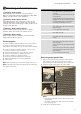
en Installation Preparing the appliance 5Installation I ns t al at i on 1. Remove the activated charcoal filter from the film. 2. Open the cover on the top of the appliance and remove it ¨, insert the activated charcoal filter © and then close the cover. Preparing for installation Caution! Ensure that there are no electrical wires, gas pipes or water pipes in the area where holes are to be drilled. 1.
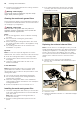
Installation en Installation Hanging the appliance 1. Screw in the mounting supports for the extractor 1. If there is any protective film on the appliance, first hood until they are hand-tight, use a spirit level to level the appliance and then screw the mounting supports in fully. remove the protective film from the back and, following installation, remove the rest of the film. 2. Remove the metal grease filter before hanging the appliance. 3. Hang the appliance on the wall. 4.
*9001196386* 9001196386 980815 en